Old Dominion University
CYSE 301 Cybersecurity Techniques and Operations
Assignment 2: Traffic Tracing and Sniffing
Edwin C Wells IV
Task A – Get started with Wireshark
Q1. How many packets are captured in total? How many packets are displayed?
36 Packets captured with 36 packets displayed.
Q2. Apply “ICMP” as a display filter in Wireshark. Then repeat the previous question (Q1).
36 Packets were captured with 32/36 being ICMP protocols.
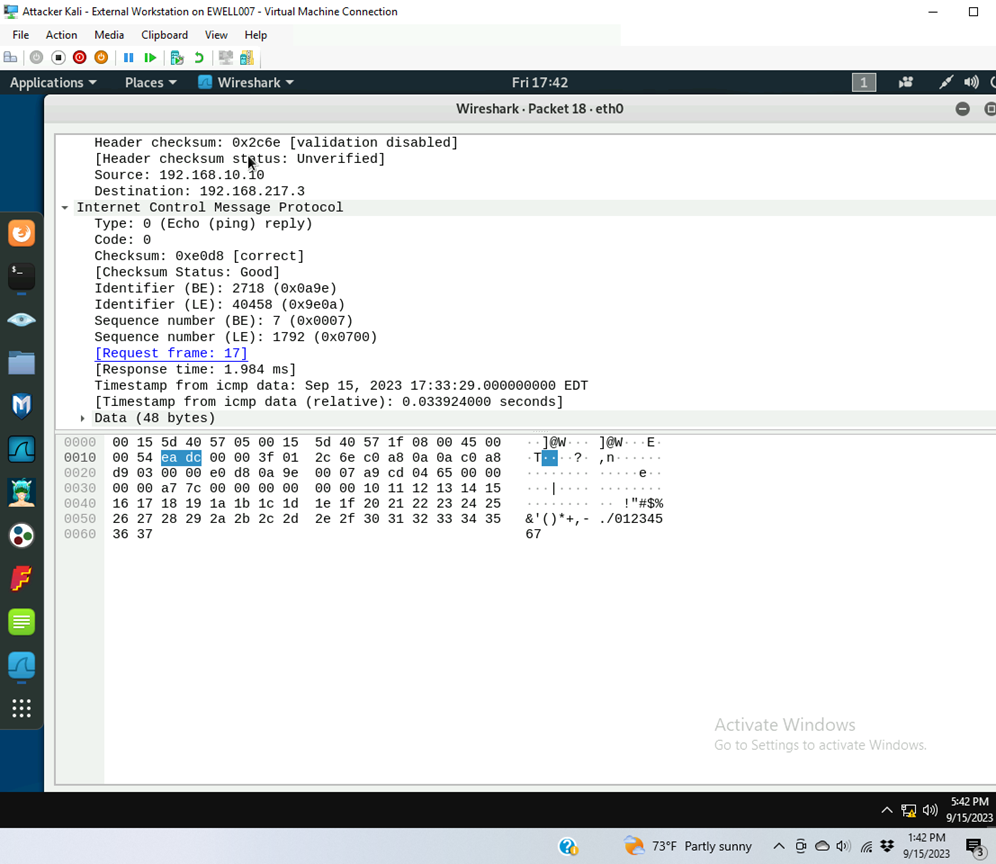
Q3. Select an Echo (reply) message from the list. What are the source and destination IPs of this packet? What are the sequence number and the size of the data? What is the response time?
Source IP is 192.168.10.10
Destination IP is 192.198.217.3
Sequence number (BE) is 7 and (LE) is 1792
Size is 48 bytes
Response time is 1.984 ms
Q4. Apply “DNS” as a display filter in Wireshark. How many packets are displayed?
- There were no DNS packets with previous steps taken thus, began recapturing packets in Wireshark then opened a Firefox window in the virtual machine terminal.
- There are 36 DNS packets displayed out of 72.
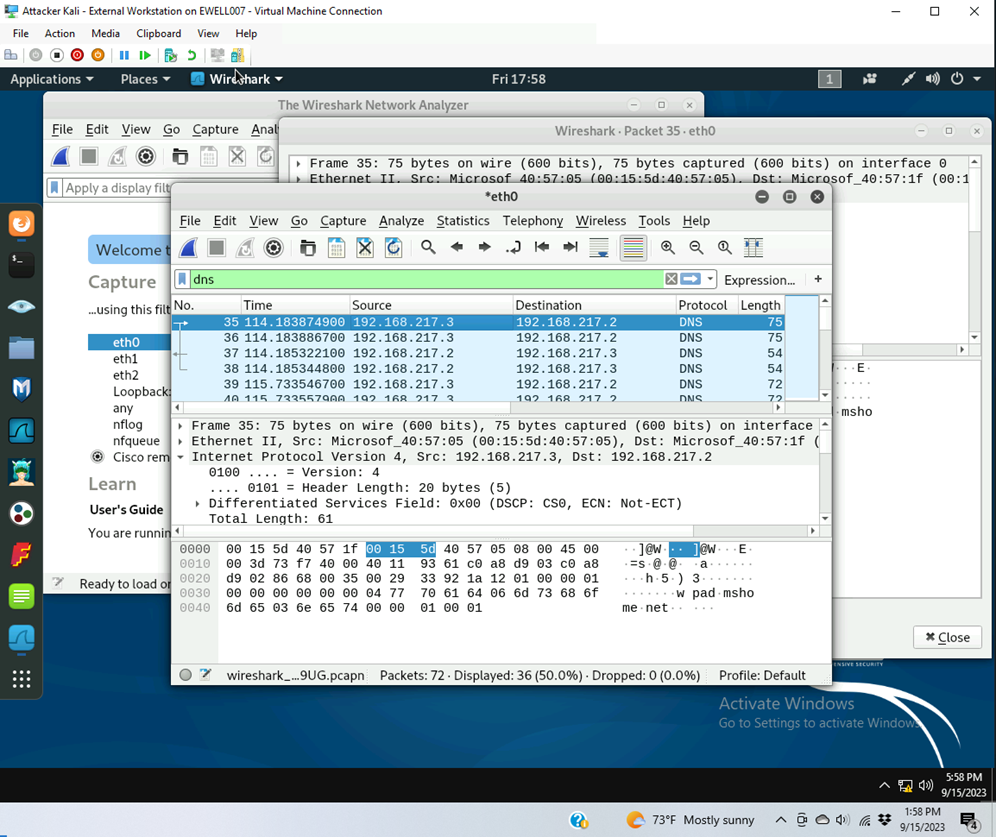
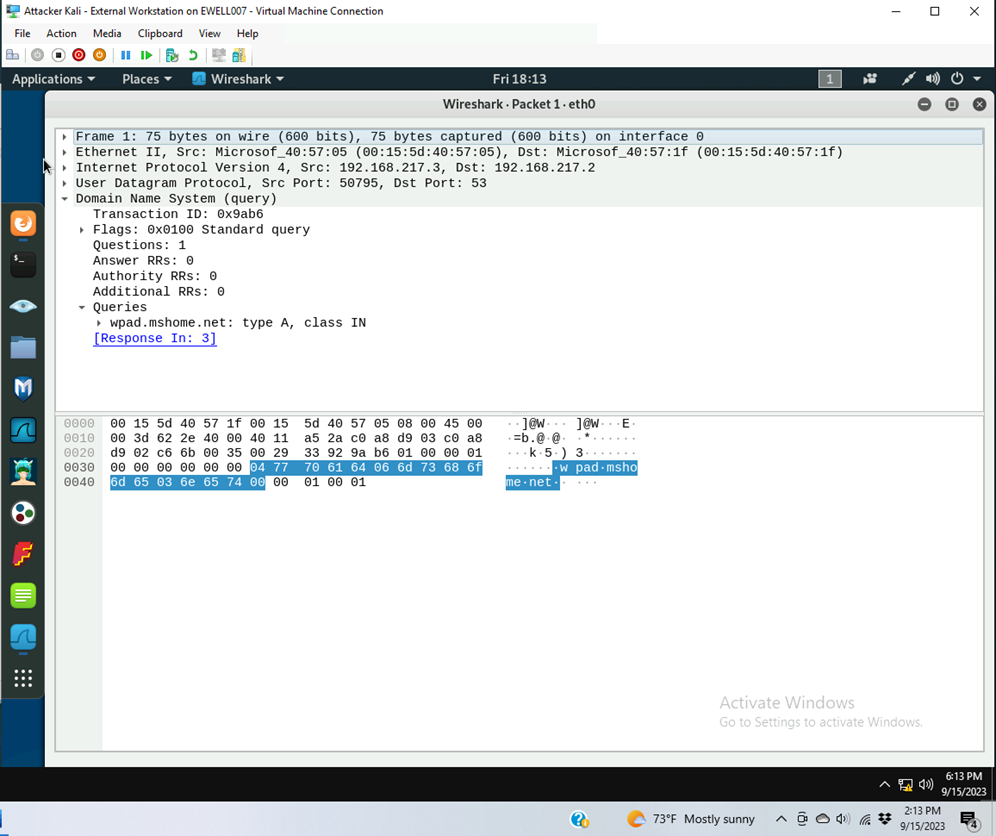
Q5. Find a DNS query packet. What is the domain name this host is trying to resolve? What is the source IP and port number, destination IP and port number?
Host name being resolved is wpad.mshome.net
Source is IP 192.168.217.3 Port 50795
Destination is IP 192.168.217.2 Port 53
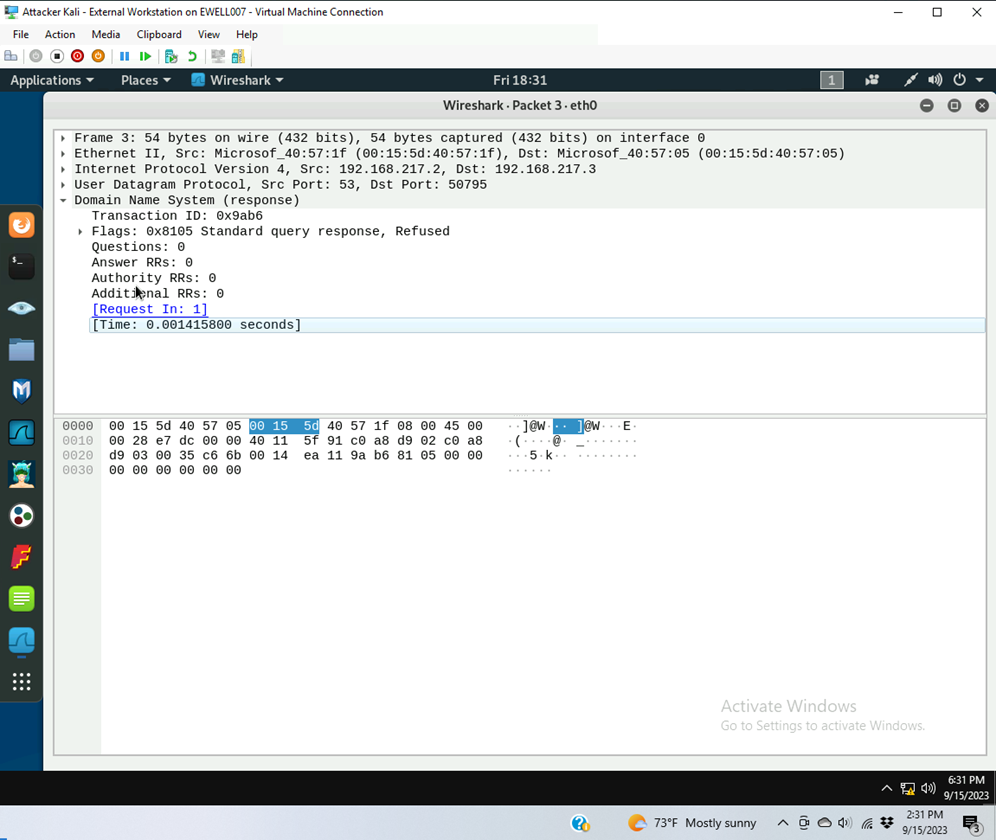
Q6. Find the corresponding DNS response to the query you selected at the previous step, and what is the source IP and port number, destination IP and port number? What is the message replied from the DNS server?
Source is IP 192.268.217.2 Port 53
Destination is IP 192.168.217.3 Port 50795
Response to standard query is “Refused”.
Task B: Sniff LAN traffic
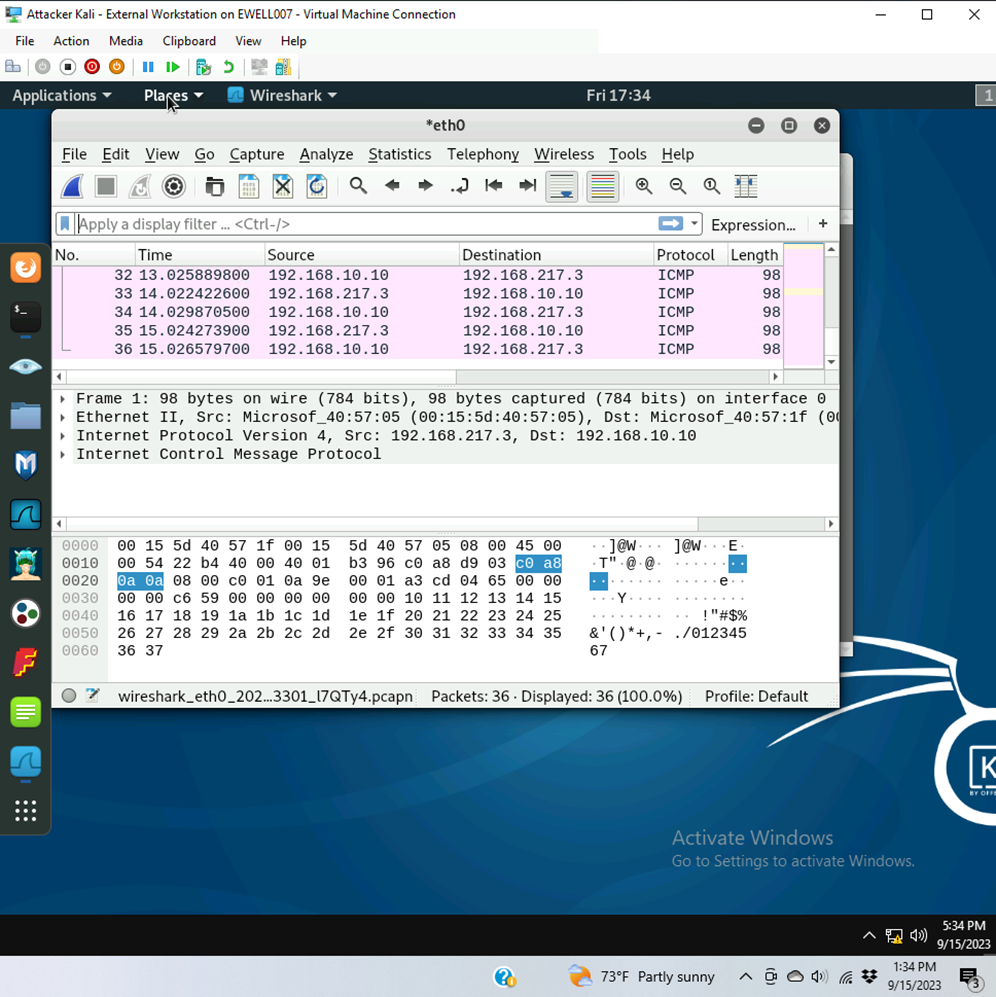
1. Sniff ICMP traffic
Open two terminals on External Kali VM. Use one ping Ubuntu VM and use the other ping Internal Kali.
- Apply proper display or capture filter on Internal Kali VM to show active ICMP traffic.
- Captured active ICMP traffic from 192.168.217.3 to 196.168.10.13 and 196.168.10.10
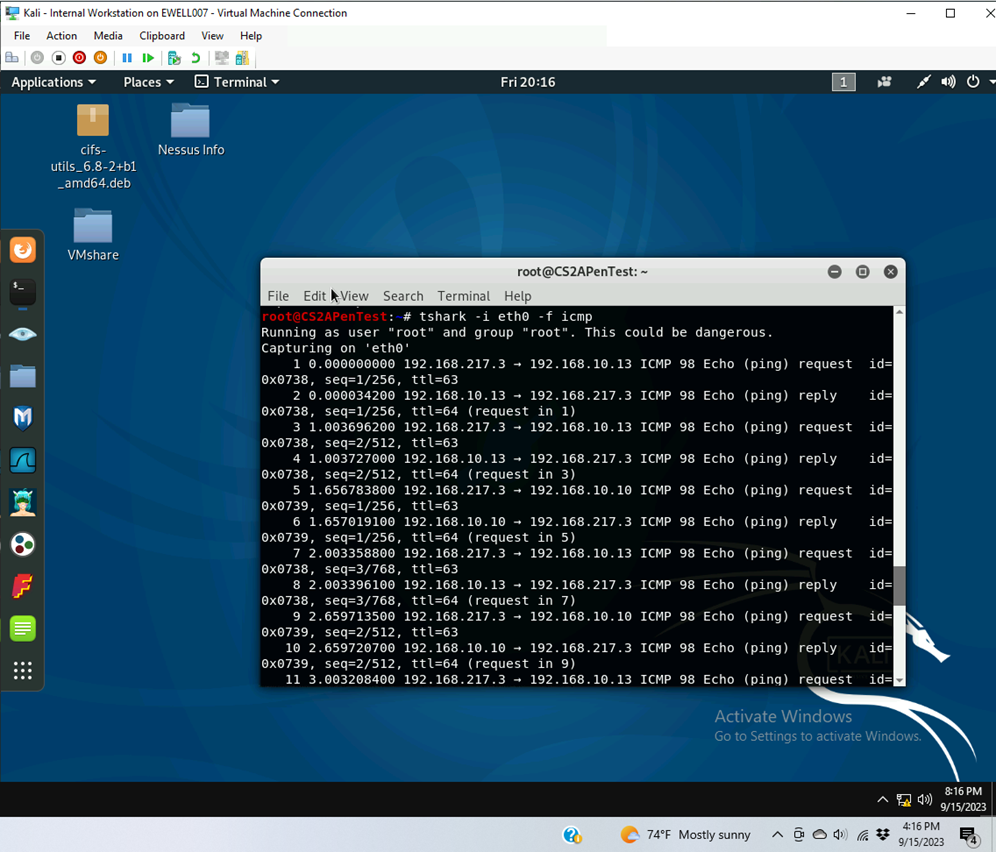
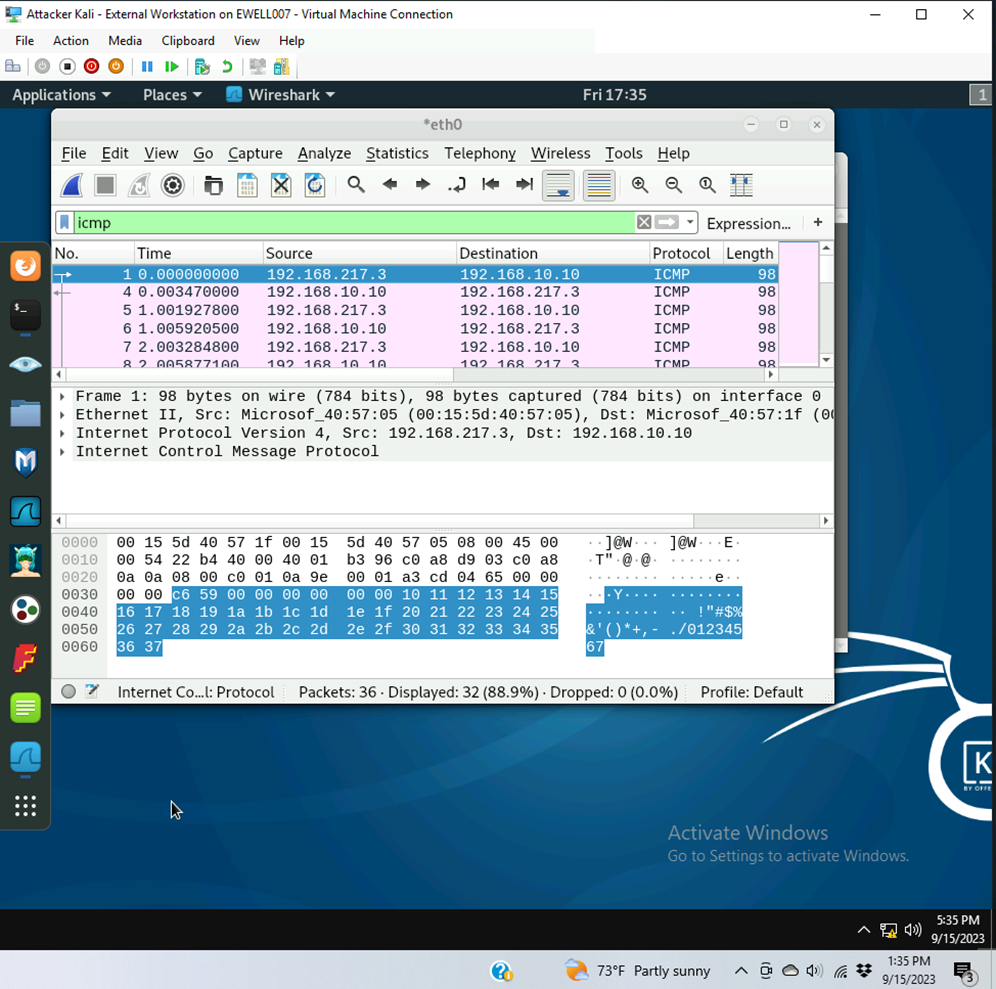
- Apply proper display or capture filter on Internal Kali VM that ONLY displays ICMP request originated from External Kali VM and goes to Ubuntu 64-bit VM.
- Used display filter to display only ICMP from 192.168.217.3 to 192.168.10.10 ICMP
- Command used tshark -I eth0 -Y “icmp && ip.src==192.168.207.3 && ip.dst==192.168.10.10”

2. Sniff FTP traffic
- Ubuntu VM is also serving as an FTP server inside the LAN network. Now, you need to use External Kali to access this FTP server by using the command: ftp [ip_addr of ubuntu VM]. The username for the FTP server is cyse301, and the password is password. You can follow the steps below to access the FTP server.
- Unfortunately, Internal Kali, the attacker, is also sniffing to the communication. Therefore, all of your communication is exposed to the attacker. Now, you need to find out the password used by External Kali to access the FTP server from the intercepted traffic on Internal Kali. You need to screenshot and explain how you find the password.
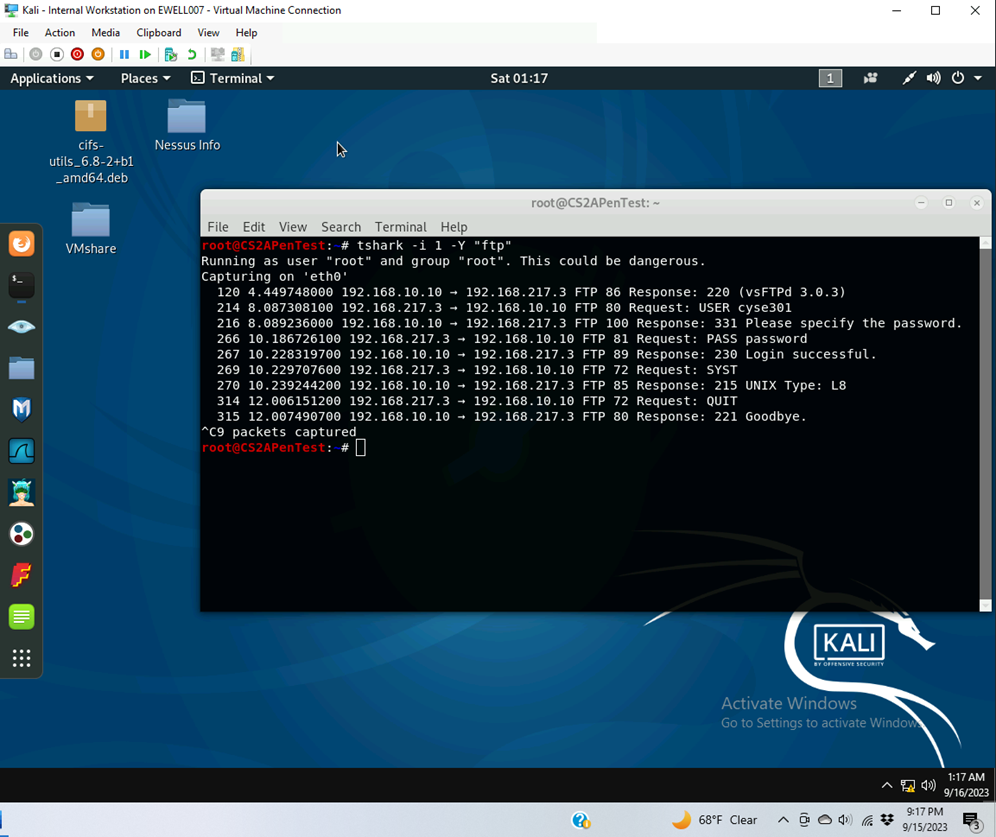
- I used the command line tshark -I 1 -Y “ftp” to display the FTP packets between 192.168.217.3 and 192.168.10.10
- Packet 214 contains the user ID
- Packet 266 contains the password input from 192.168.217.3
- Packet 267 contains the login successful verification.
- Thus we have a verified user ID and password
- Unfortunately, Internal Kali, the attacker, is also sniffing to the communication. Therefore, all of your communication is exposed to the attacker. Now, you need to find out the password used by External Kali to access the FTP server from the intercepted traffic on Internal Kali. You need to screenshot and explain how you find the password.
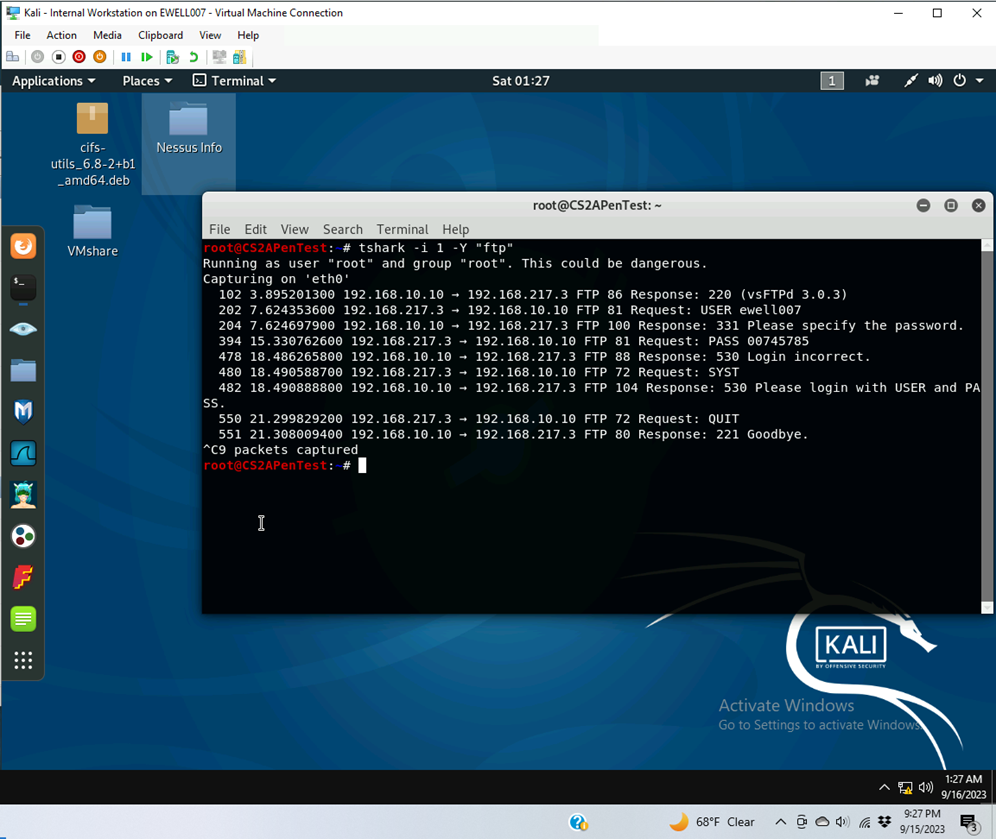
- After you successfully find the username & password from the FTP traffic, repeat the previous step (2.a), and use your MIDAS ID as the username and UIN as the password to reaccess the FTP server from External Kali. Although External Kali may not access the FTP server, you need to intercept the packets containing these “secrets” from the attacker VM, which is Internal Kali.
- I used the command line tshark -I 1 -Y “ftp” to display the FTP packets between 192.168.217.3 and 192.168.10.10
- Attempted to log into the FTP server with my MIDAS information on the external Kali machine.
- Packet 202 contains the USER ID request
- Packet 394 contains the password input
- Packet 478 responds with an incorrect login
Task C – Extra credit: Steal files with Wireshark
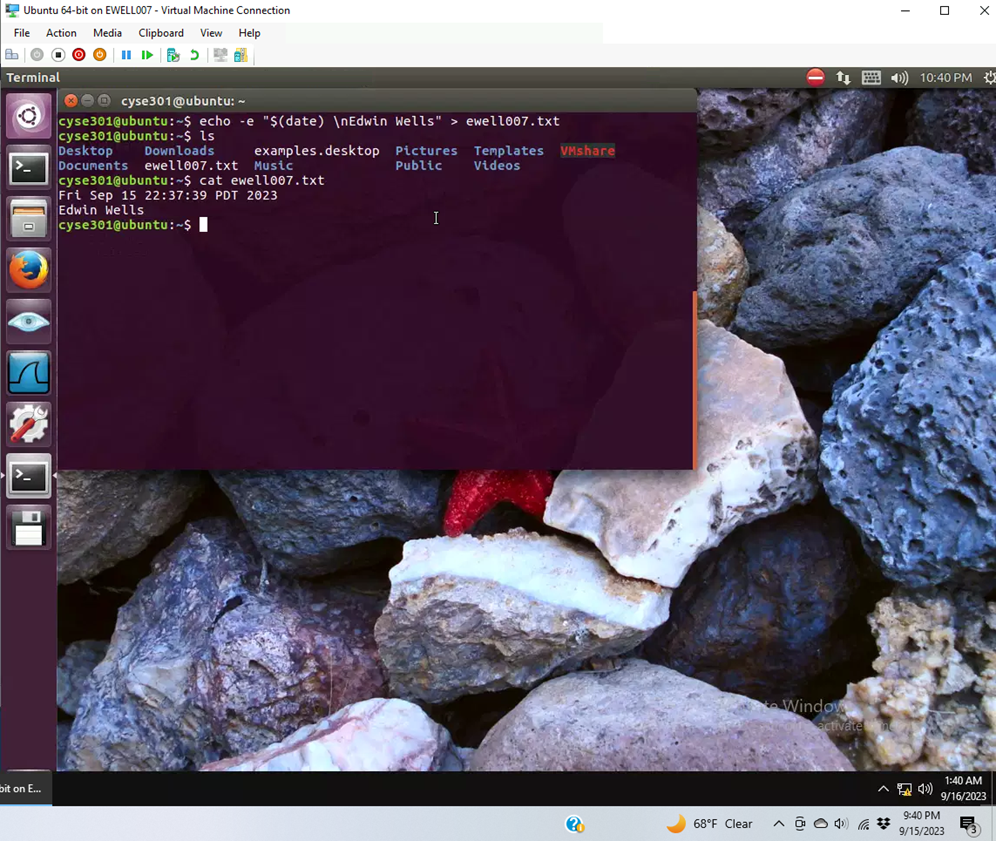
Login to Ubuntu VM, and create a file in your home directory, named “YOUR_MIDAS.txt”. Put the current timestamp and your name in the file.
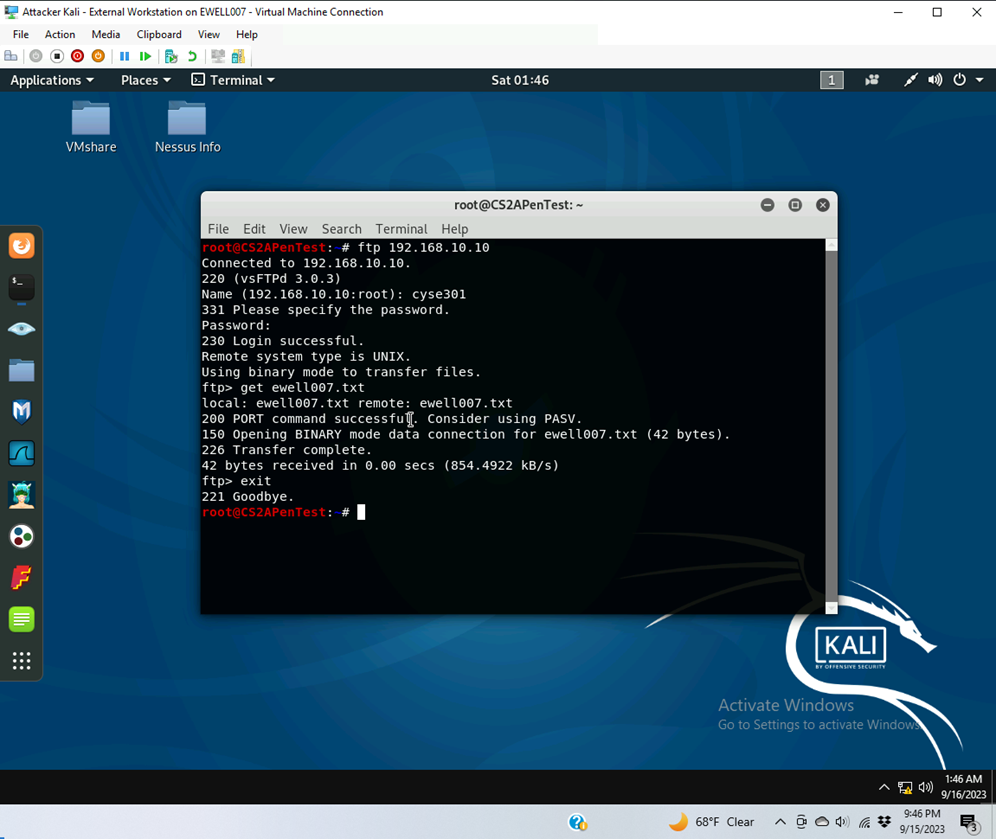
Once you have the file ready in Ubuntu, switch back to External Kali. Get the file you just created with FTP protocol remotely.
- Logged into ftp server from external kali
- Used the get command to retrieve ewell007.txt
- Apply a proper display filter to display the FTP-DATA packets between External Kali and Ubuntu VM.
- Switched to the internal kali machine
- Used ftp-data to filter display to 1 packet out of 1109 packets

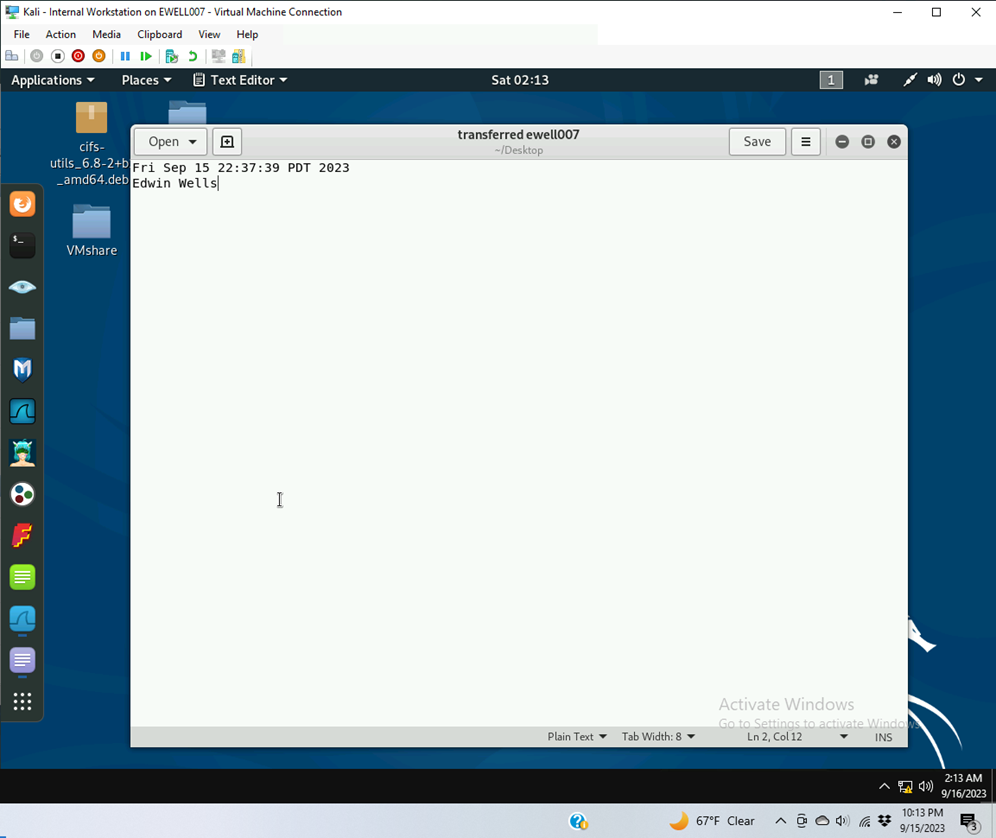
- Follow the tcp steam of the FTP-DATA packet, and view the content of the file just transferred.
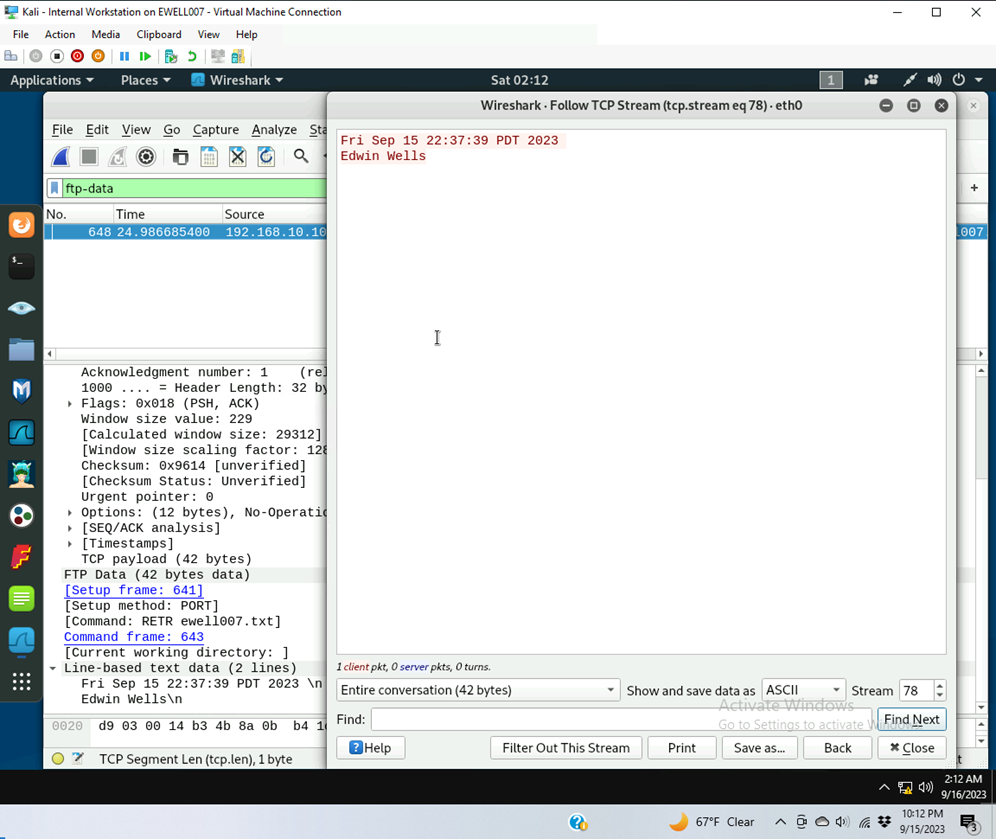
- Export (Save) the transferred file as a text file in Internal Kali and view the content.
- Saved the TCP stream a text file “transferred ewell007” on the kali internal machine desktop
- Viewed the file