CYSE 270 – Linux for Cybersecurity – Assn. #12 – Advanced Network Configuration
Scenario: You, as a network admin, are going to set up your Ubuntu VM as a gateway to provide Internet access to another client Ubuntu VM. The client VM needs to be in the same internal network as the gateway (as shown in Figure 1). Once the connection is ready, you need to configure the firewall to secure the network properly. The following requirements need to be satisfied to receive full credits.

Please note that you need to customize the value in the fields marked in RED above.
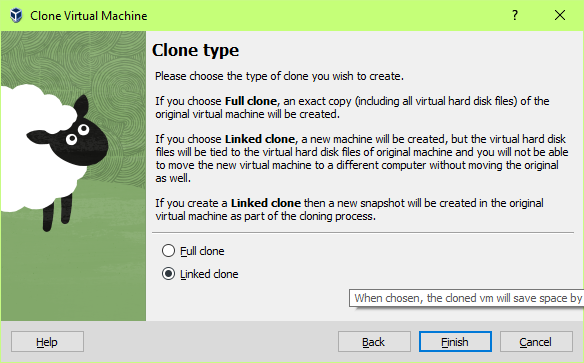
Please configure the network with the following requirement: (You need to clone the existing VM)
Task A –Network Configuration (60 points) Please submit the screenshot for all the steps.
Please note – I just set up Ubuntu this class and ‘ifconfig’ would not work, took numerous installs and downloads. I had already copied the Clone so ‘ifconfig’ did not work either on that VM and all the downloads and installs did not work So, I ended up deleting it out 2x to get it to work right.
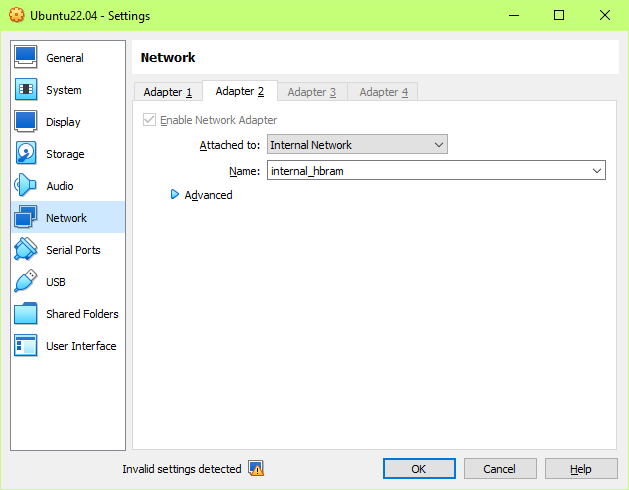
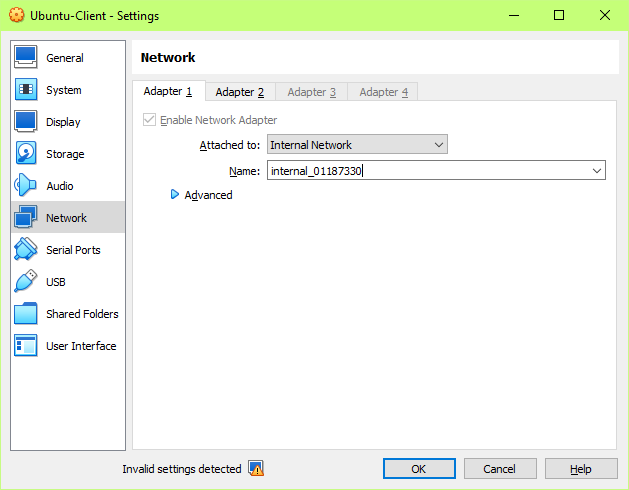
__XX_____In the virtual box setting, connect two VMs in the same internal network, “internal_{UIN}”. Replace {UIN} with your real UIN. hbram
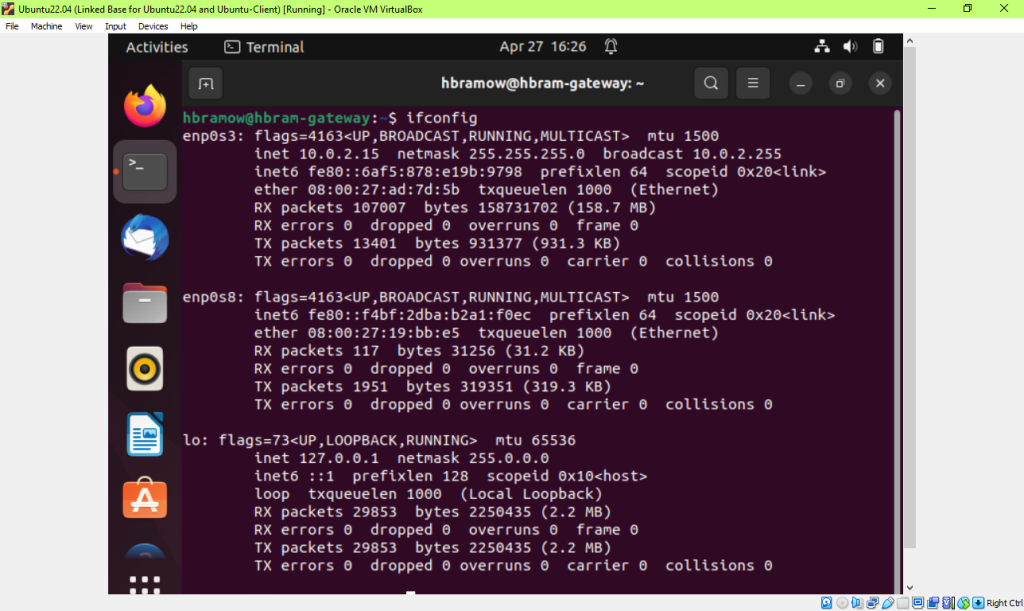
Step 1. Set Ubuntu linked base network A Ubuntu network #1. Screen for Ubuntu A (will be ‘Gateway’)
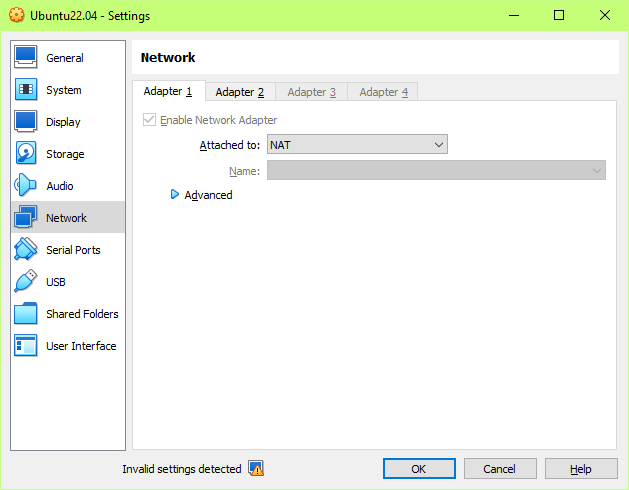
Step 1. Set Ubuntu linked base network A as internal network_hbram. Ubuntu A (will be ‘Gateway’)
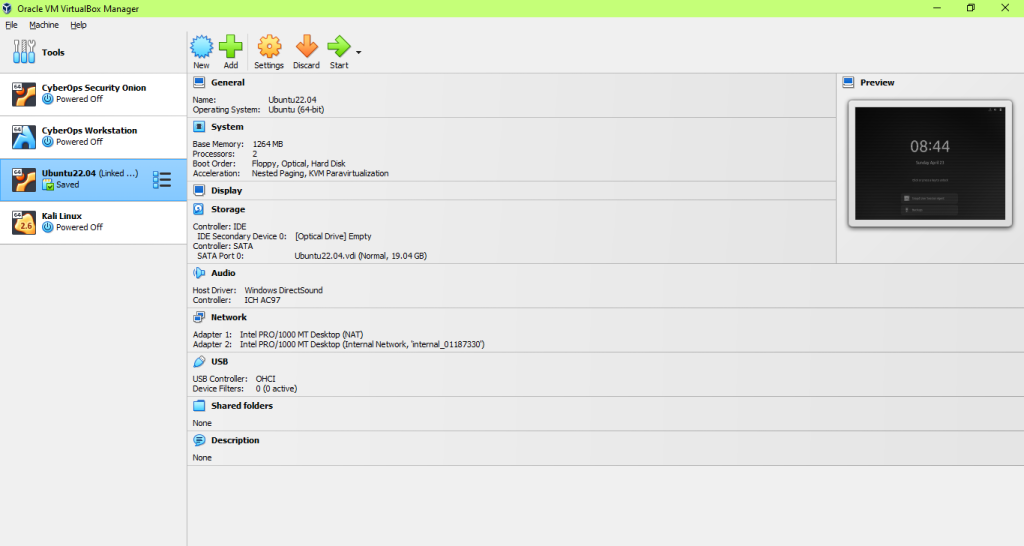
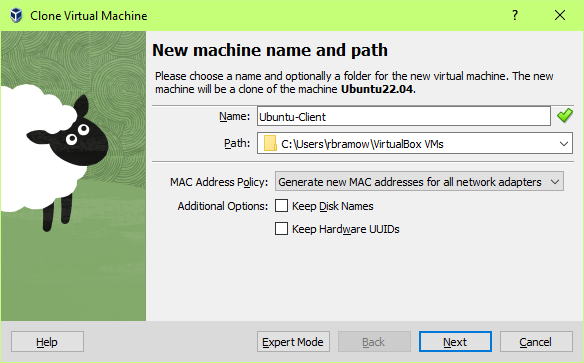
Step 1 – clone this original VM (gateway); the clone will then become the ‘client’ vm

Step 1. Set Ubuntu clone network B; Screen #1 setup for Ubuntu B (Clone – Client)

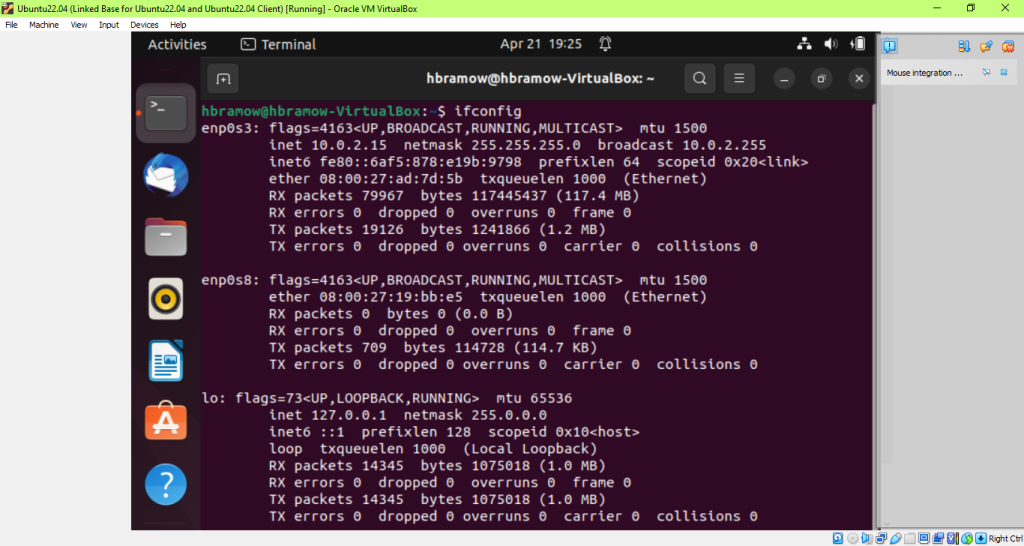
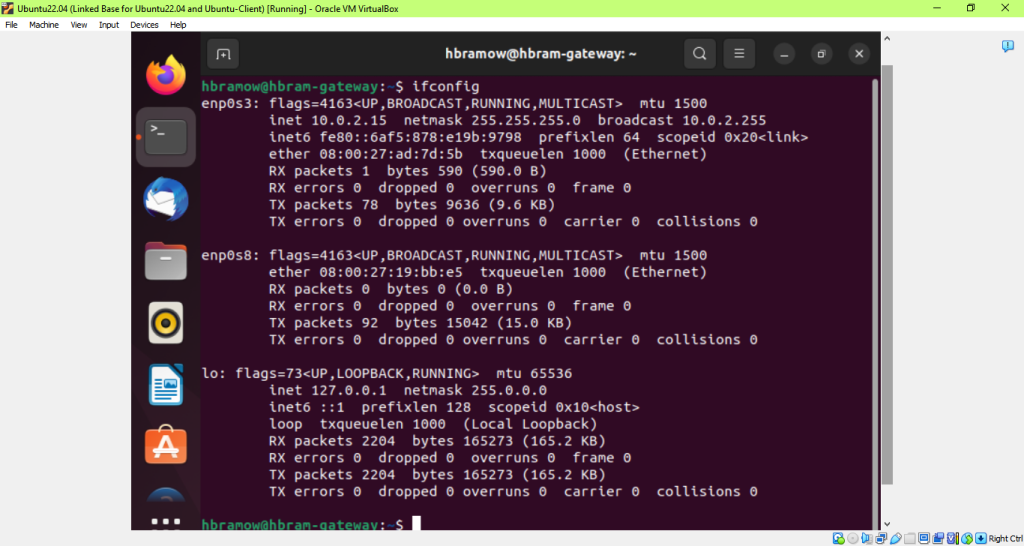
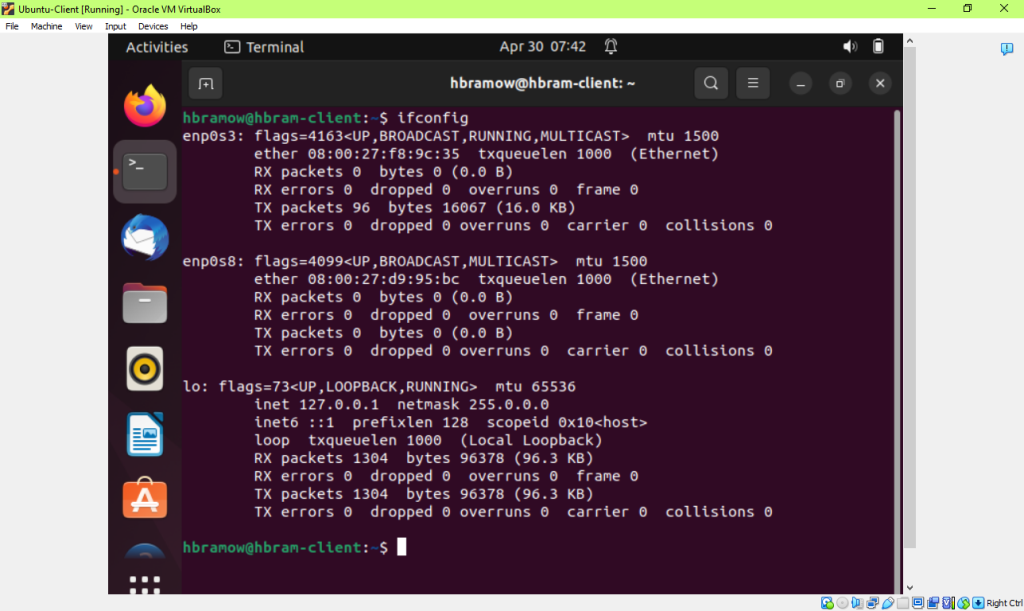
Check ifconfig for Ubuntu – Gateway (not changed name yet)
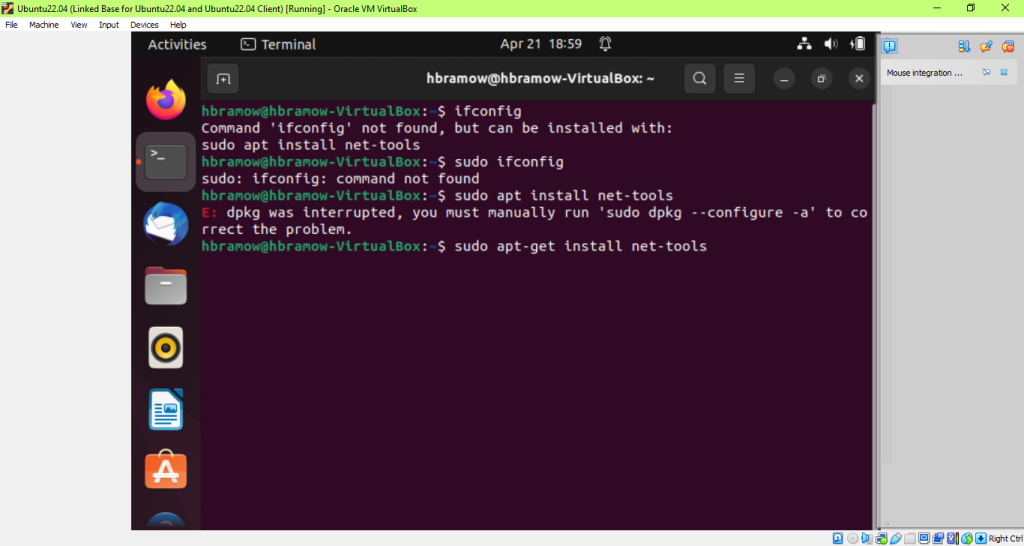
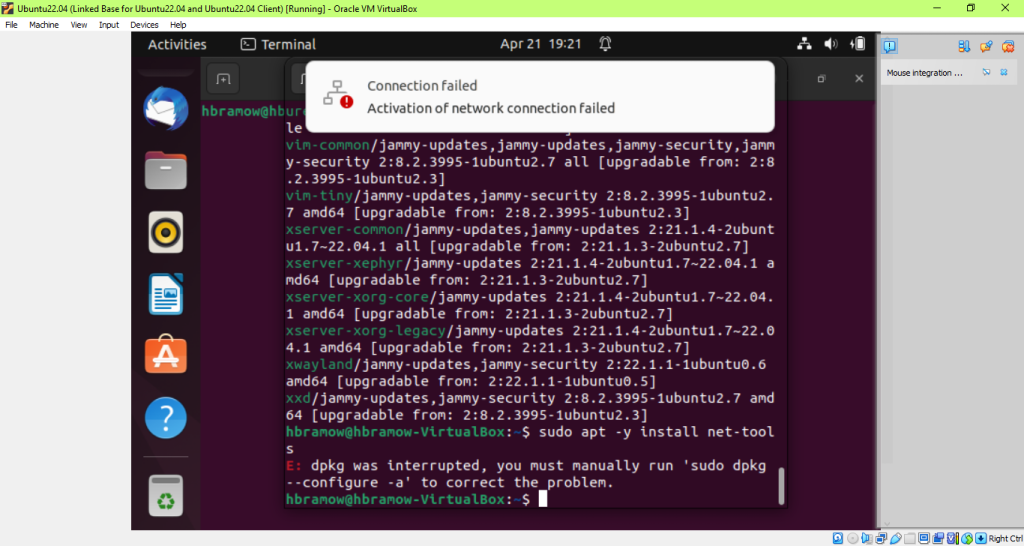
No ifconfig command – must use the ‘ip’ command instead. It won’t install either.
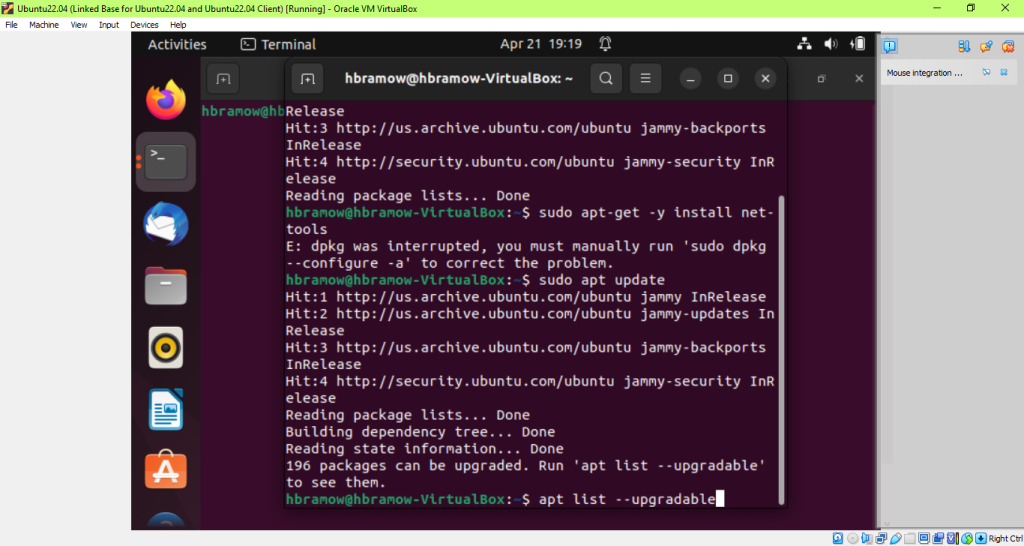
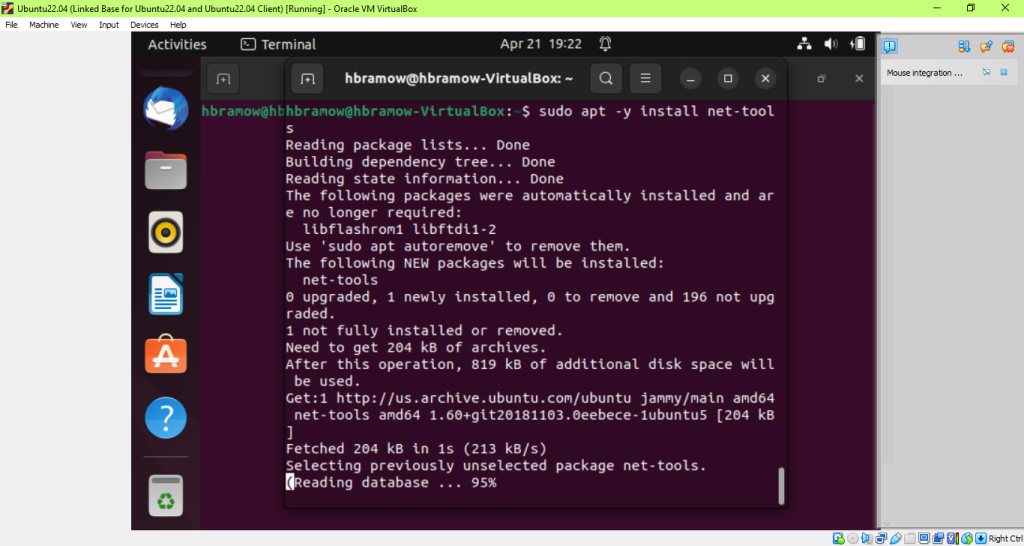
Finally, it can set up tools so I can use the command ‘ifconfig’!!
Ifconfig – Ubuntu A – Gateway
Ubuntu A – gateway – ping worked
Ubuntu B – Clone ifconfig must use sudo apt-get install net-tools; then sudo apt-get update
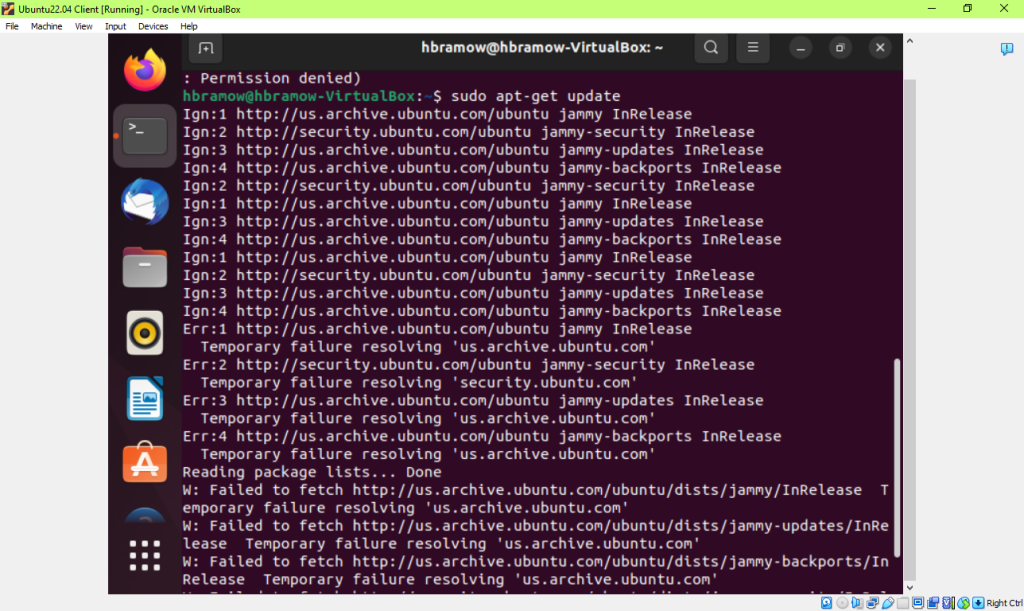
Still issue – no internet yet;
Ubuntu B – Clone ping won’t work yet either no internet – had to reclone 2x due to all these issues. Fyi
- __XX____Change the hostname of the Client VM to “hbram {MIDASname}-Client.” Replace {MIDAS name} with your real MIDAS name. Reg Ubuntu VM – make ‘gateway’ ; client make ‘client’
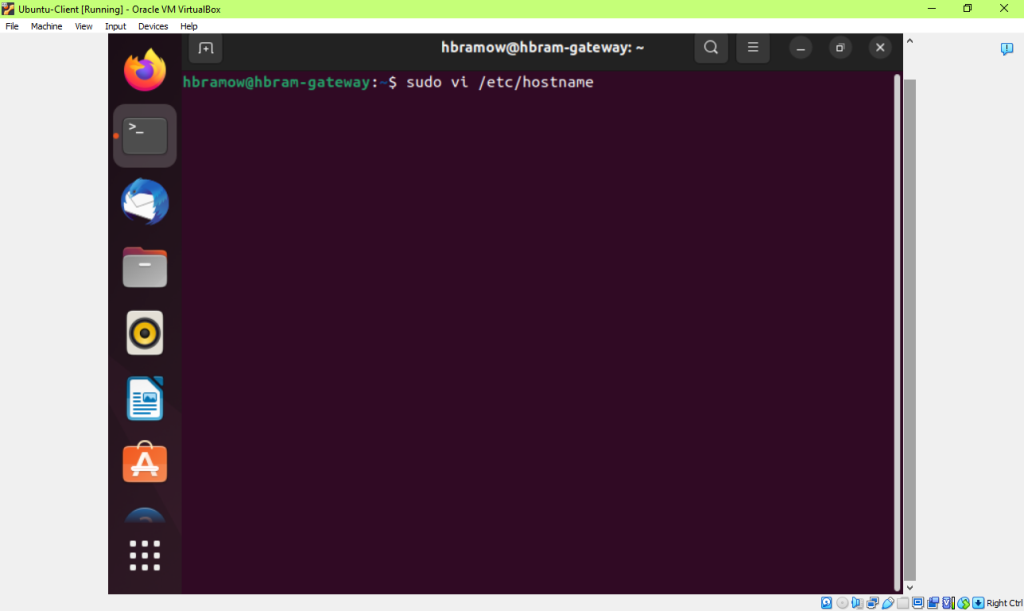
__XX_1 – Ubuntu A VM – sudo vi /etc/hostname; type ‘gateway’ then :wq! Save file; REBOOT sys;
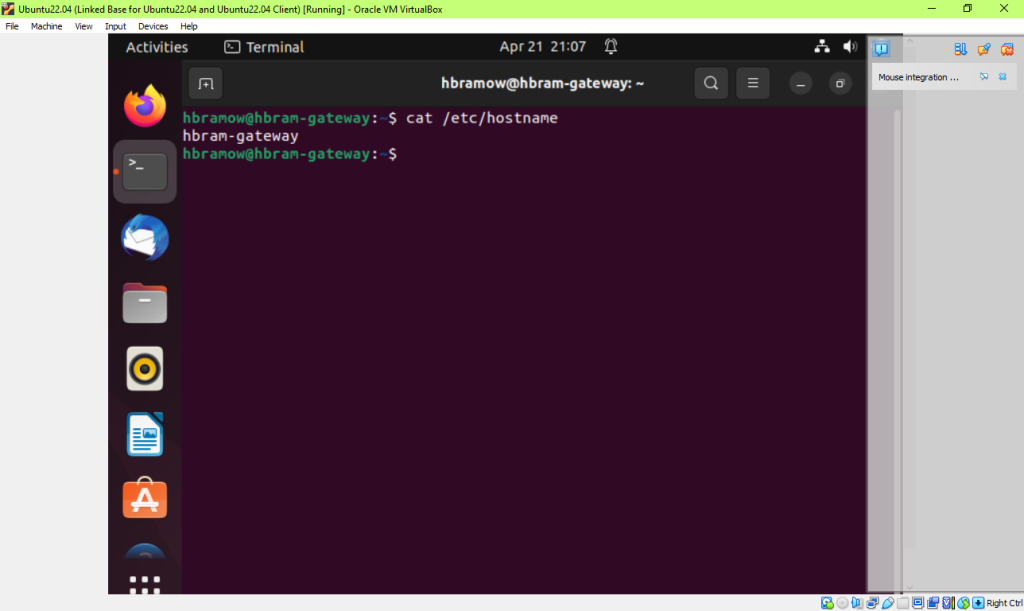
__x___cat /etc/hostname – should show file name in file;
Step 2 – change hostname Ubuntu A vm to Gateway; sudo vi /etc/hostname; gateway; reboot

Step 2 – Use shell script in /etc/hostname file & save & exit Ubuntu A to hbram-gateway
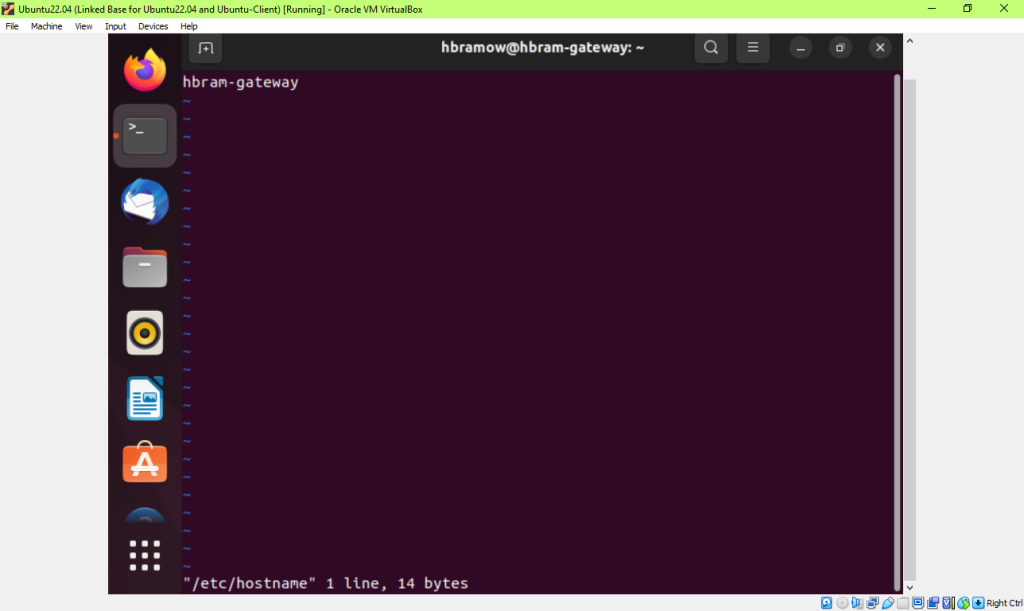
Step 2 change host Ubuntu A to hbram-gateway; verify it with cat /etc/hostname
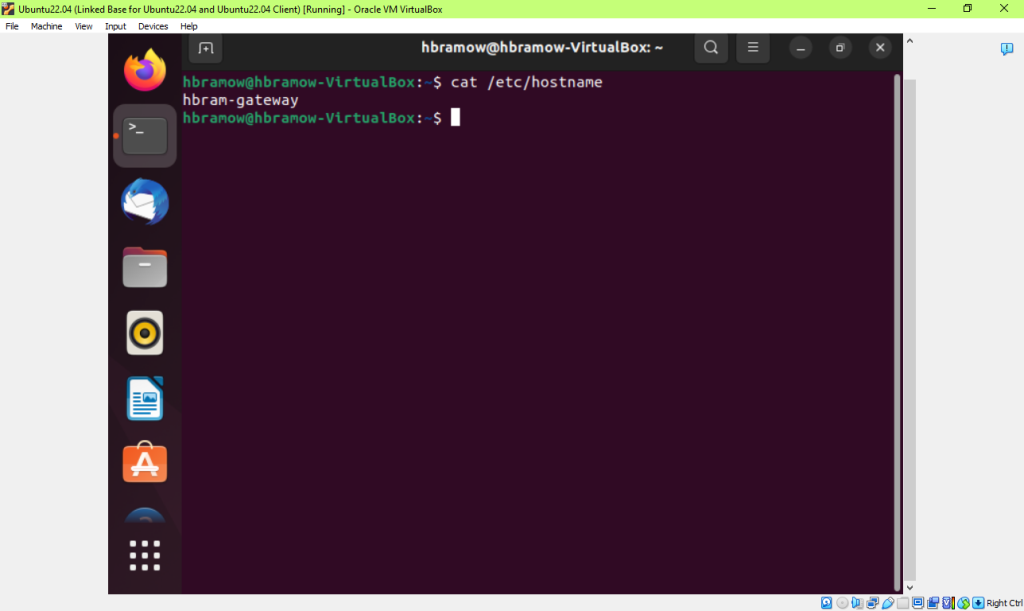
Step 2 – Then ReBOOT; and then cat /etc/hostname – on Ubuntu A to hbram-gateway
Step 2 – Then on client VM –
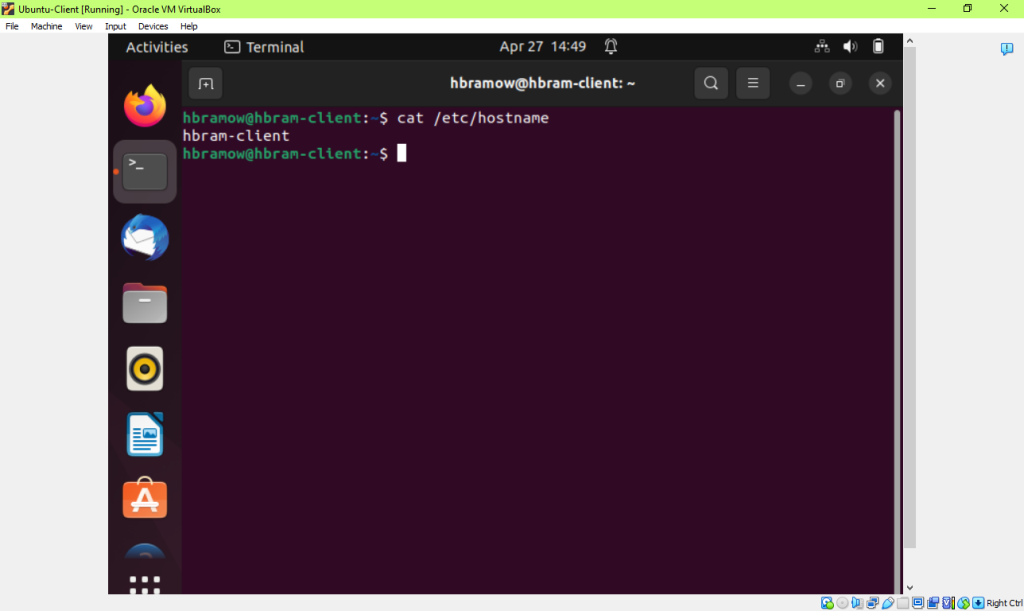
__XX___2 – Client Ubuntu VM – sudo vi /etc/hostname; type ‘client’ in file then: wq! Save file; REBOOT sys; __XX___cat /etc/hostname – should show file name in file
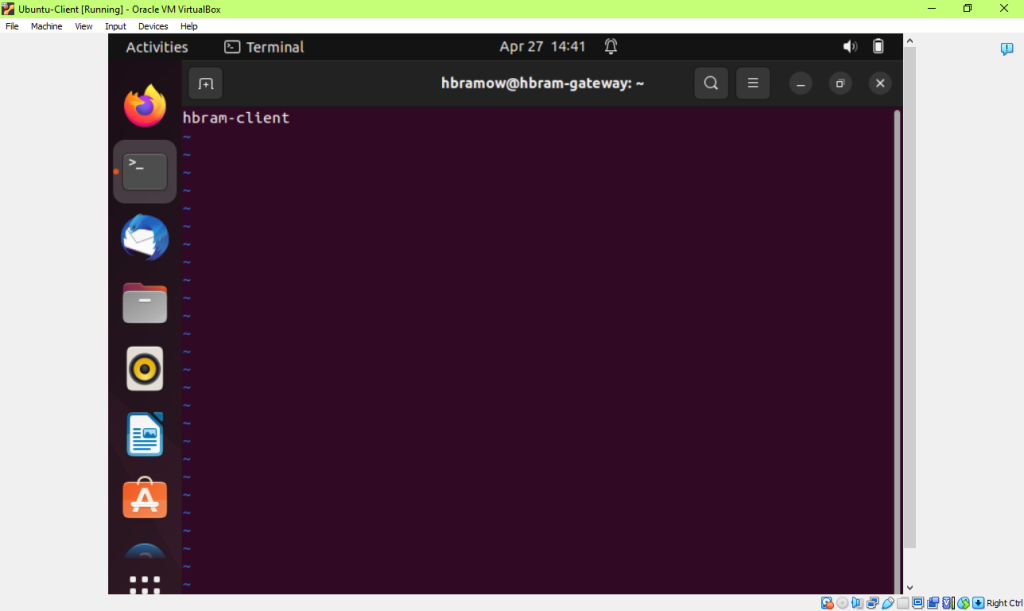
Step 2 – change host Ubuntu B to hbram-client NOTE – when I recloned this 2nd time due to 0 ability to use ‘ ifconfig’, it copied that name ‘gateway’ also.
Then, I had to change the name ‘gateway’ name to ‘client’.
Step 2 – Shell Script changed for Client Name– Ubuntu B to hbram-client
Step 2 – Then ReBOOT; and then cat /etc/hostname – Ubuntu B to hbram-client
- _x____Configure the temporary IP address on the Gateway Ubuntu (A), as shown in Figure 1.
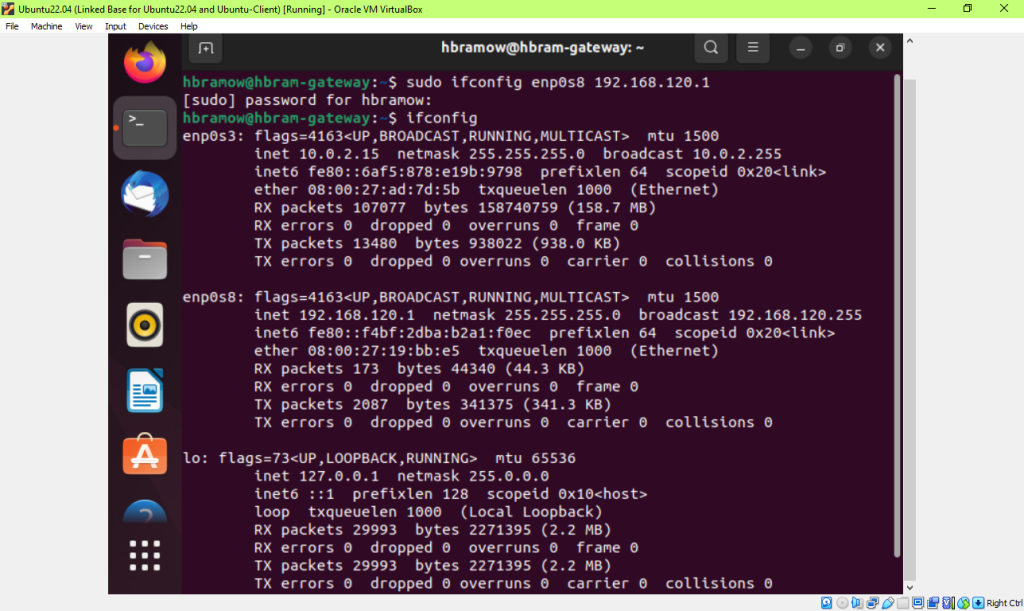
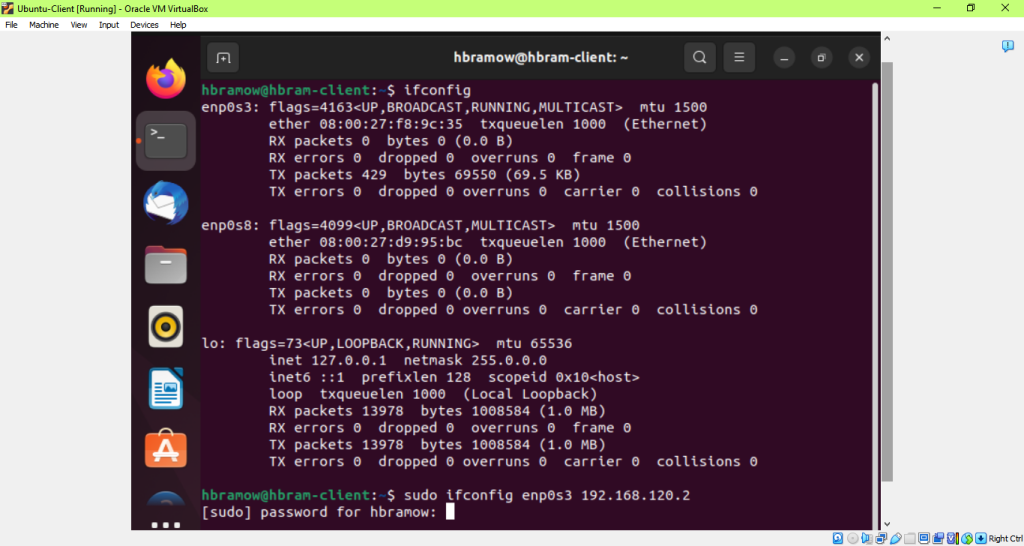
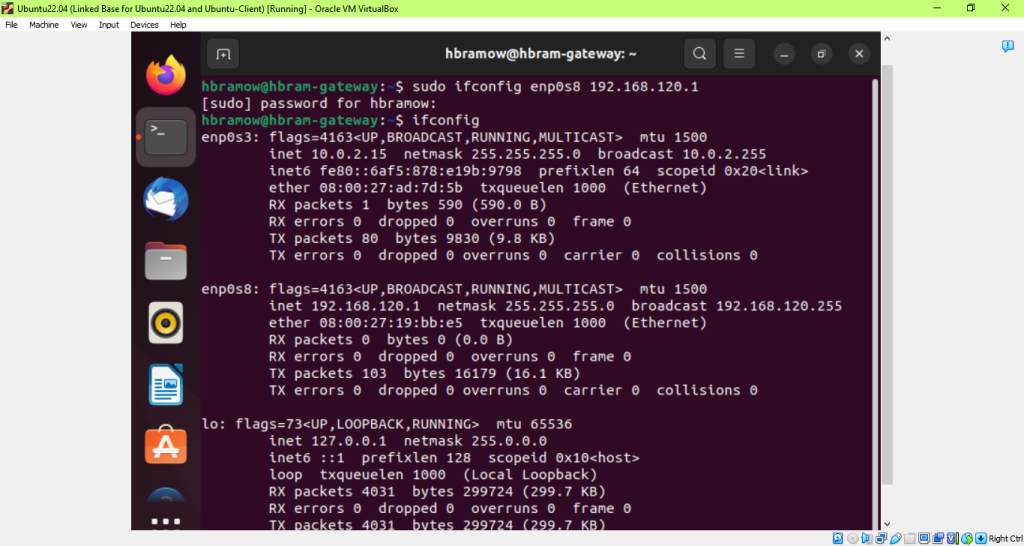
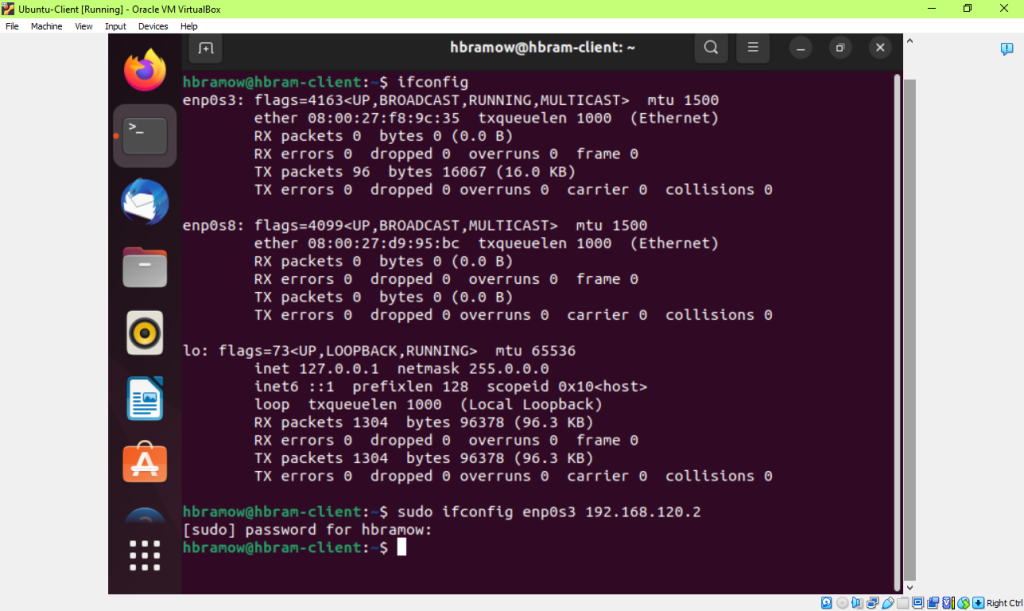
__X__ on Reg. Ubuntu A, check config 1st; type ifconfig. 1st network is its IP address. 2nd network get this name of network. Use it here: sudo ifconfig [device network] 192.168.120.1 as per image on p.1
Step 3 Ubuntu B – sudo ifconfig enp0s8 192.168.50.2 – ifconfig won’t work still so I had to then DELETE the Clone VM by clickin ‘Remove’ button, and all files too w it.
Back to Clone VM step again. R click on Ubuntu Clone; name it Client, choose: Generate new Mac Address for all network adapters; next

Set the network for Ubuntu Client
Since ifconfig was fixed/added to the Gateway VM, the new clone then already has it when I deleted it and recloned it again……
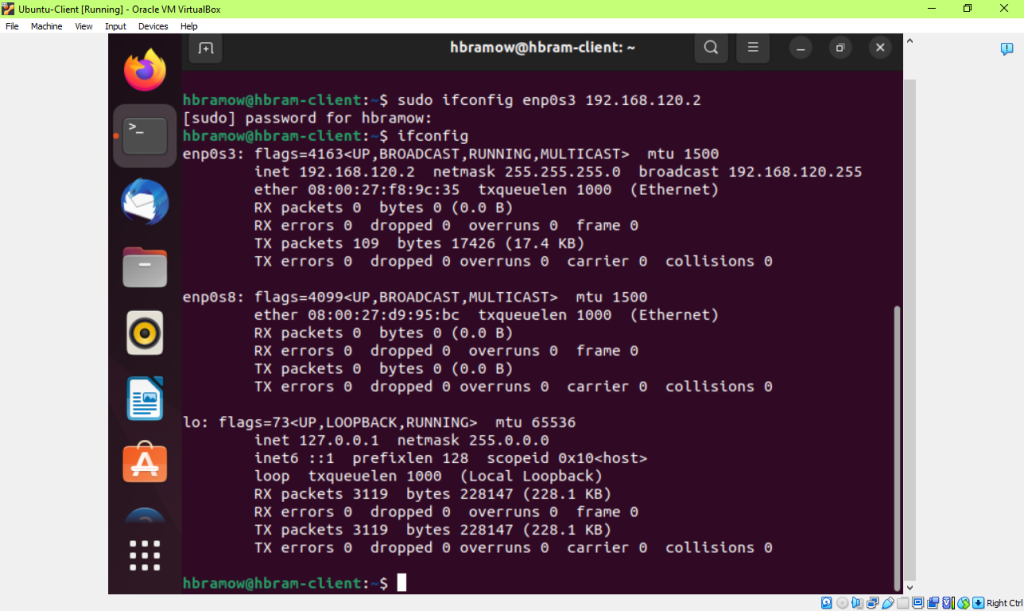
Step 3 – ifconfig – Ubuntu A – Gateway – see what’s there now
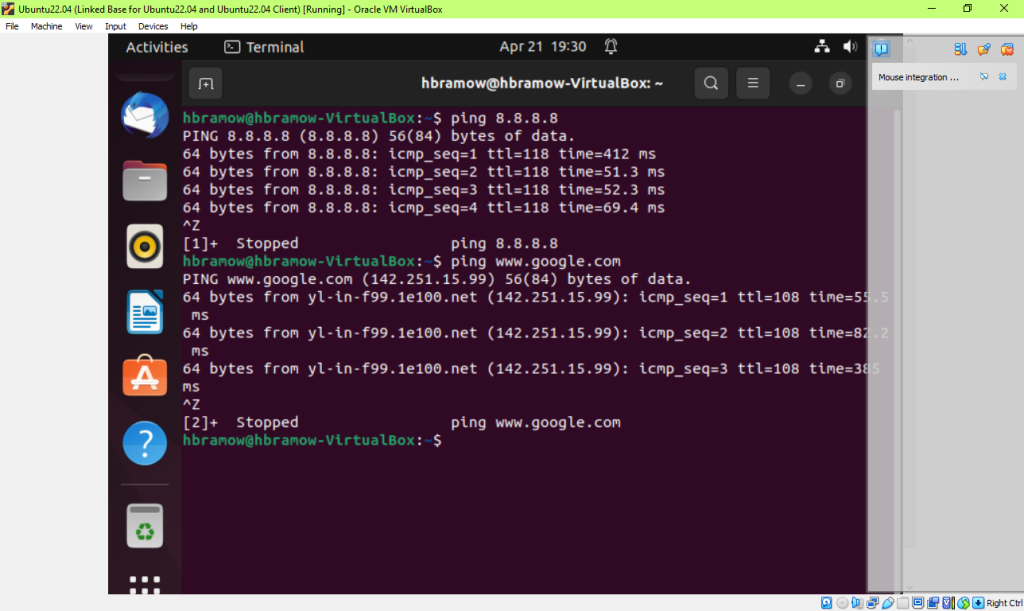
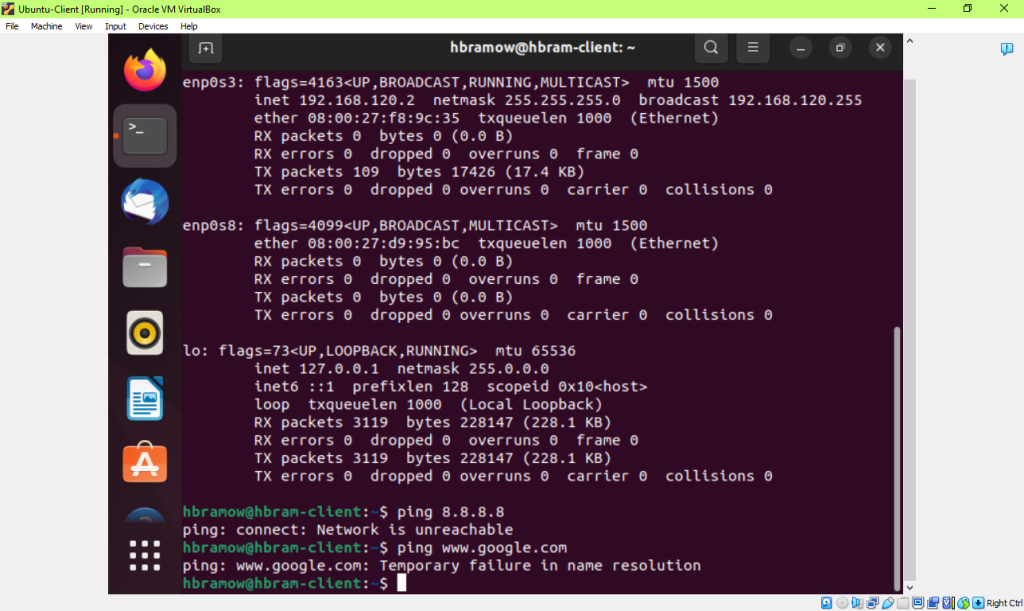
Step 3 – Ubuntu A – gateway – ping worked; www.google.com worked
Step 3 – Ubuntu A ‘gateway’ – sudo ifconfig enp0s8 192.168.120.1
Step 3 – Ubuntu A – gateway – 2nd time –ping worked; www.google.com worked still

4.1___X__Configure the temporary IP address on the Client Ubuntu (B), as shown in Figure 1.
4.2 __X___ on Client Ubuntu B, check config 1at; type ifconfig. Use it here: sudo ifconfig [device network] 192.168.120.2
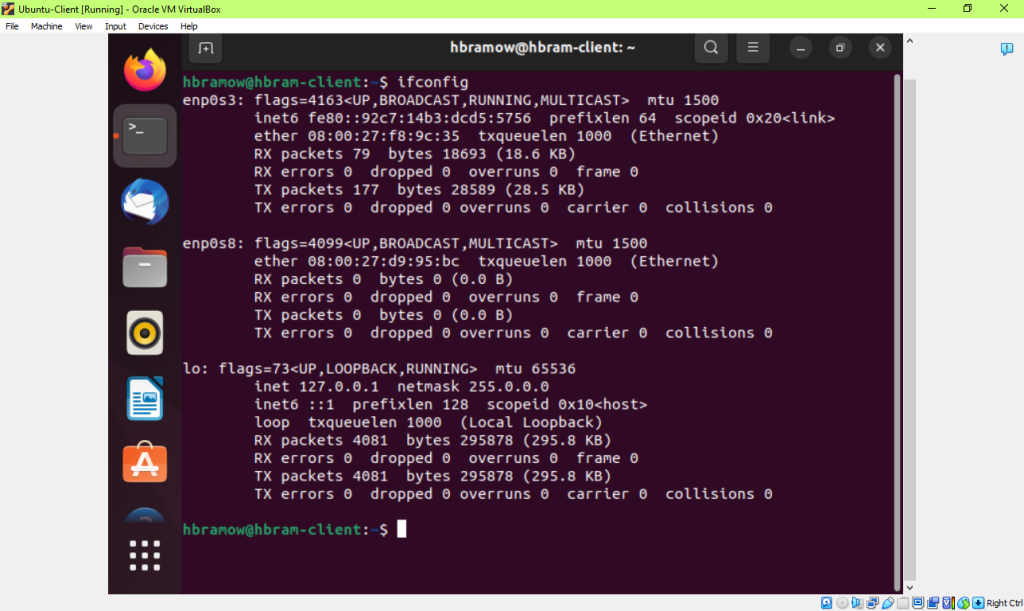
Step 4 – Ubuntu B client – first do ‘ifconfig’ –
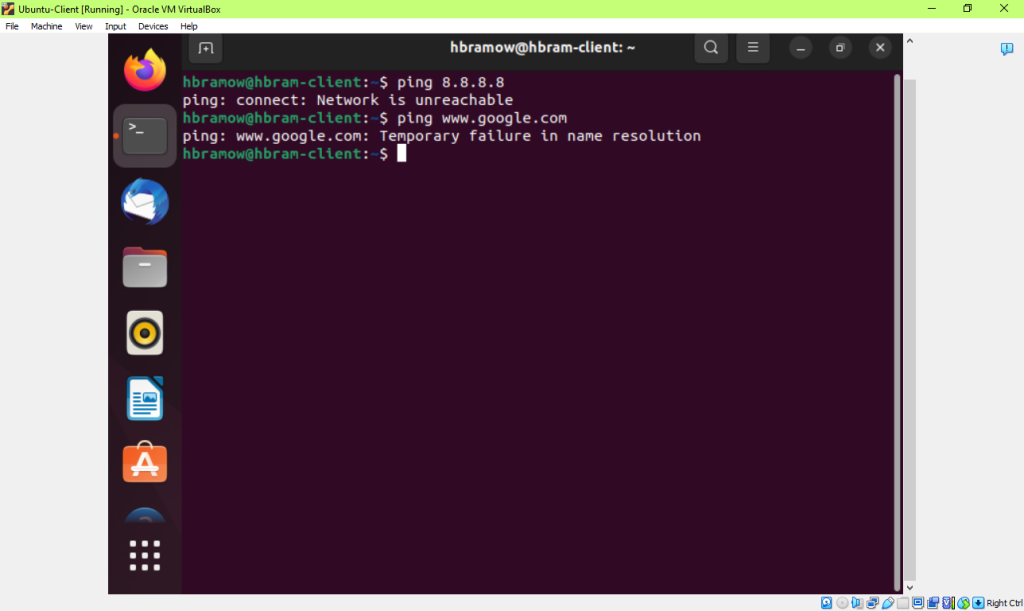
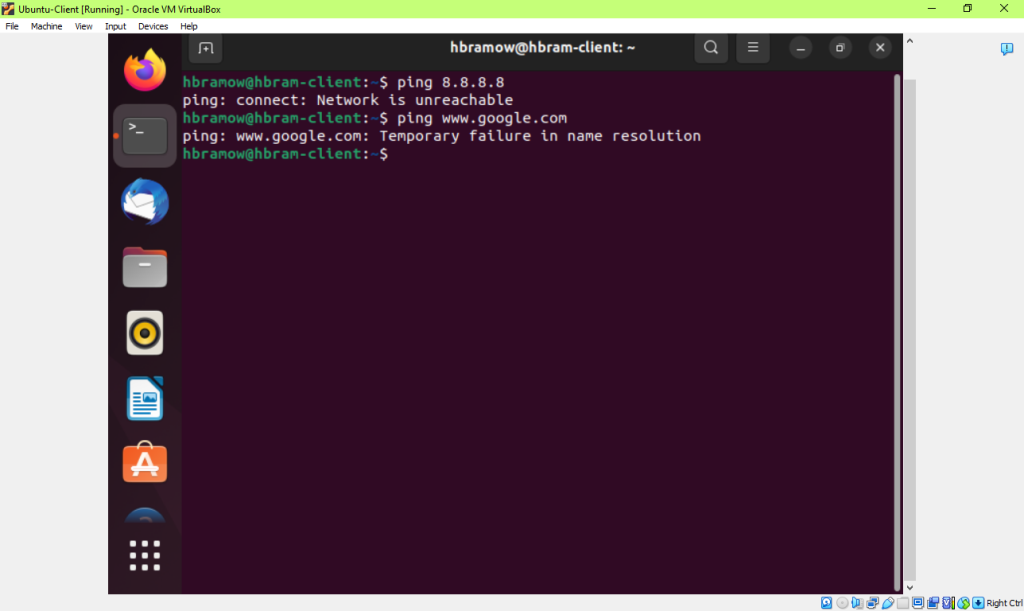
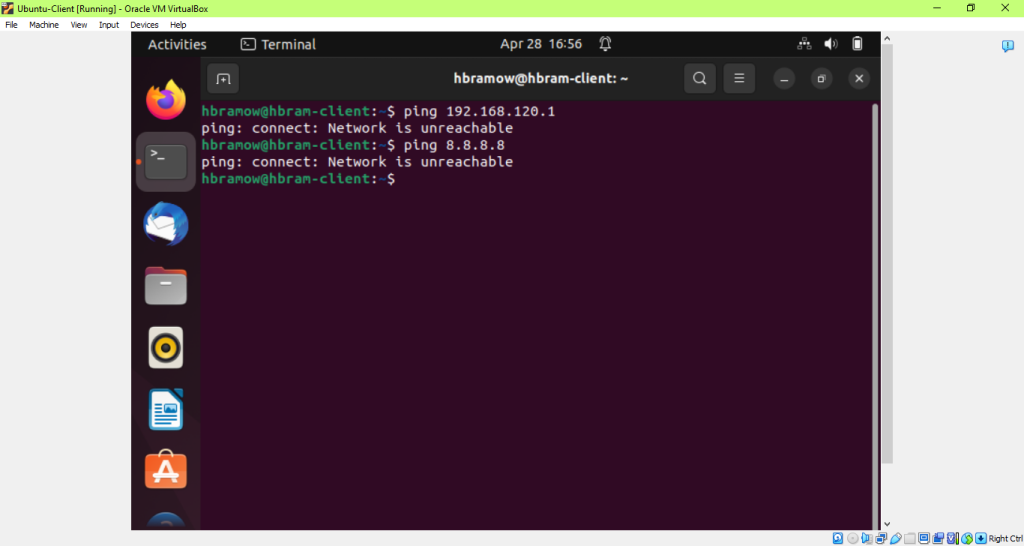
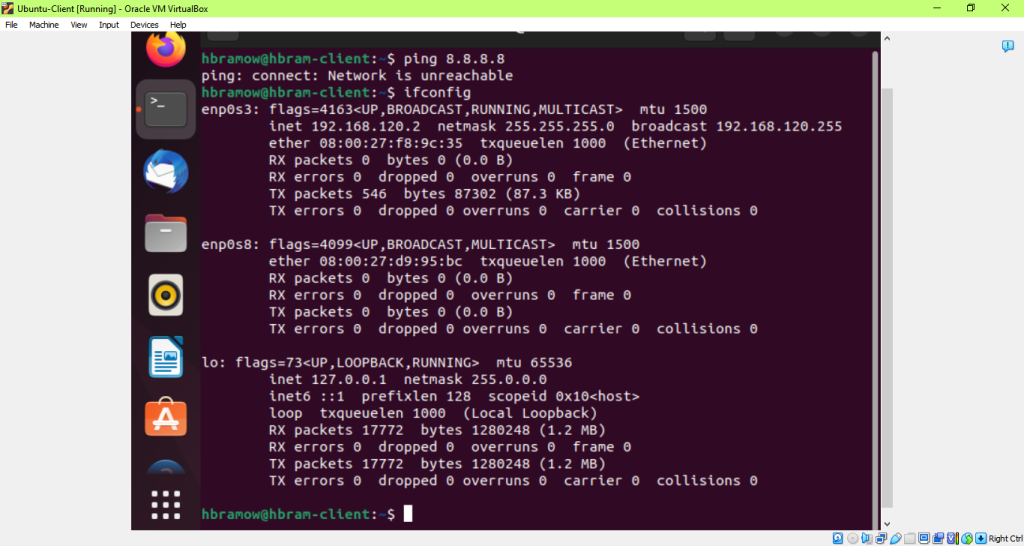
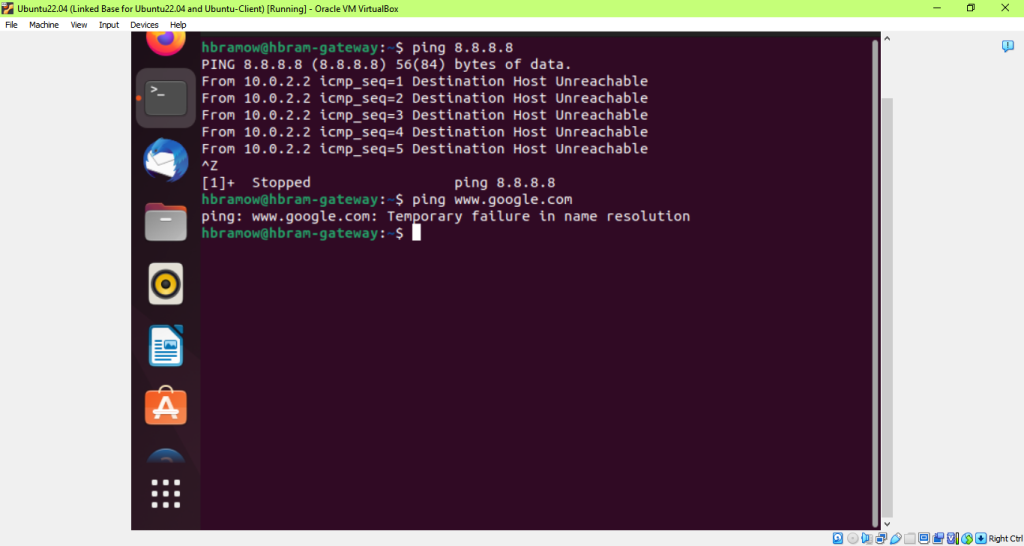
Step 4.1 – Ubuntu B – Client – ping 8.8.8.8 and www.google.com – no connection doesn’t work
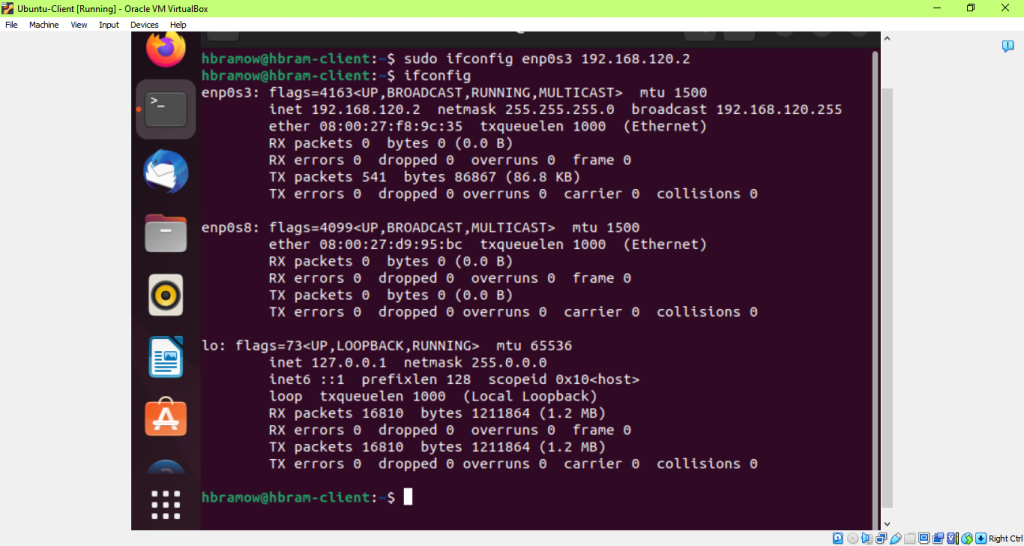
Step 4.1 – Ubuntu B ‘client’ – sudo ifconfig enp0s3 192.168.120.2
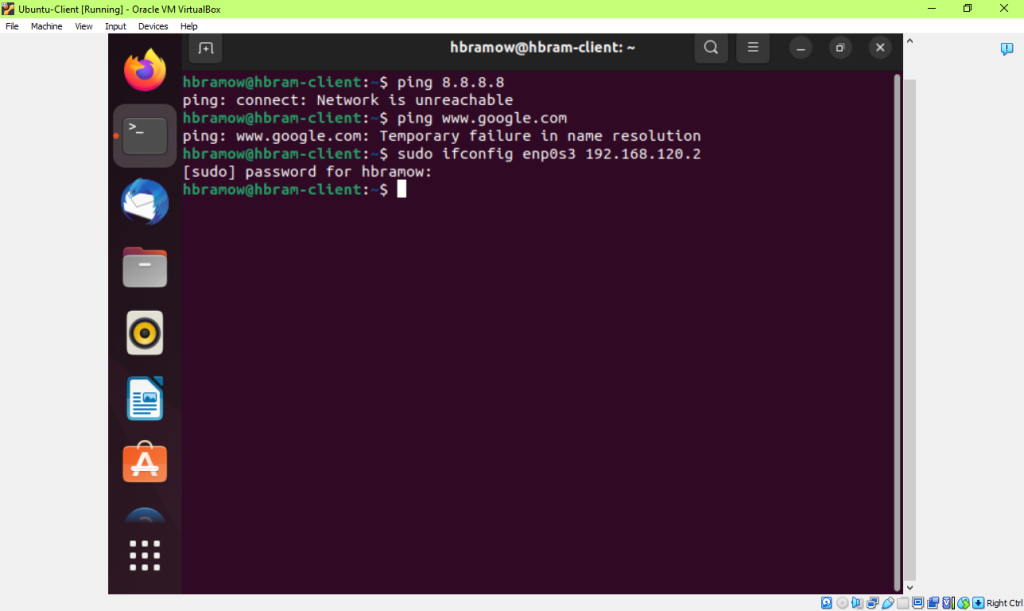
Step 4.1 – Ubuntu B ‘client’ – ifconfig

Step 4.1 – Ubuntu B – Client – 2nd time – ping 8.8.8.8 & www.google.com – does not work
4.1__x___ Ubuntu B – Client VM — Configure the temporary IP address [see above]
4.2__X___routing table, and DNS server on Client VM as shown in Fig 1. [see down below this section]
Configure Routing Tables –
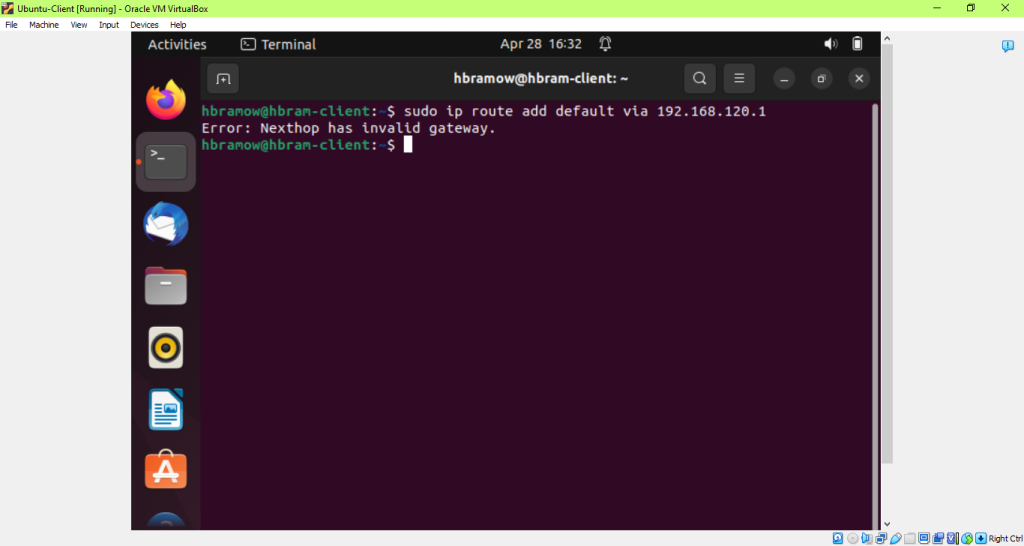
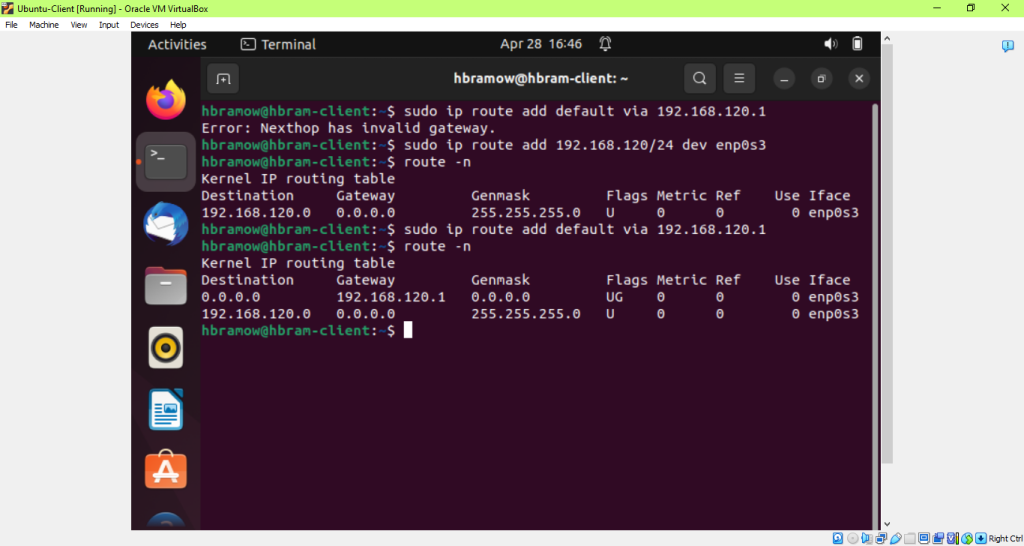
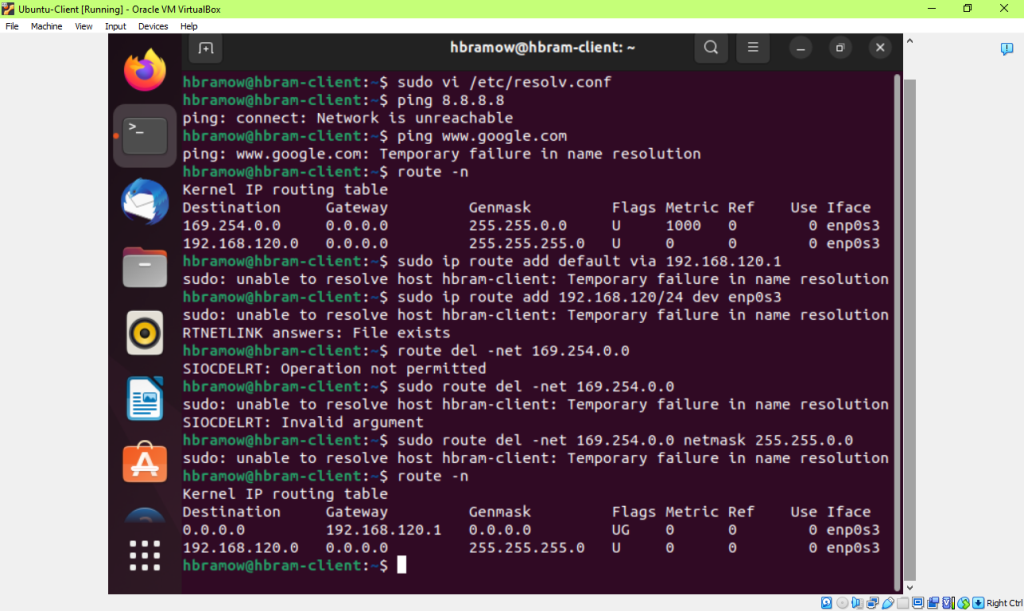
Step 4.2 – Ubuntu B Client – Add route through Gateway – sudo ip route add default via 192.168.120.1
Step 4.2 – Add entry route – sudo ip route add 192.168.120/ 24 dev enp0s3
sudo ip route add default via 192.168.120.1
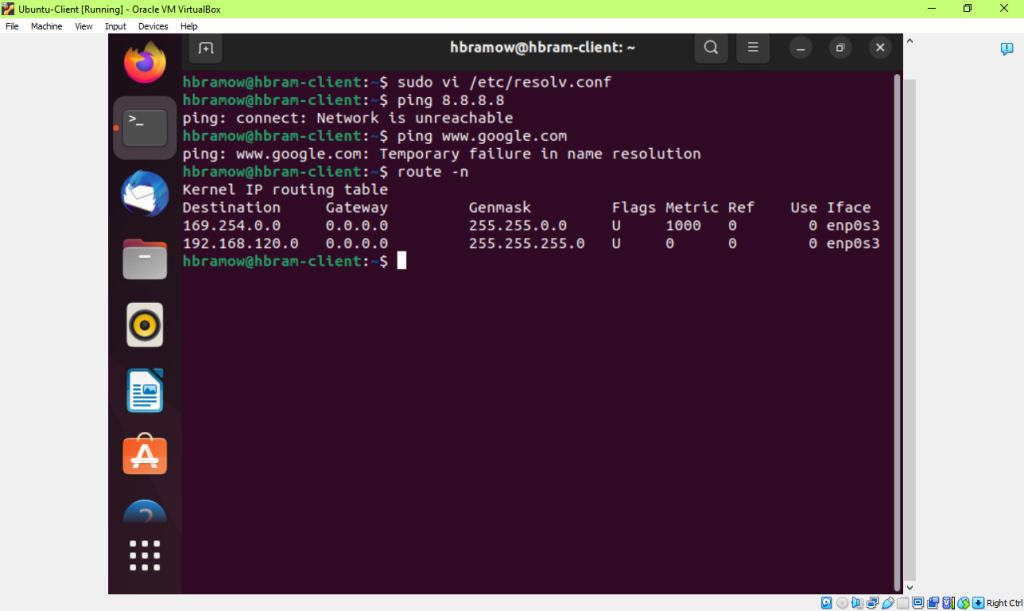
Step. 4.2 – route –n [route show]
Step 4.2 – Test connections with VMs – on client vm – ping gateway 192.168.120.1 – not reachable
- __XX___Configure gateway Ubuntu to enable IP forwarding (to forward the traffic) (also NAT configuration)
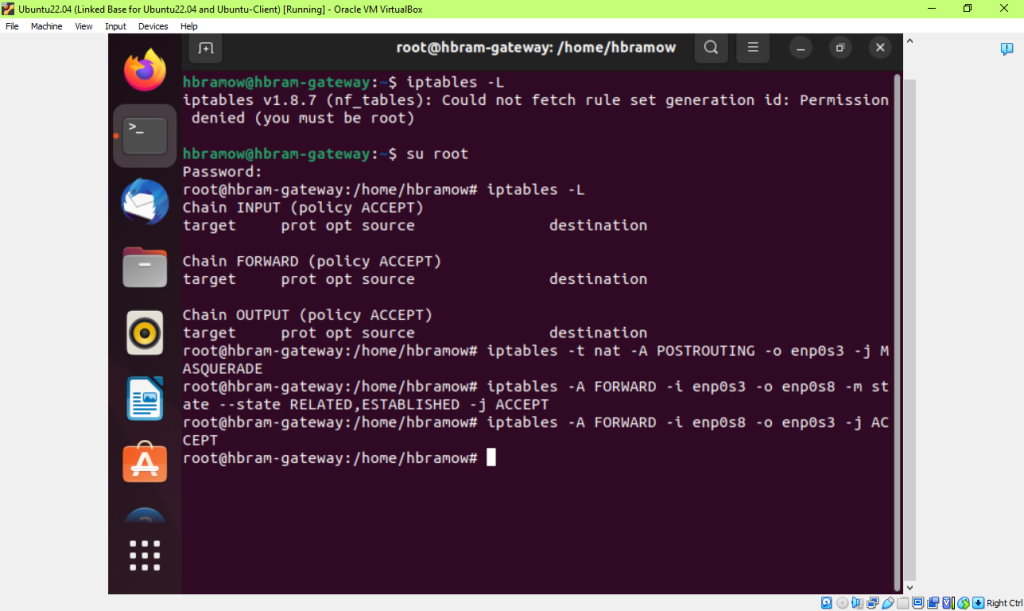
Ubuntu A – GATEWAY VM – Configure Firewall – NAT on the gateway vm
routing tables – Ubuntu A Gateway
sudo iptables –t nat –A POSTROUTING –o enp0s3 –j MASQUERADE
sudo iptables -A FORWARD –i enp0s3 –o enp0s8 –m state –STATE RELATED,ESTABLISHED –j ACCEPT
sudo iptables –A FORWARD –i enp0s8 –o emp0s3 –j ACCEPT
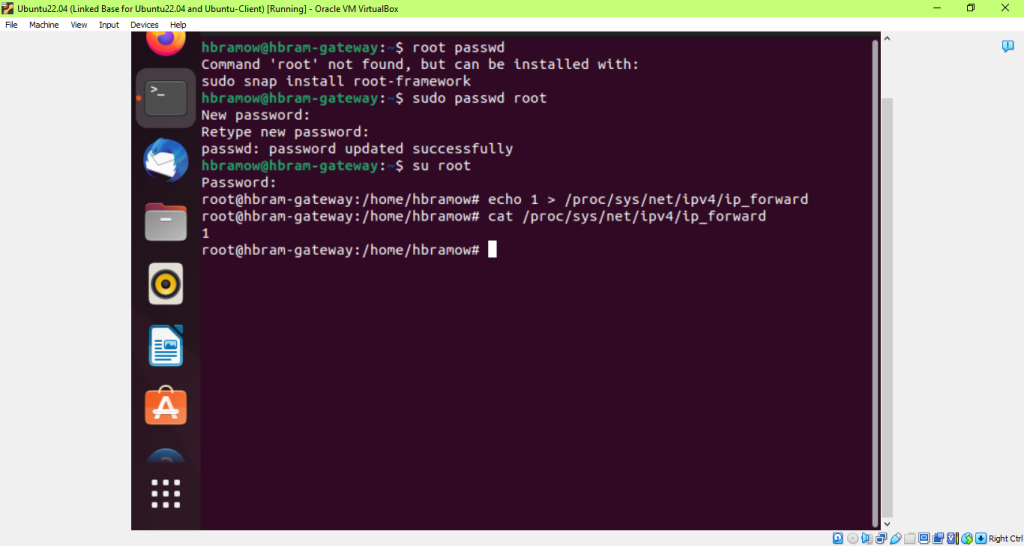
Step 5 configure gateway for IP forwarding

Step 5 –
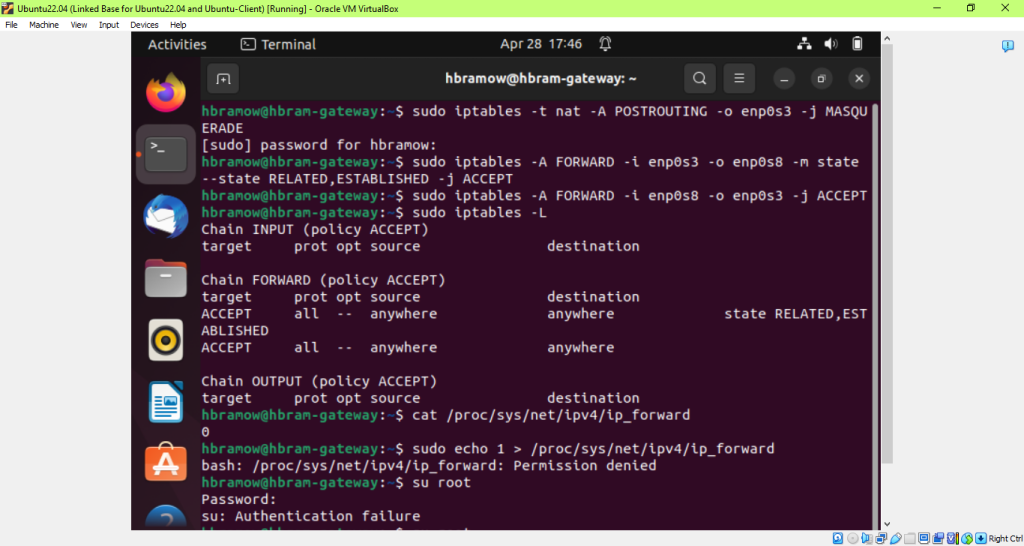
Step 5 – Su root – had to reset passwd
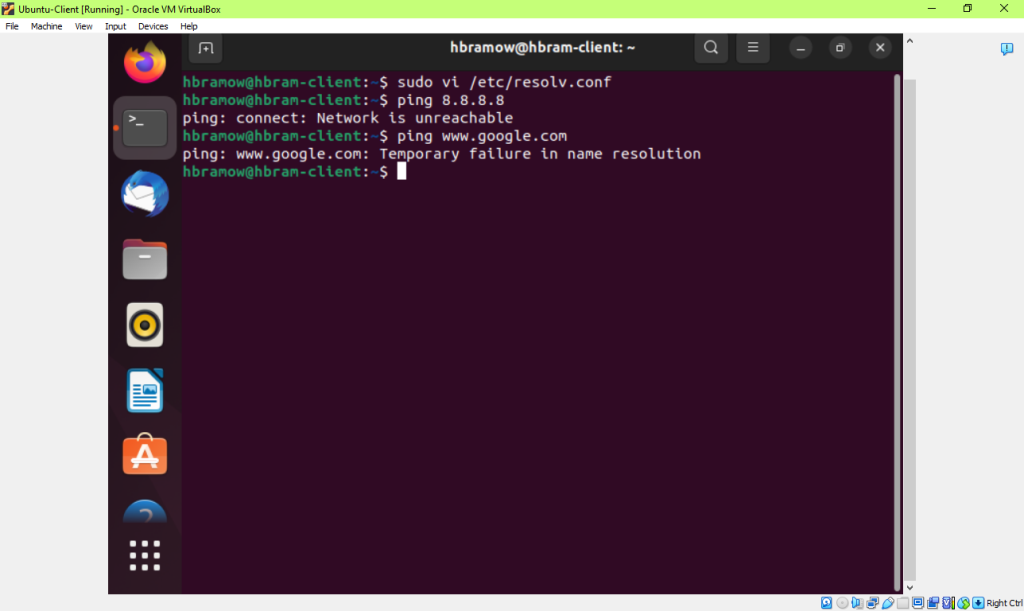
- _XX____Test your ping connection to _____8.8.8.8 and_______ www.google.com in the client VM, respectively.
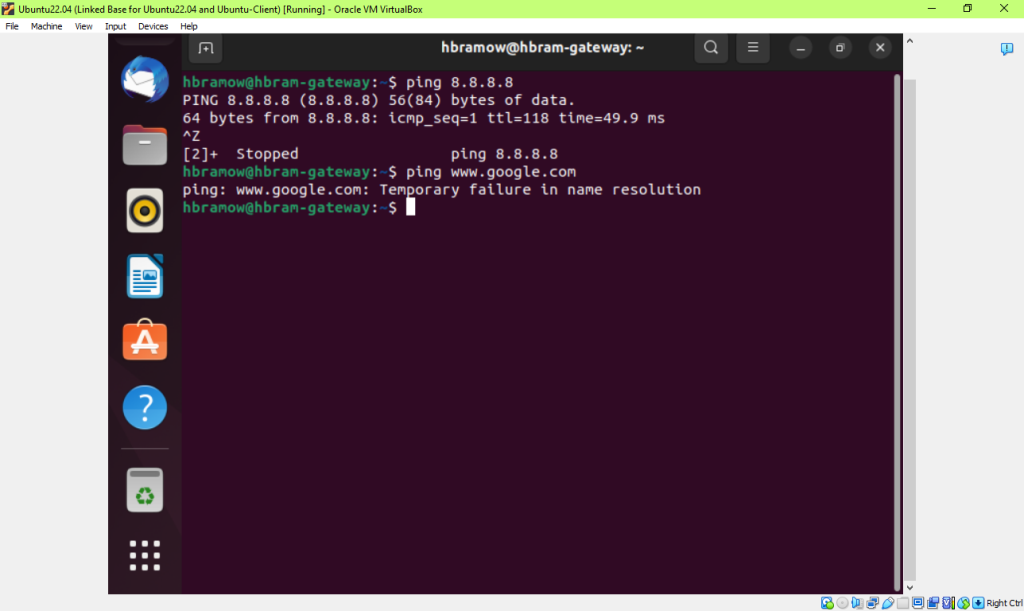
Step 6 – Ubuntu B – Client – ping 8.8.8.8 – does NOT work still
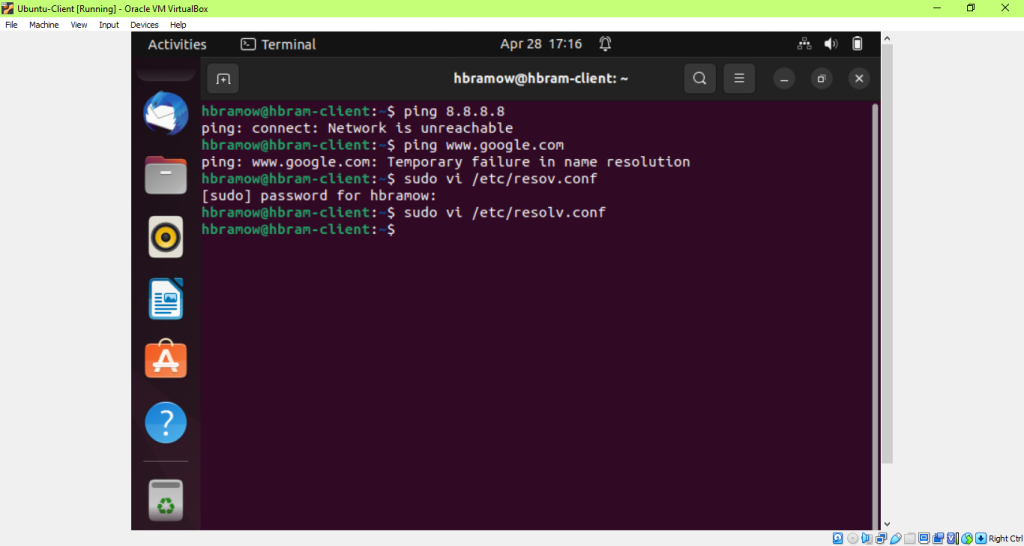
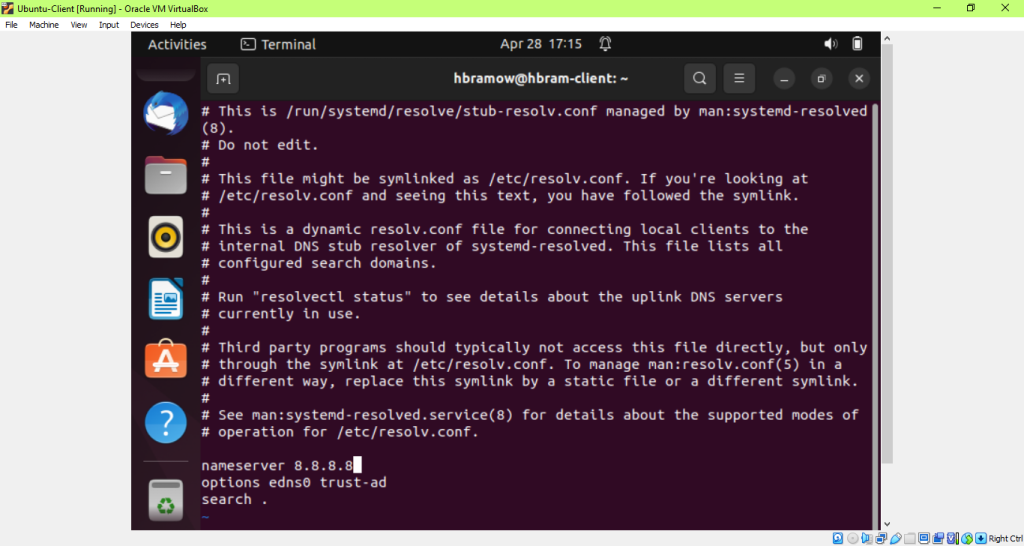
Step 6 – resolv.conf file reset nameserver to 8.8.8.8
Step 6 – Checked IP address on Client – pc crashed and so it had reverted back!! Only temporary!
Step 6 – Had to ReSet temporary IP address AGAIN for Client VM –
Step 6 Finally!!! – Ping 8.8.8.8 and ping www.google.com – still does not work!
Step 6 – looked at route –n – route also reverted to the 169 ip address instead of the gateway address that was there!

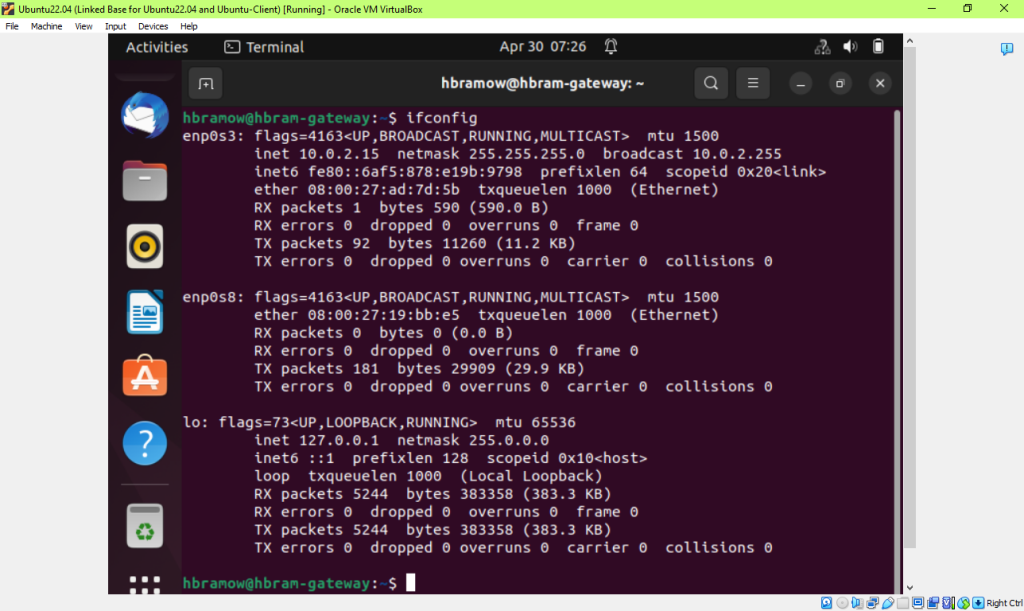
Step 6 – check IP on gateway vm – IP also reverted back
Step 6 – reset ip on gateway vm; sudo ifconfig enp0s8 192.168.120.1
Step 6 – Gateway vm – ping 8.8.8.8 and www.google.com
Step 6 – Client VM – ping 8.8.8.8 and www.google.com

Gateway also Lost the settings each time pc crashed due to running 2 VMs was too much for it I guess –
Again input settings Ubuntu A gateway Sunday
Pinged on Gateway after losing settings again….
Gateway vm – resolv.con the nameserver reverted back from 8.8.8.8 –
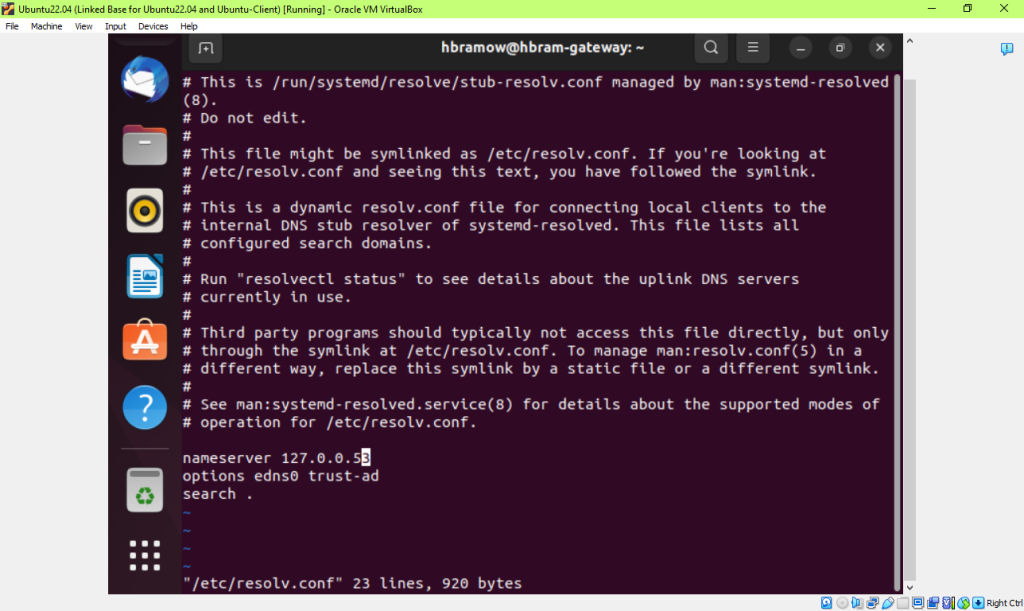
Reset to 8.8.8.8 on Gateway

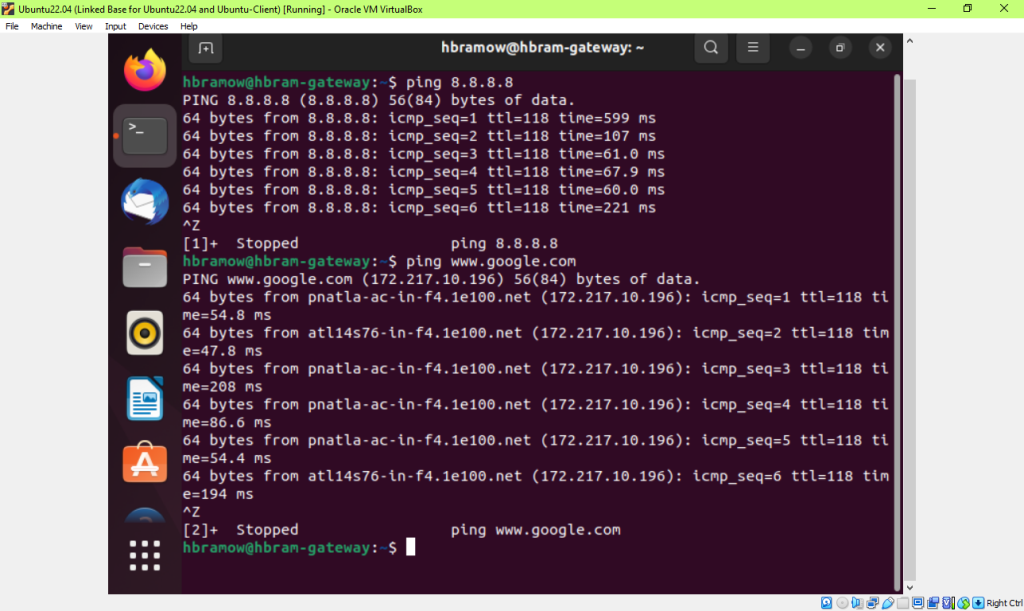
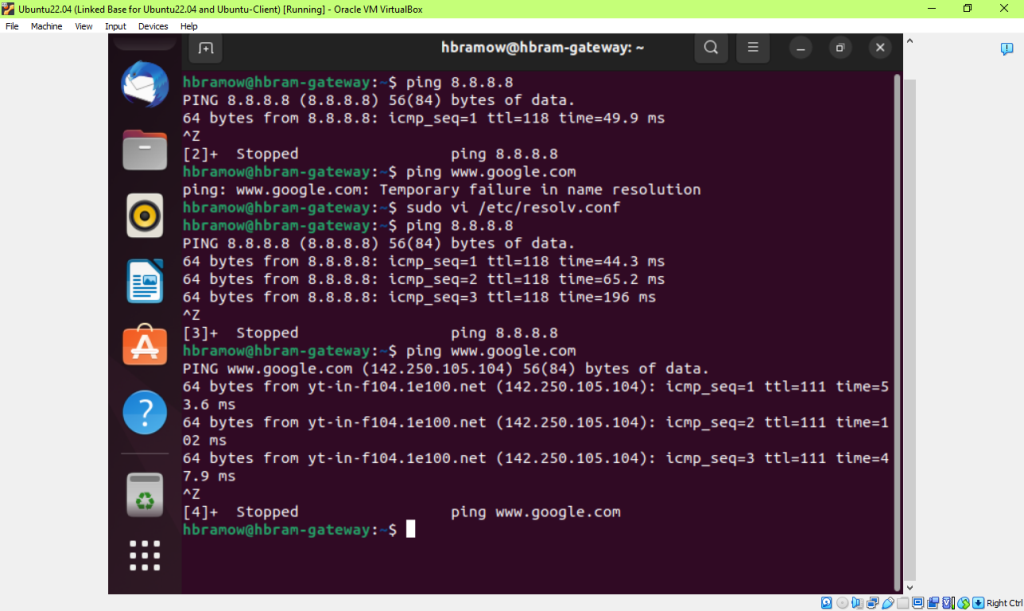
PING WORKS!!!!! GATEWAY
Client VM – checking settings & corrected back —
Client VM lost IP temporary address…yes temporary….I get it now really. Thanks! So glad can make it permanent!
Checking on Client VM IP address –
Client VM – resolv.conf — Nameservers were wrong for client
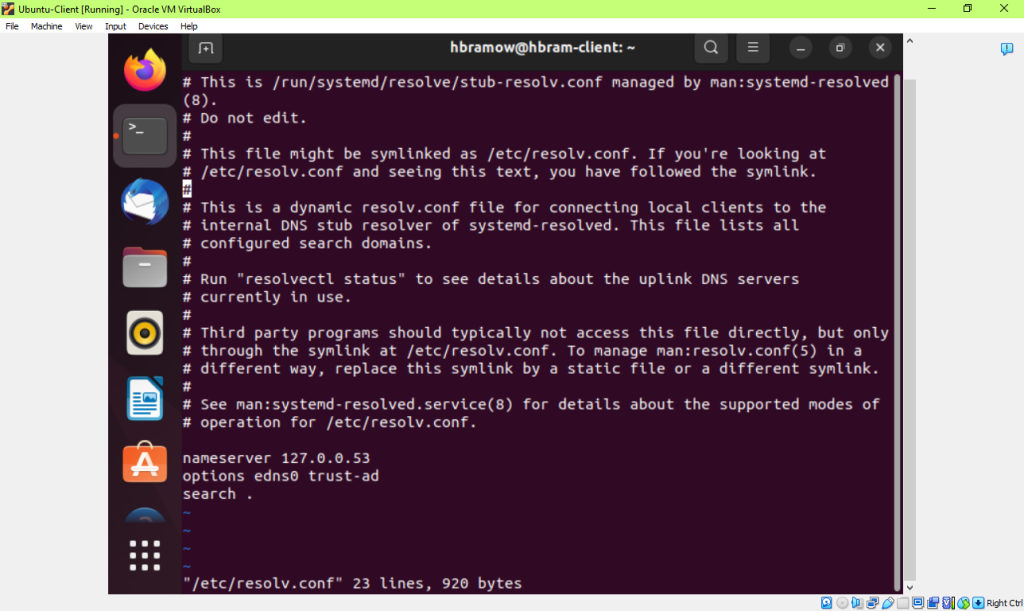
Client VM – corrected nameserves again to 8.8.8.8

Ping Client VM – still not reachable
Checked routes for Client VM – Route had reverted back to 169.254.0.0 should be the GATEWAY IP!!!!
Fixed routing gw on CLIENT vm – Route del 169.254.0.0 gateway –
Iptables need to put in again in Gateway Sunday
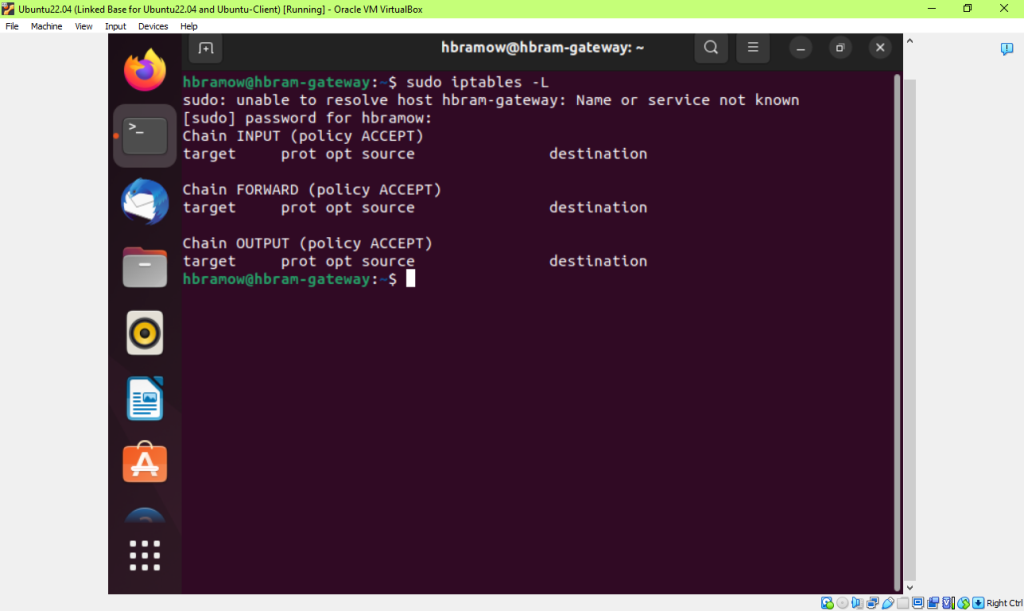
Gateway had to be in ROOT to add back the routing table –
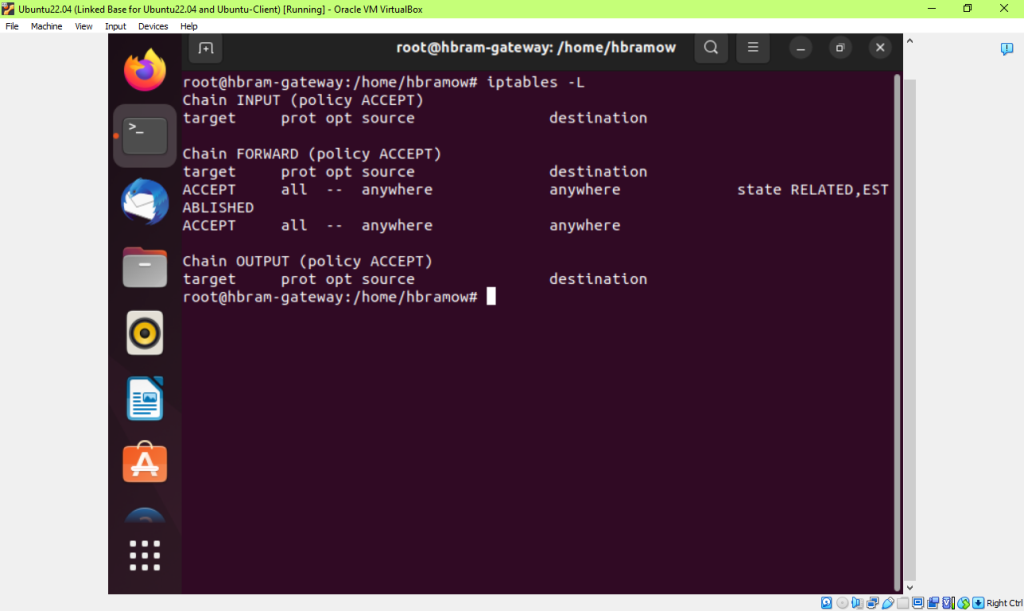
Gateway Routing Table back!!
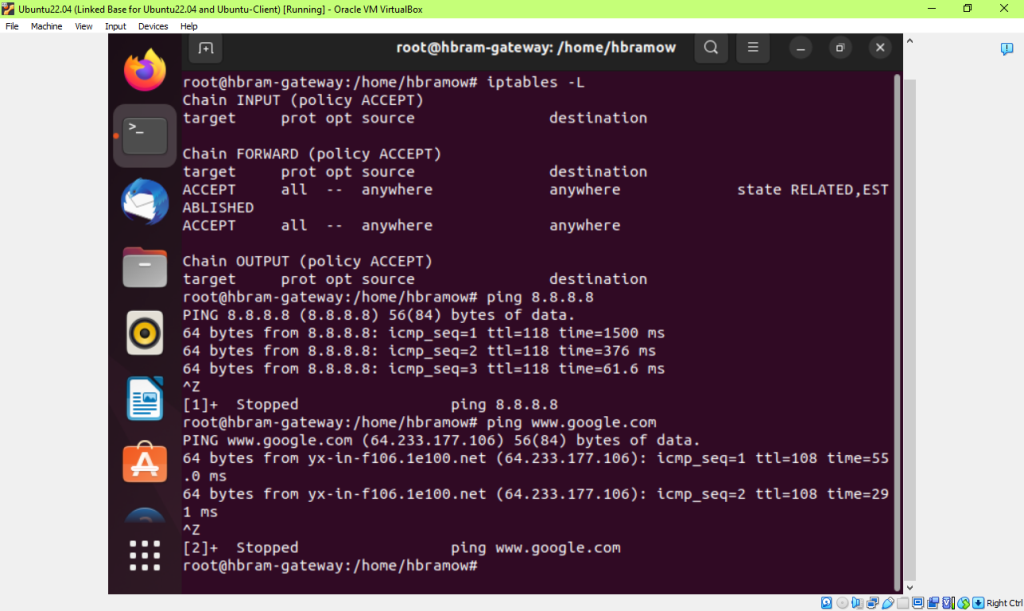
Ping 8.8.8.8 WORKS FINALLY!!!!
Client – tables and ping not working still

Enabled traffic forwarding on the Gateway –
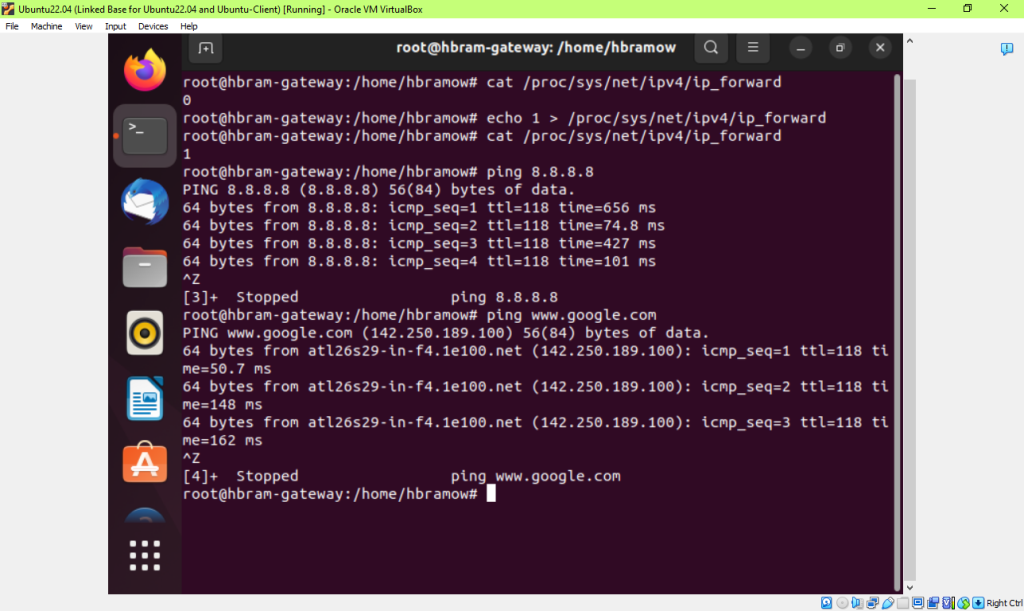
CLIENT VM – Ping Works!!!
CLIENT CAN PING THE GATEWAY VM!!!!
FINISHED!!! YOU ARE CORRECT AND THANK YOU FOR THE ENCOURAGEMENT. I DO NOT GIVE UP EASILY EITHER. BUT YOUR WORDS THAT IF I DID IT CORRECTLY IT WOULD WORK, TOLD ME TO KEEP LOOKING FOR THE ANSWER!
Task B –Firewall Configuration (40 points)
- ______Configure the iptables on the gateway Ubuntu to block all the inbound ICMP packets from the Client VM.
- _____Configure the iptables on the gateway Ubuntu to block all the outbound ICMP packets that originated from the gateway Ubuntu itself.
Step 1 & 2 – Task B
Extra credit:
________________Set the permanent IP address on the Client Ubuntu based on the above network topology.
Powered off Client/Clone
Powered back on –
Ping