Cybersecurity Techniques and Operations
CYSE 301 focuses on learning different tools and techniques used to secure computer systems and networks. The course covers topics such as network traffic analysis, firewall configuration, vulnerability scanning, and penetration testing. Through hands-on labs, I am learning how cybersecurity professionals monitor networks, identify potential security risks, and protect systems from attacks.
Since I am currently taking this course, I am still developing my skills and gaining experience with different cybersecurity tools.
Hands-On Lab: Network Traffic Analysis and Firewall Configuration
One of the labs I have worked on involved using Nmap, Wireshark, and pfSense to analyze network traffic and configure firewall rules.
During this lab, I used Nmap to scan devices on a network and identify open ports and running services. I also used Wireshark to monitor network traffic and observe how devices communicate with each other.
After collecting the original scan results, I configured firewall rules in pfSense to restrict certain types of traffic. I then performed another scan to see how the firewall affected the results.
This lab helped me understand the difference between open, closed, and filtered ports. It also showed me how firewall rules can help protect a network by limiting access to certain services.
Skills I Am Developing
Through this course, I am gaining experience with:
- Using Nmap to scan networks and identify open ports.
- Monitoring network traffic with Wireshark.
- Configuring firewall rules using pfSense.
- Understanding how firewalls affect network communication.
- Identifying potential security risks in network configurations.
- Troubleshooting problems in virtual network environments.
Reflection
So far, CYSE 301 has given me a better understanding of how network security works in a hands-on environment. One thing I enjoy about this course is being able to use actual cybersecurity tools instead of only learning about them through lectures.
The firewall lab was especially interesting because I could see how changing firewall rules affected the results of my network scans. It helped me understand why properly configuring security tools is important when protecting a network.
Since I am still taking this course, I expect to continue building my knowledge of network security, penetration testing, and other cybersecurity techniques. I believe these skills will be useful for my future career, especially because I am interested in gaining more experience with security operations and network defense.
Course Artifacts
Assignment 2: Sword vs. Shield
For this assignment, I used Nmap to scan a network, Wireshark to monitor traffic, and pfSense to configure firewall rules. I compared the scan results before and after applying the firewall rules to understand how they affected network accessibility and security.
CYSE 301: Cybersecurity Technique and Operations
Assignment 2: Sword vs. Shield
In this assignment, you will act as an attacker to identify the vulnerabilities in the LAN network and a defender to apply proper countermeasures. You need to provide a screenshot for each task below.
Task A: Sword – Network Scanning (5 + 15+ 10 + 10 = 40 points)
Power on/ Connect the following listed VMs,
- External Kali
- pfSense
- Ubuntu
- Windows Server 2022
- Internal Kali
Make sure not to add/delete any firewall rule/policies before continuing.
Screenshot required — label it with the exact step/question number.
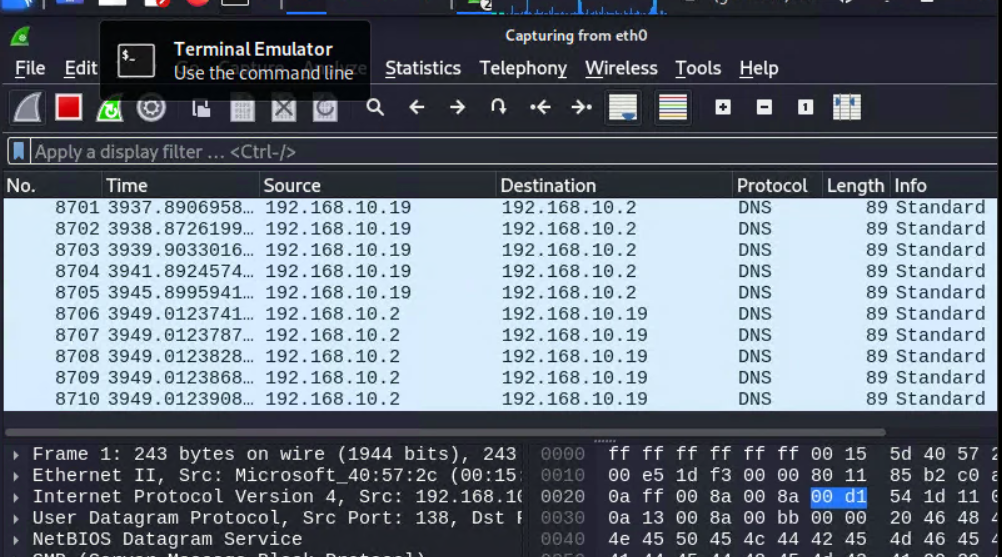
- Run Wireshark in the Internal Kali VM while External Kali is scanning the network.
Image 1
- Use Nmap in External Kali to profile the basic information about the subnet topology (including open ports information, operating systems, etc.)
Image 2
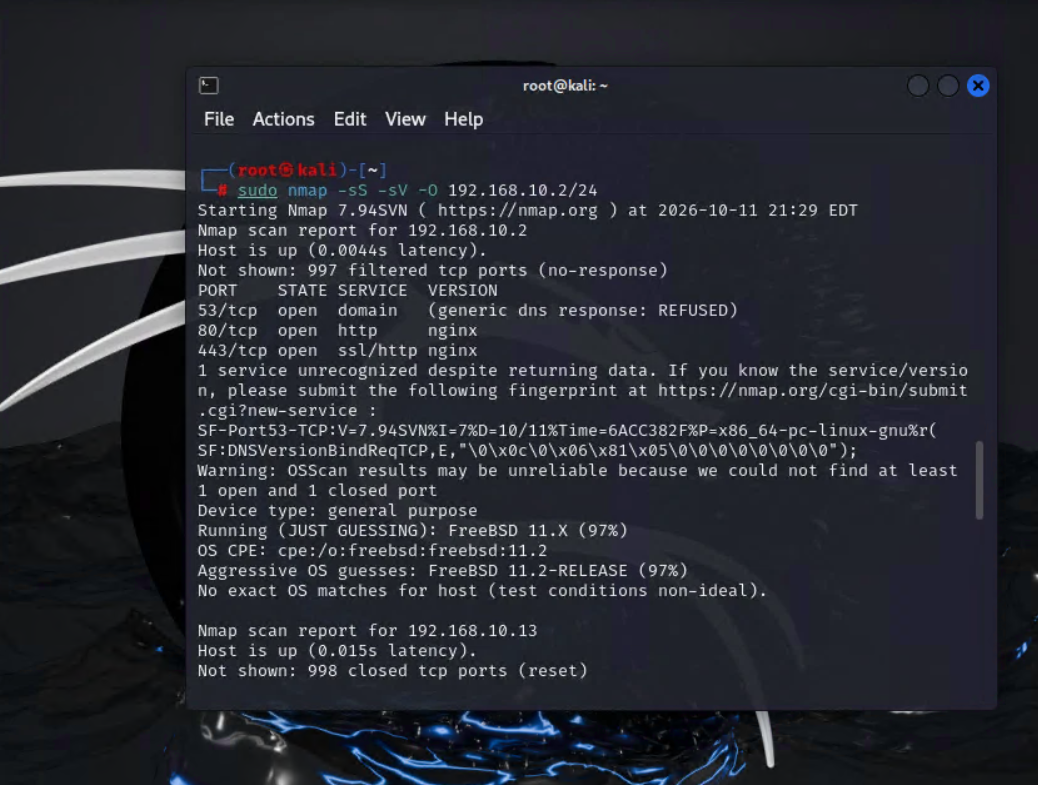
You need to submit a table summarizing the following (please add more rows if required):
| IP addressOf the VMs | Open ports | Service versions | Operating System detection | Backend software information |
| 192.168.10.2192.168.10.13192.168.10.18192.168.10.19 | 53, 80, 4438000, 808921, 22135, 139, 445 | (REFUSED), HTTP, SSLHTTP, SSLFTP, SSH | FreeBSDUnknownLinux(ubuntu)Windows Server 2022 | NginxSplunkdVsftpd, openSSH |
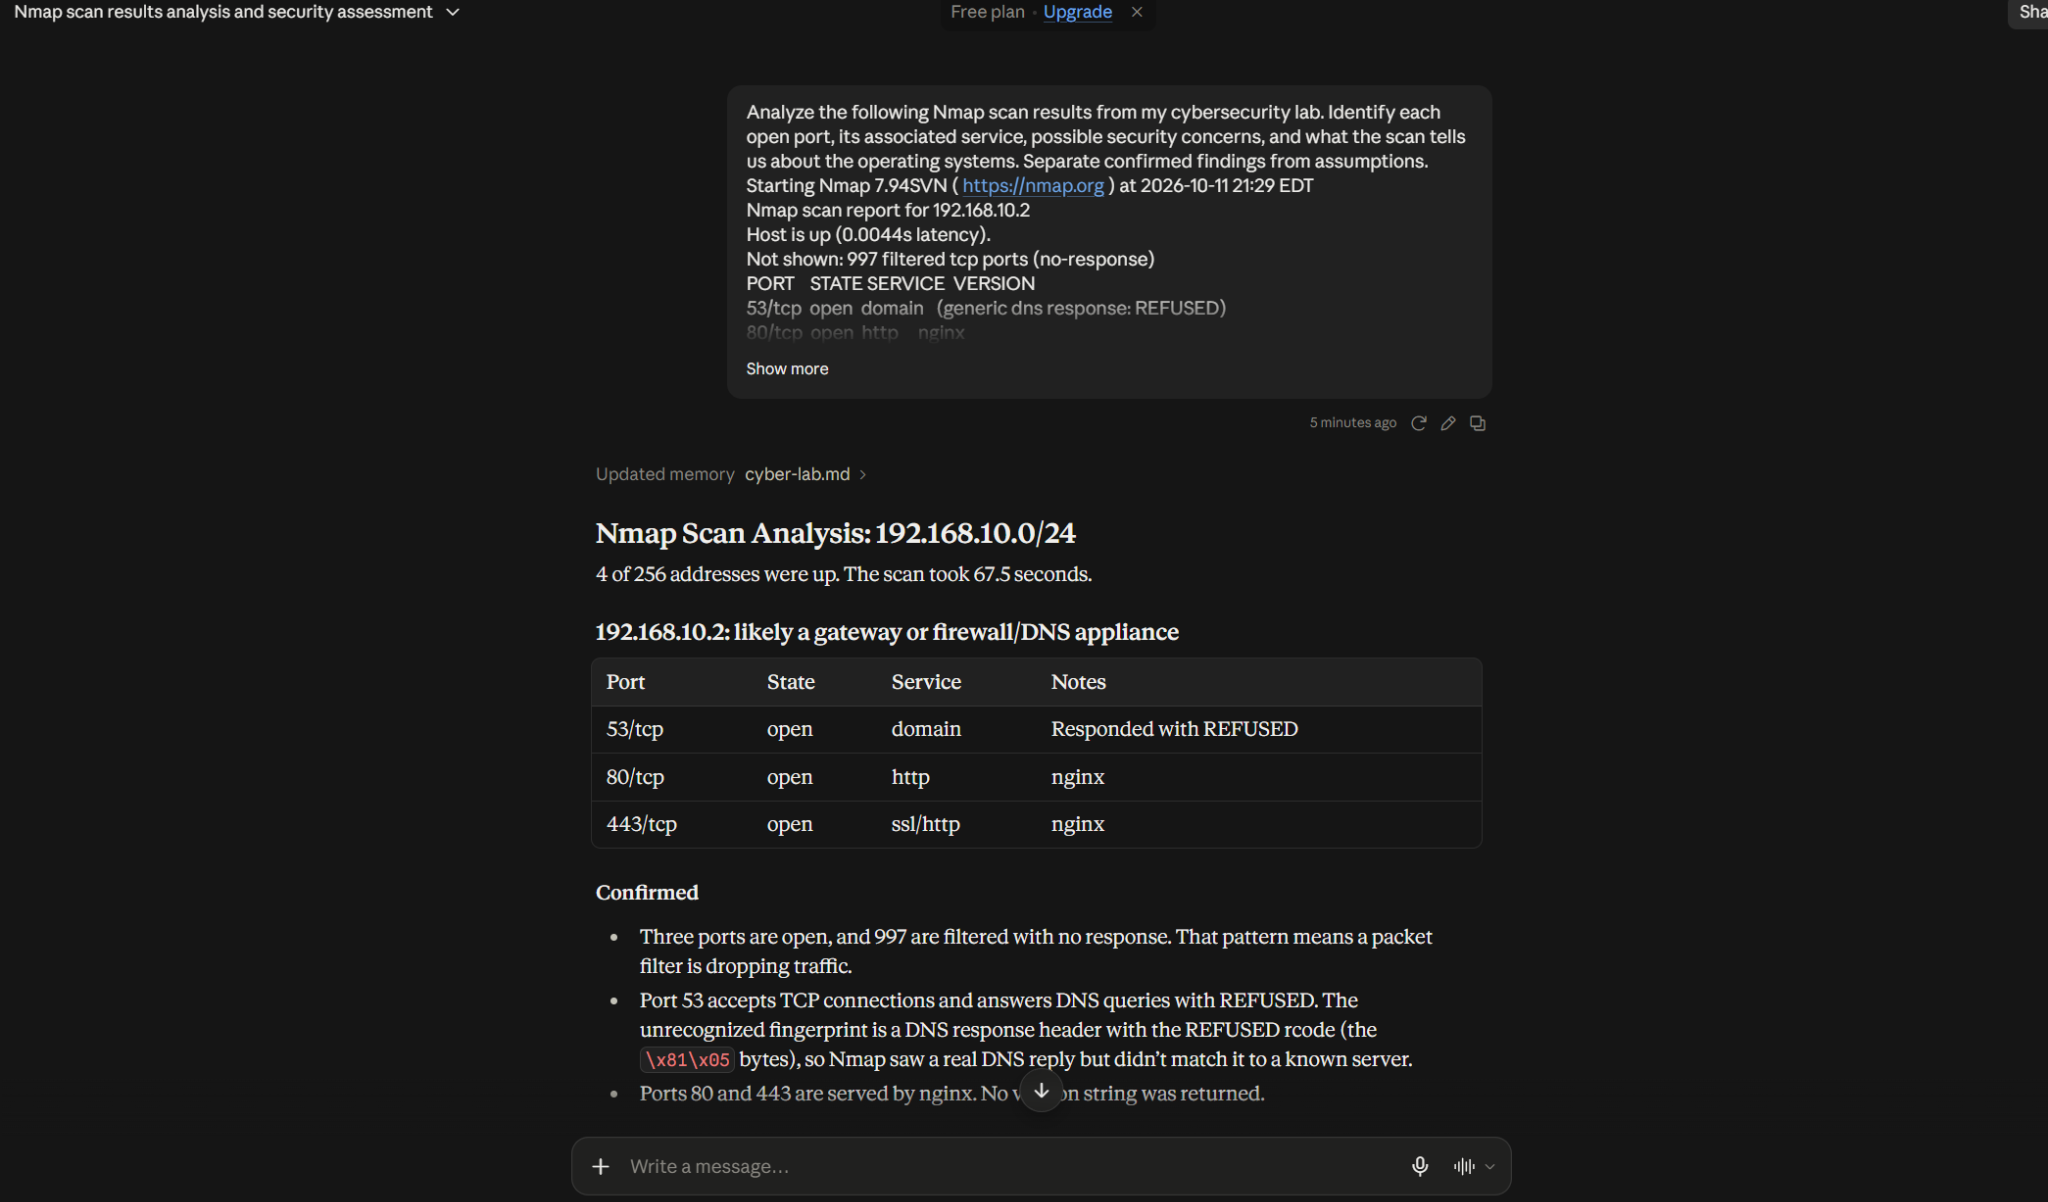
- (AI Task) (10 points): Copy your Nmap output into an AI system (ChatGPT or equivalent).
https://claude.ai/share/28933da6-5f40-499b-9259-b2dcd7bc57ee
The actual Nmap results identified two open ports on 192.168.10.18: port 21 running vsftpd 3.0.5 and port 22 running OpenSSH 8.9p1 on Ubuntu. The scan also reported 968 filtered ports and 30 closed ports. Another host, 192.168.10.13, had ports 8000 and 8089 open, both associated with Splunk services. AI can correctly identify these services from Nmap output, but its analysis must distinguish confirmed findings from potential risks. FTP can transmit credentials without encryption when configured for standard FTP, making its configuration worth checking. However, the scan alone does not prove that anonymous login is enabled or that the service is vulnerable. Similarly, identifying SSH or Splunk does not automatically mean either service is exploitable. The scan also does not establish internet accessibility. A useful analysis should highlight the exposed services, recommend verifying configurations and software updates, and acknowledge that no exact operating system match was detected for the first host. Any unsupported vulnerability claims or exaggerated severity ratings would reduce the analysis’s reliability. I would use AI as a starting point in a real SOC, but validate its conclusions using evidence, configuration checks, and trusted vulnerability databases before taking action.
- Using Chain-of-Thought Prioritization.
https://claude.ai/share/28933da6-5f40-499b-9259-b2dcd7bc57ee
Using the Nmap output, provide multiple prompts asking the AI assistant for
Screenshot the full reasoning trace with your prompts (not just the final ranked list).
In 3–5 sentences, state whether the AI’s step-by-step reasoning matches your own understanding of the subnet and identify one step in the chain where the AI’s logic was weak, unsupported, or skipped a step.
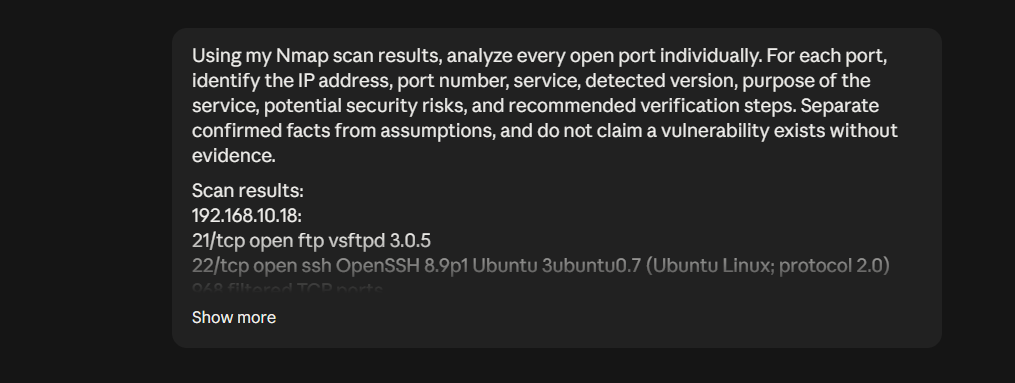
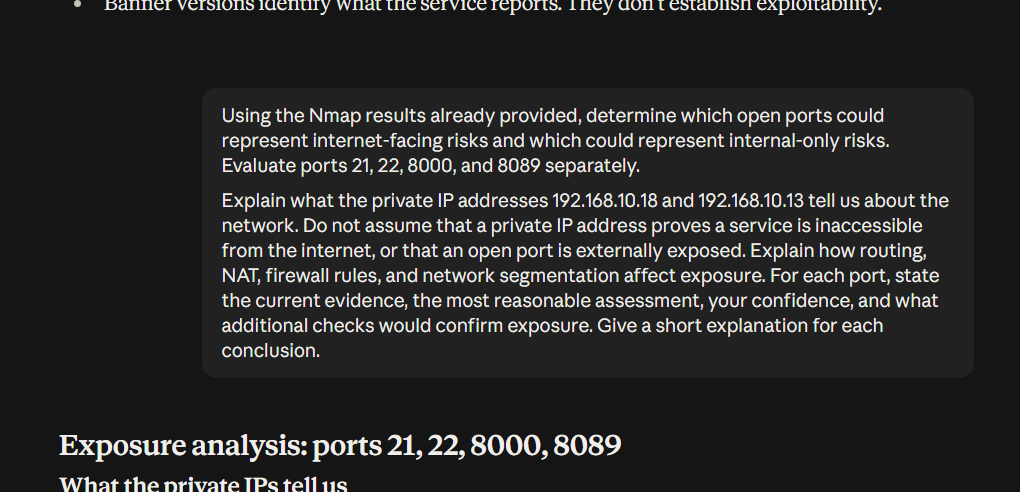
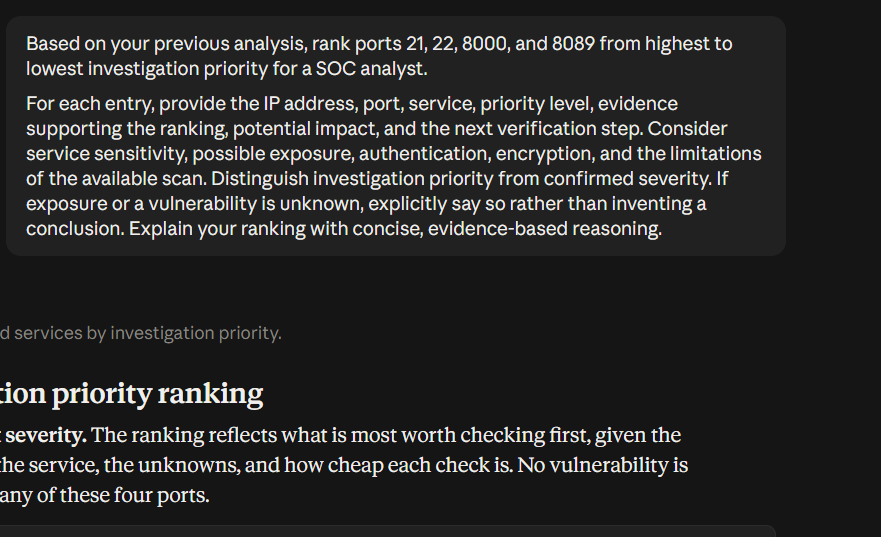
The AI’s step-by-step reasoning mostly matches my understanding of the subnet because it correctly identified the four open ports and distinguished internal reachability from confirmed internet exposure. It also recognized that the private IP addresses 192.168.10.18 and 192.168.10.13 do not prove that the services are inaccessible from the internet, since NAT, port forwarding, and VPNs can affect accessibility. One weakness in its logic was ranking Splunk Web on port 8000 as the highest priority partly because Splunk Free may lack authentication, even though the scan did not confirm that authentication was disabled on this specific system. I also noticed that the AI treated some network details, such as the lack of filtering on the Splunk host, as evidence of broad internal accessibility without fully establishing the network’s segmentation. Overall, I would use its ranking as a starting point, but verify the service configurations, access controls, and external exposure before making final SOC decisions.
———————————————–End of Task A——————————————————————–
Task B:
In order to receive full credits, you need to fill the table (add more rows if needed), implement the firewall rule(s), attach the screenshot of your rule configured in the firewall table, and attach the screenshot of the rule and the Ping test verification of the rules.
Important: Open Pfsense using a browser on the Internal Kali.
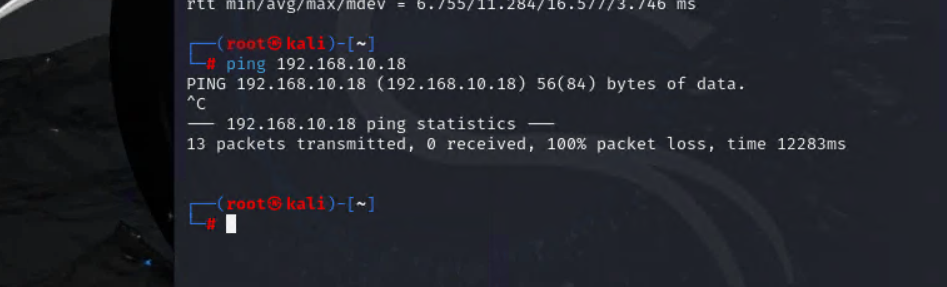
- Configure the pfSense firewall rule to block the ICMP traffic from External Kali to the Ubuntu VM.
| Rule # | Interface | Action | Source IP | Destination IP | Protocol(port # if applicable) |
| 1 | WAN | block | 192.168.217.3 | 192.168.10.18 | 1 |
Attach Two Screenshots (Mandatory)-
- A screenshot of the firewall rule that you have created in Pfsense for the above task
- A screenshot of the terminal where you have tested the rule is in effect or not.
Image A
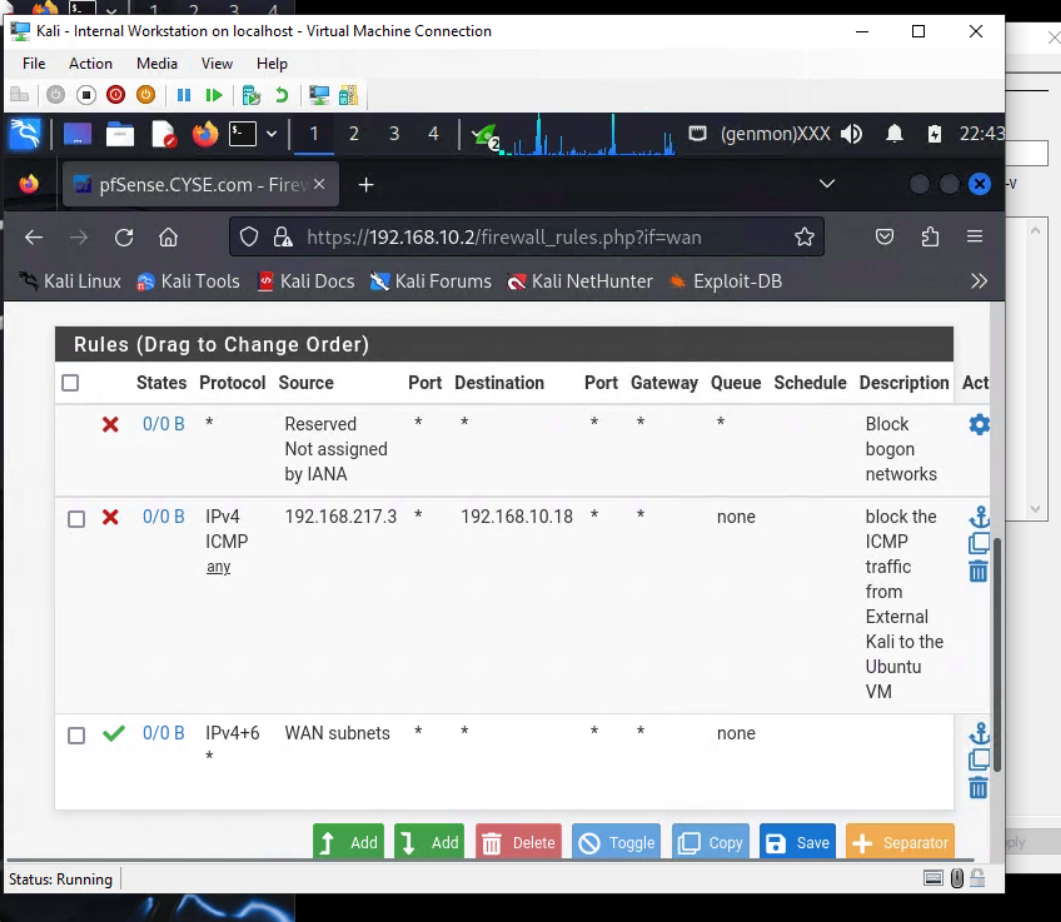
Image b
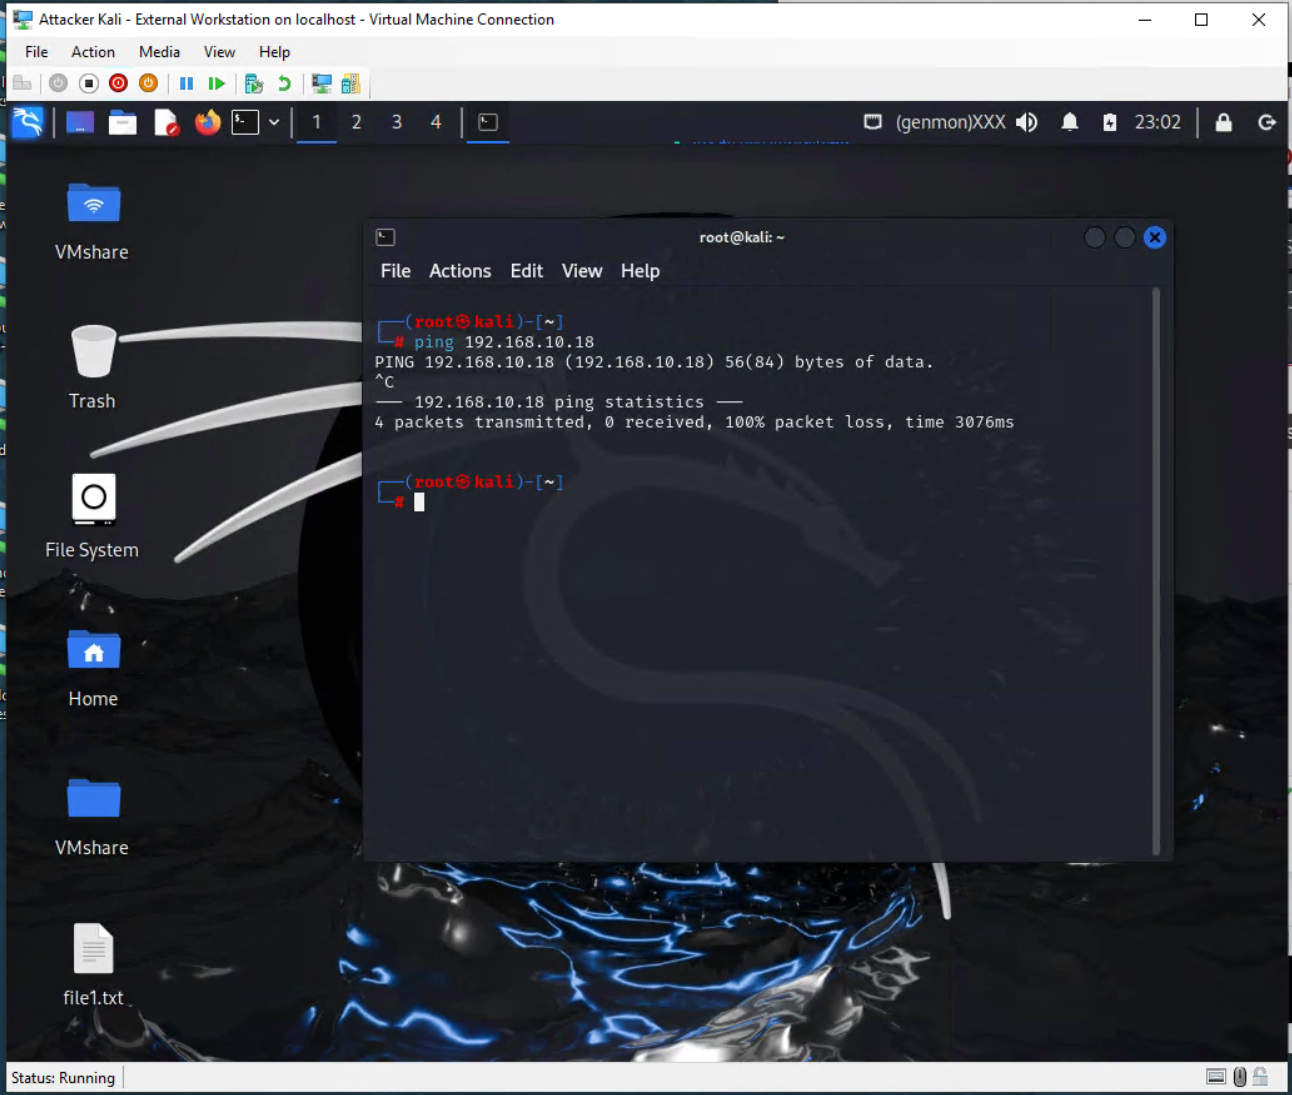
- Clear the previous firewall policies and configure the pfSense firewall to block all ICMP traffic from External Kali to the LAN side.
| Rule # | Interface | Action | Source IP | Destination IP | Protocol(port # if appliable) |
Attach Two Screenshots (Mandatory)-
- A screenshot of the firewall rule that you have created in Pfsense for the above task
- A screenshot of the terminal where you have tested the rule is in effect or not.
[Add the screenshots for Firewall Rules and Ping test here]
Image c
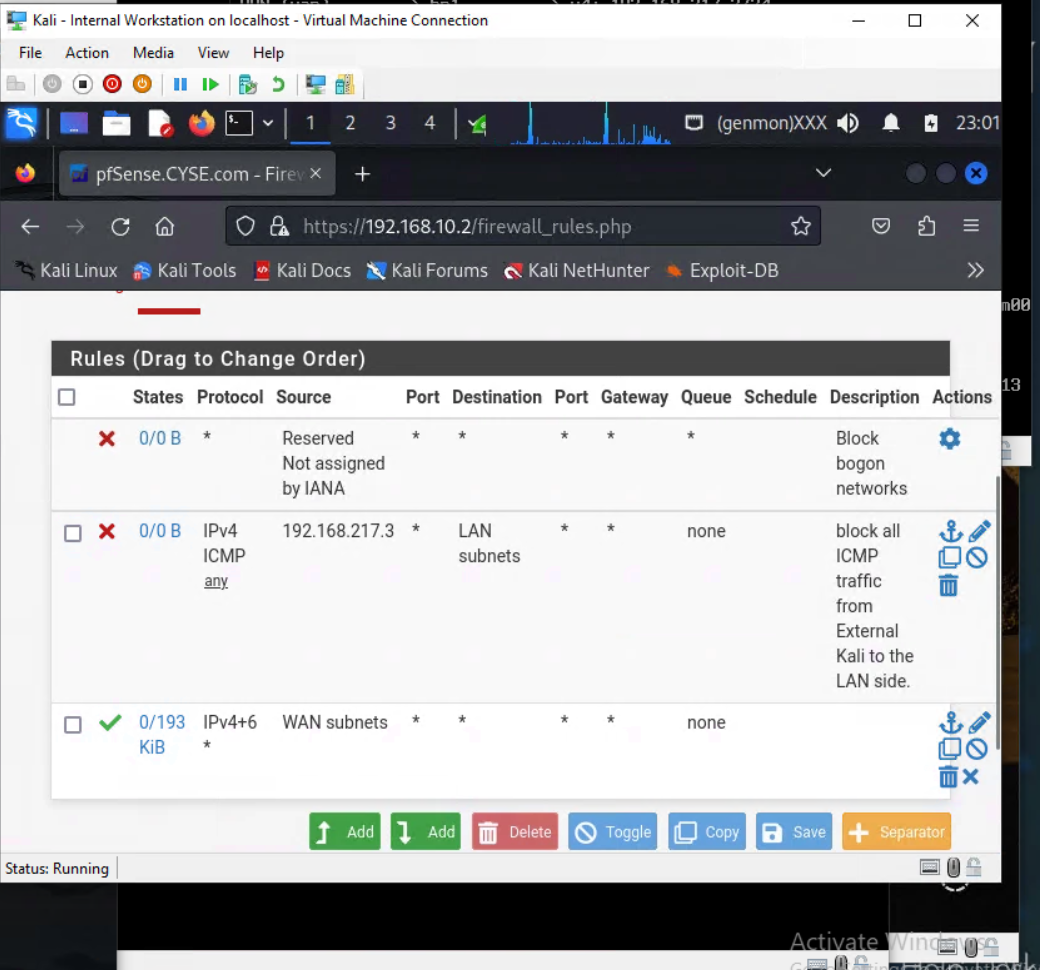
Image d
Add your Reflection (~150 words):
- What security advantages does blocking ICMP provide?
- What operational disadvantages might occur?
Blocking ICMP traffic can provide some security benefits by limiting how much information an outside device can collect about a network. Attackers often use ping requests to discover active systems before performing additional scans. By blocking ICMP, a firewall can make basic network discovery more difficult and reduce certain types of ICMP-based attacks or unwanted traffic. However, blocking ICMP also creates some operational disadvantages. Network administrators regularly use ping to check whether devices are reachable and to troubleshoot connectivity problems. If ICMP is blocked, it becomes harder to tell whether a device is offline or whether the firewall is simply preventing responses. Some ICMP messages are also important for normal network operations, including reporting errors and helping with Path MTU Discovery. Overall, blocking ICMP can reduce unnecessary exposure, but it should be done carefully. A better approach may be to restrict unnecessary ICMP traffic while allowing specific diagnostic messages when needed.
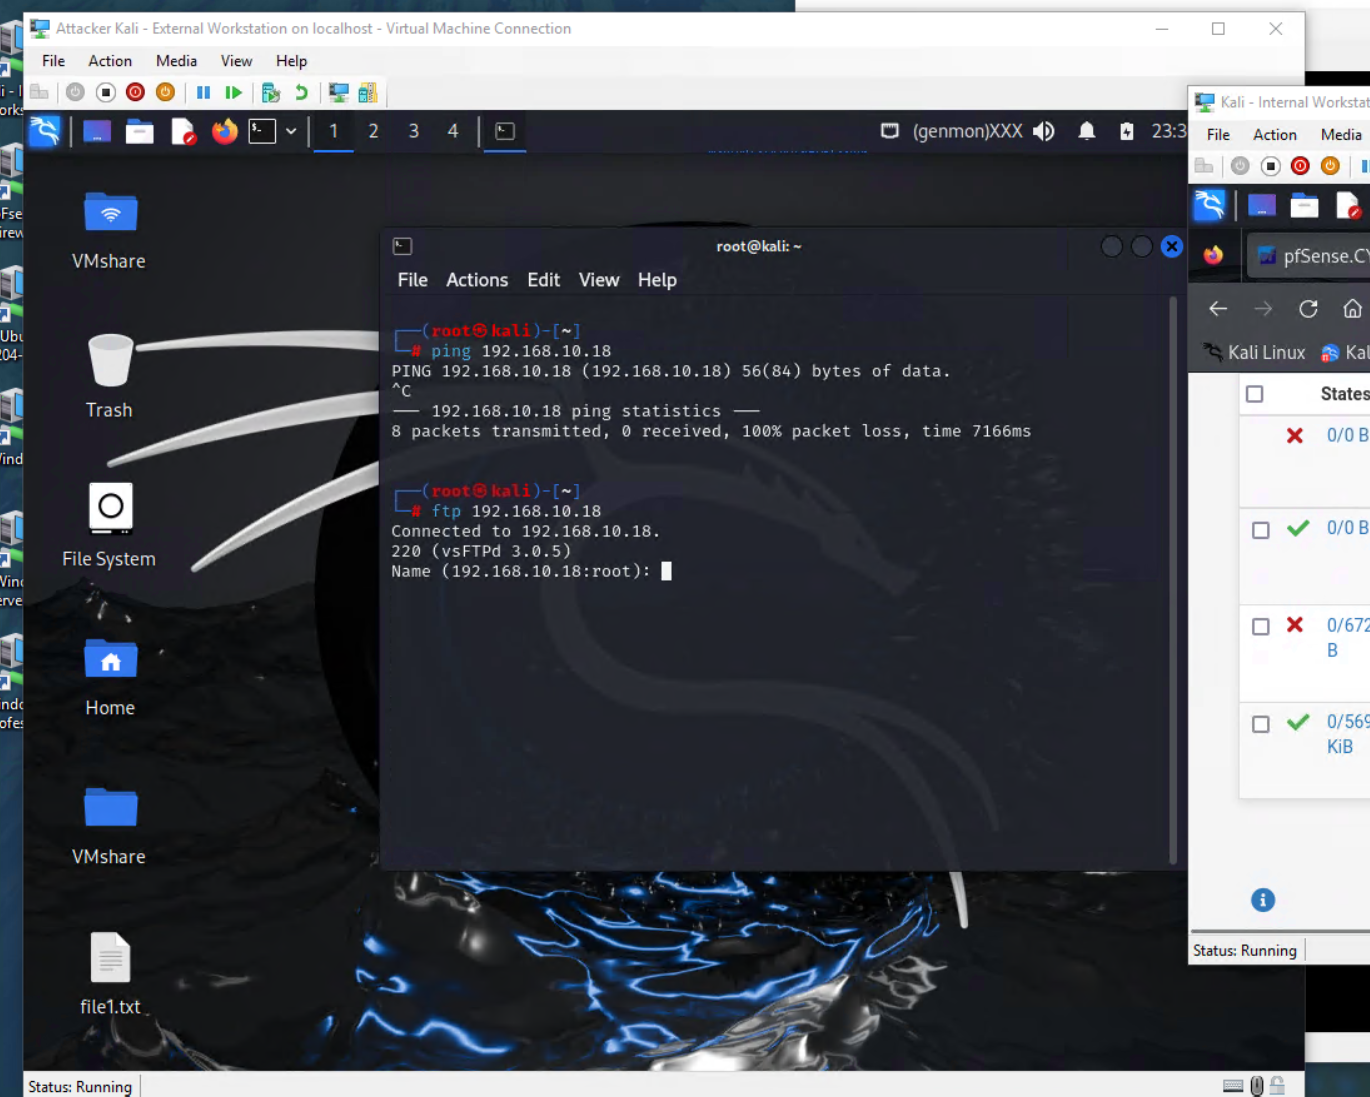
- Clear the previous firewall policies and configure the pfSense firewall to block ALL traffic from External Kali to the LAN side, except for the FTP protocol directed towards Ubuntu. You can add more rows in the table here, if necessary.
| Rule # | Interface | Action | Source IP | Destination IP | Protocol(port # if applicable) |
| 1 | WAN | pass | 192.168.217.3 | 192.168.10.18 | 20/21 |
| 2 | WAN | block | 192.168.217.3 | any | all |
Attach Two Screenshots (Mandatory)-
- A screenshot of the firewall rule that you have created in Pfsense for the above task
- A screenshot of the terminal where you have tested the rule is in effect or not.
Image e
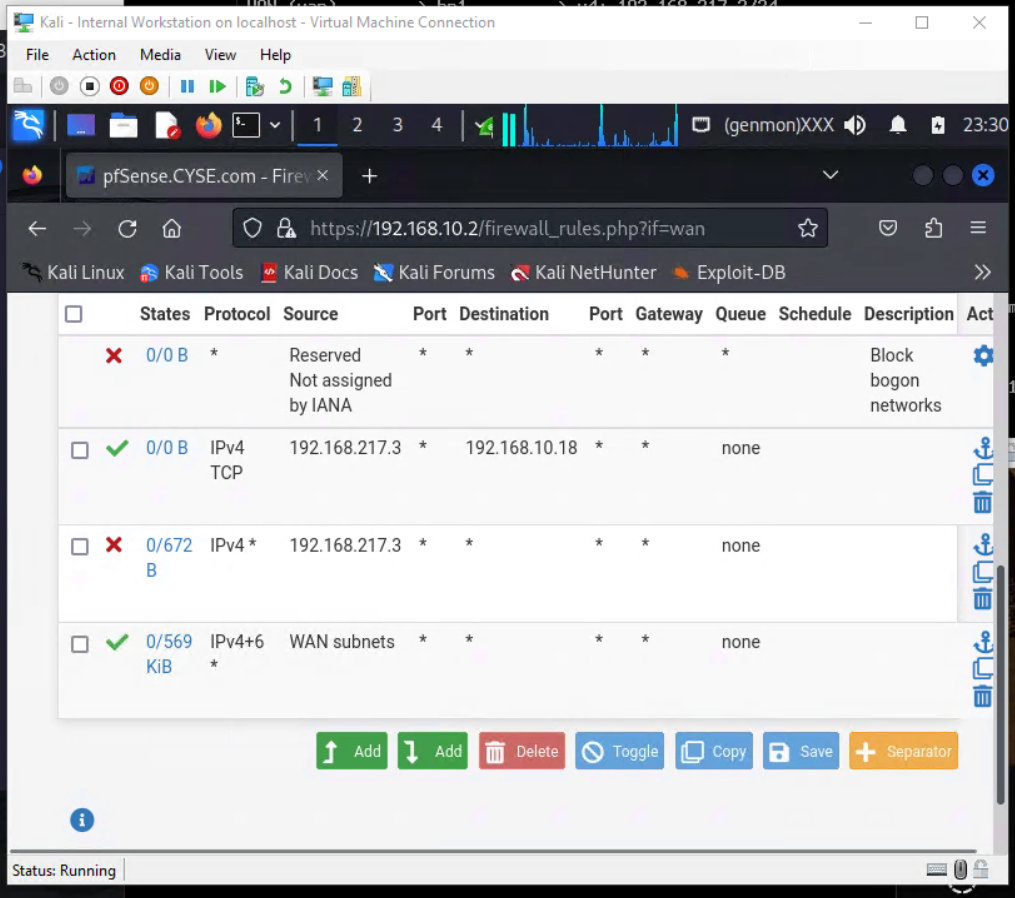
Image f
- Keep the firewall policies you created in Task B.3 and repeat Task A.1 to rescan the subnet using nmap in External Kali.
Image 4
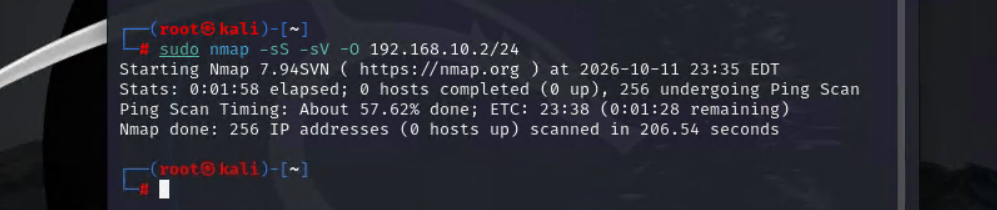
Now, compare the results/ findings, and complete the following table and add your reflection as asked here:
| Before Firewall Rules | After Firewall Rule |
| Open Ports 21, 22, 53, 80,135, 139, 443, 445, 8000, 8089 | none |
| OS Detection Accuracy Accurate detection results | none |
| Service Enumeration Accurate Service identifications | none |
Write in your own words (~ 200 words) explaining:
- Why does Nmap show “filtered” instead of “closed”, if there is any.
- How firewall behavior affects scan results
- What information is hidden from attackers
After setting up the firewall rules in pfSense, I used Nmap to scan the network again and compare the results to my first scan. The goal was to see how the firewall changed what an outside computer could learn about the internal network. One major difference was that some ports showed up as filtered instead of closed. A closed port means the computer responded but no service was running on that port. A filtered port means Nmap could not tell if the port was open or closed because the firewall blocked the response. In this lab, the firewall blocked most traffic from External Kali but still allowed FTP connections to Ubuntu. The firewall also affected Nmap’s ability to detect the operating system and identify running services. Since Nmap needs responses from the target computer to collect this information, blocking those responses makes it harder to get accurate results. Overall, the firewall helps protect the internal network by limiting access and making it harder for attackers to gather information. However, it does not remove all vulnerabilities from the systems. It mainly helps reduce the number of services that outside devices can access.