Assignment 10 – Networking Basics

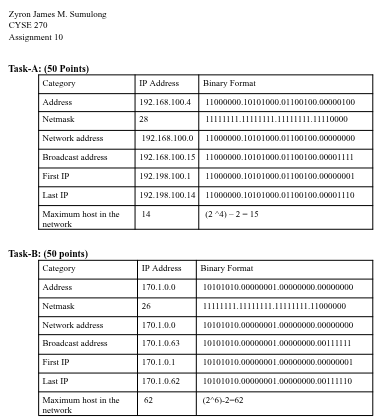
Understanding subnetting takes time and practice. Using the methods covered during the class,
fill in the following tables for Network, broadcast, first IP, Last IP and Max. Hosts in the
network.
The column for IP address should be in Decimal format for each, except number of hosts. (Refer
to the examples in the slide for week 10-Networking Basics)

Reflection

This assignment was a great refresher for me as I learned about subnetting during my time in the Navy. In the present time, I am a network engineer and understanding subnetting is crucial for my job as you utilize it to design and manage IP address schemes.

Assignment 4 – Group and User Management

Goal:
The goal of this lab is to familiarize students with the fundamental tasks of managing user
and group accounts in Linux. By completing this lab, students will gain practical experience
in creating, modifying, and deleting accounts, as well as managing group memberships
and permissions, which are essential skills in system administration and cybersecurity.
Submission Instructions:
• Complete all tasks in Task A and Task B on your chosen Ubuntu/Kali VM.
• Take screenshots for each step as evidence of successful command execution.
• Save all your screenshots and results in a single PDF or Word document.
• Ensure that all commands are executed correctly and include detailed explanations
for each step taken.

In this assignment, you should replace xxxxx with your MIDAS ID in all occurrences.
Task A – User Account management (8 * 5 = 40 points)
1. Open a terminal window in VM and execute the correct command to display user account
information (including the login shell and home directory) for the current user using grep.
2. Execute the correct command to display user password information (including the encrypted
password and password aging) for the current user using grep.
3. Create a new user named xxxxx and explicitly use options to create the home directory
/home/xxxxx for this user.
4. Set a password for the new user.
5. Set bash shell as the default login shell for the new user xxxxx, then verify the change.
6. Execute the correct command to display user password information (including the encrypted
password and password aging) for the new user xxxxx using grep.
7. Add the new user xxxxx to sudo group without overriding the existing group membership.
8. Switch to the new user’s account.
Task B – Group account management (12 * 5 = 60 points)
Use Linux commands to execute the following tasks:
1. Return to your home directory and determine the shell you are using.
2. Display the current user’s ID and group membership.
3. Display the group membership of the root account.
4. Run the correct command to determine the user owner and group owner of the /etc/group
file.
5. Create a new group named test and use your UIN as the GID.
6. Display the group account information for the test group using grep.
7. Change the group name of the test group to newtest.
8. Add the current account (xxxxx) as a secondary member of the newtest group without
overriding this user’s current group membership.
9. Create a new file testfile in the account’s home directory, then change the group owner to
newtest.
10. Display the user owner and group owner information of the file testfile.
11. Delete the newtest group, then repeat the previous step. What do you find?
12. Delete the user xxxxx along with the home directory using a single command

Reflection
This lab focused on managing user and group accounts. I learned how to create and manage user accounts, modify user attributes, and manage group memberships. I utilized commans such as grep, usermod, groupadd, chown, and chgrp to manage account information, files permissions and groups.

Assignment 9 – Task Automation

Task A – Backup your system (Using crontab) [100 points]
Scenario: Performing system backup can be time-consuming, and the process is often
overlooked. For this scenario:
1. (10 Points) Create a new user Alice (with home directory).
2. (50 Points) Write a shell script that backups Alice’s home directory by creating a
tar file (tape archive), using the following steps:
a. Do the following:
• Take 2 inputs with their values- your MIDAS name and current date
(for example, midas=Mohammed).
• Create a variable named as filename that should be assigned the
value as MIDAS-date (example output after executing the script
would be like, Mohammed-2024.11.04-22.08.01.tar.gz).
• Using tar command, create a tape archive for Alice’s home directory
(/home/Alice) and the filename created above (in step-2-ii). (Please
learn about tar command in Linux for its usage)
b. Move the tape archive file/tar file (created in step 2-iii) to /var/backups/
directory using correct command in linux.
c. To optimize the disk usage, pick a compression algorithm (bz2, gzip, or xv) to
compress the tar file you created in /var/backups/ in the previous step-2b.
3. (30 Points) Create a crontab file to keep the scheduled task running for 3
minutes, then check the contents in the /var/backups directory.
4. (10 Points) Cancel the crontab jobs.

Reflection
This lab gave me experience with automating system backups using a shell script and scheduling task with crontab. A challenge I faced was setting up the cron job to automate the backup, but testing it and ensuring the scheduled task ran correctly helped reinforce my understanding of cron syntax.

Assignment 8 – Shell Script

Task A (Correct script (25 points) + result/output after executing the script (25 points)-
Conditional Statement
Write a shell script using nano or vi editor (eg, vi scriptname.sh) like below, that performs
the following task:
1. Add the Shebang (#!/bin/bash) as the first line in your script.
2. Read a number using read function
3. Using if statement, check if the input number is greater than 10, then print the message
“Input number is greater than 10”.
4. If the number is not greater than 10, then print the message, “Input number is not
greater than 10”.

Task B (Correct script (25 points) + result/output after executing the script (25 points) –
Shell Script to Create a new file
Write a shell script using nano or vi editor (eg, nano scriptname.sh) like below, that
performs the following task:
1. Add the Shebang (#!/bin/bash) as the first line in your script.
2. Reads the name of the file to check for a filename that exists.
3. Check whether the given input is a directory or regular file.
4. If the input is a directory and exists, then display the message “Directory exists”.
5. If the input is a regular file, then display the message “It is a regular file, and the file
exists” and display the contents of the file.
6. If the given input name in step-1 doesn’t exist, then create the new file with the given
name in step-1.

(Extra credit: 10 points) Add your name to the file (using redirection operator ‘>’) and
display the contents for the newly created file.
7. Save and exit the editor and remember to make the script executable using the
command chmod +x scriptname.sh)

Reflection
This assignment gave me hands-on experience writing shell scripts reading user input and checking file types in Linux. I found it helpful to reinforce how scripts interact with the file system.

Assignment 7 – Storage Management

Part I– Check your file system (30 points).
Submit the screenshot for All the three steps.
Step 1. Execute the ls /dev/sd* command to see the current hard disk devices. [use sudo ]
Step 2. Execute the fdisk -l command to list the current hard disk partitions. [use sudo ]
Step 3. Execute the parted -l command to list the current hard disk partition table. [use sudo ]
Part II– Create a new virtual disk (30 points)
Submit the screenshot for All the three steps.
Step 1. In the VM setting, attach a new virtual hard disk with the size of 200 MB to our current Linux
VM. Name it as “your_midas.vdi” [ HINT: Please refer to the slides and discussion during the class for
week 7]
Step 2. Load this virtual hard disk to your virtual machine.
Step 3. Repeat the steps in Part I and highlight the differences after adding the new virtual hard disk.
Part III– Creating Partitions and Filesystems (60 points)
Submit the screenshot for All the three eight steps.
Step 1. Use the fdisk command to create a new primary partition on the new virtual hard disk attached
in Part II.
Step 2. Use the correct command to create an ext4 filesystem on the new partition.
Step 3. Repeat the steps in Part I and highlight the differences.
Step 4. Make a new directory named /cyse. And mount the new partition under this directory.
Step 5. Use the df command to check the mounting point of the new partition.
Step 6. Create a new file named for YourMIDAS.txt (replace YourMIDAS with your MIDAS ID) in the
directory /cyse and put your name in that file.
Step 7. Unmount /cyse directory.
Step 8. Check the contents in /cyse directory. What do you find?

Reflection
This assignment strengthened my understanding of Linux storage management by identifying file systems, adding virtual disks, and create partitions. Creating a new partition and formatting it was a great way to practice real-world storage tasks. Mounting the new partition, creating files on it, and then unmounting reinforced how Linux handles mounted storage.

Assignment 6 – File Permissions

Task A: Get accounts and groups ready (70 points)
Step 1. Create three groups- employee, payroll, and admin. (You may refer to the slides under Module
2 – Group Management)
Step 2. Create three user accounts with a specified home directory for Sophia, Olivia, and Emma. Set
the primary group for Sophia, Olivia, and Emma to “employee”, “payroll”, and “admin”, respectively.
And change their login shell to /bin/bash. Don’t forget to set their passwords.
Step 3. Create a shared group called “your_midas” (replace it with your MIDAS name) and set this shared
group as the above accounts’ secondary group. After this step, remember to check each user’s group
profile.
Step 4. Create a directory named /home/cyse_project, which is to be owned by the “your_midas” group
which is a shared group). After this step, remember to check the permission of this shared directory.
Step 5. Change the permissions of the /home/cyse_project directory to “rwxrwx—” using the octal
method so that only the project group members have access to this directory. After this step, remember
to check the permission of this shared directory.
Step 6. Switch to Sophia’s account. Change the default permissions using octal method with umask
command, to “rw-r—–” for Sophia when she creates a file or directory. Check the value of umask, and
permission of a new file after this step.
Step 7. Create a new file called “Sophia_homework” in the home directory of Sophia and put your name
in the file as content. After this step, remember to check the content and the permission of the new file.
(ls -l Sophia_homework)

Step 8. Copy “Sophia_homework” to the /home/cyse_project directory. After this step, remember to
check the permission of the file in the shared directory.
Step 9. Switch to Emma’s account. Try to read “Sophia_homework” in the /home/cyse_project
Directory.
Step 10. Exit out of Emma’s account and Sophia’s account.
Task B: Set SGID permission (15 points)
Step 1. Switch to root or the regular user’s account. To allow group members to access the files shared
in the shared directory, you need to fix the sharing issue by setting the correct SGID group values to
/home/cyse_project directory.
Step 2. Switch to Sophia’s account. Copy “Sophia_homework” to the /home/cyse_project directory as
“Sophia_homework2”.
Step 3. Switch to Emma’s account. Try to read “Sophia_ homework2” in the /home/cyse_project
directory.
Task C: Unset SGID permissions (15 points)
Step 1. Switch to root the regular user’s account. To disallow group members to access the files in the
shared folder, you need to fix the sharing issue by setting the correct SGID group values to
/home/cyse_project directory to remove the group user read permission.
Step 2. Switch to Sophia’s account. Copy “Sophia_homework” to the /home/cyse_project directory as
“Sophia_homework3”.
Step 3. Switch to Olivia’s account. Try to read “Sophia_home3” in the /home/cyse_project directory.

Reflection
This assignment allowed me to practice managing user accounts, groups and permissions in Linux. I was able to create a shared group and set that up for a secondary group membership, allowing me to control shared access to resources. This assignment gave me a solid foundation in managing user and group access, which in return, will be useful for maintaining secure systems.
Assignment 5 – Password Cracking

The goal of this lab is to test the strength of different passwords.
Task A – Password Cracking
1. Create 6 users in your Linux Terminal, then set the password for each user that
meets the following complexity requirement respectively. You should list the
passwords created for each user. [6 * 5 = 30 points].
1. For user1, the password should be a simple dictionary word (all lowercase)
2. For user2, the password should consist of 4 digits.
3. For user3, the password should consist of a simple dictionary word of any
length characters (all lowercase) + digits.
4. For user4, the password should consist of a simple dictionary word
characters (all lowercase) + digits + symbols.
5. For user5, the password should consist of a simple dictionary word (all
lowercase) + digits.
6. For user6, the password should consist of a simple dictionary word (with a
combination of lower and upper case) + digits + symbols.
Remember, do not use the passwords for your real-world accounts.
2. Export above users’ hashes into a file named xxx.hash (replace xxx with your
MIDAS name) and use John the Ripper tool to crack their passwords in wordlist
mode (use rockyou.txt). [ 40 points]
3. Keep your john the ripper cracking for 10 minutes. How many passwords have been
successfully cracked? [30 points]

Reflection
This assignment emphasized how easily weak passwords can be cracked. I created multiple users with varying password strengths and learned how different combinations affect password security. Overall, this assignment reinforced the significance of strong, complex passwords in cybersecurity.

Assignment 3 – Working with vi editor

Goal
• Practice using the vi editor.
Notes:
• Remember the “modes” in the vi editor.
• You may use the “Escape” key to return to command mode if you get confused and need
to start over.
Submission Instructions
• Take screenshots for each step you perform and write down the correct
command corresponding to each step number. Submit this in a PDF file.

Task: vi Practice on Kali Linux (20 * 5 = 100 points)
Open the terminal in your VM, then complete the following tasks. Please take the screenshots
of all the necessary commands that you execute for each step and submit the screenshots
with their step number in a pdf file.
NOTE: You may write the correct vi editor commands, if screenshot is not applicable. Please see
the note added to some steps below.
1. Copy the file /usr/share/doc/zstd/copyright to your home directory. Screenshot
2. Perform a long list in your home directory using the correct command. Screenshot
3. Open the file copyright in a vi-editor using vi command. Screenshot
4. Move to line 15, then insert your MIDAS ID in the same line with the following format:
****XXXX****(replace XXXX with your own MIDAS name). Screenshot + Write
Command.
5. Return to the command mode. Write Command
6. Open a new line below the current line using correct command (please refer to slides
with the list of commands used in vi editor). Screenshot + Write Command.
7. Return to the command mode. Write Command
8. Use command to Insert “****XXXX ****” five times. Screenshot + Write Command
9. Use command to return the top of the file. Screenshot + Write Command
10. Move forward three sentences. Screenshot + Write Command
11. Move forward four words. Screenshot + Write Command
12. Search for the word example or any word existing in the document that you are using
for lab-3. Screenshot + Write Command

13. Continue to the next occurrence of the search term example. Screenshot +
Write Command
14. Delete the current word, example. Screenshot + Write Command
15. Delete the current line. Screenshot + Write Command
16. Use command to jump to the end of the file. Screenshot + Write Command
17. Copy line 16 and paste the text at the end of the document. Screenshot + Write
Command
18. Replace all occurrences of http with HTTP throughout the document. Screenshot +
Write Command
19. Save and quit the document. Screenshot + Write Command
20. Rename the file copyright to copyright_cyse270. Screenshot + Write Command
Please note:
Make sure you highlight and annotate important information.

Reflection
In this assignment I was able to utilize commands to navigate directories, list files, copying, renaming, and deleting files. Overall, this lab was a great way to practice commands for file management tasks

Assignment 2 – Working with Command Line

Instructions:
1. Execute the correct commands for all the steps listed below.
2. Take screenshots after completing each step.
3. Submit your screenshots in a single Word or PDF file.
4. Clearly label each screenshot with the corresponding step number.
Steps:
1. Open a terminal window.
2. Display your current working directory.
3. Using an absolute pathname, switch to the /etc directory.
4. Using a relative pathname, move to the /etc/skel directory.
5. Using a relative pathname, move up one directory.
6. List the files in the current directory.
7. Perform a “long display” listing of the files in the current directory.
8. List all the files in the current directory that begin with the letter s.
9. Run the command that will determine the type of contents in the /etc/group file.
10. Display only the last five lines of the /etc/group file.
11. Execute the command to return to your home directory.
12. Make a directory named data in the current directory.
13. Copy the /etc/passwd file into the data directory.
14. Copy the /etc/ppp directory into the current directory (and ignore any “Permission
denied” error messages).
15. Rename the ppp directory that is located in the current directory to peers.
16. Execute the command (ls) to verify the change in the name of the directory.
17. Create a new empty file named test in the data directory.
18. Delete the data/passwd file.
19. Delete the peers directory.

Reflection
For this assignment I performed a series of tasks to manage directories and files in Linux. I learned how to use commands to navigate directories. This assignment gave me hands on experience with managing and files and directories within the terminal.

Assignment #1 – Install Linux VM

Overview
The goal of this lab is to guide you through the process of installing the operating system
that you will use for the remainder of this course.

Task A: Create a Linux VM
Install Kali Linux VM in Oracle Virtual Box.
a. Install Kali Linux as your virtual machine (VM) operating system.
Note: During the VM creation process, you can allocate different amounts of memory and
CPU cores depending on the hardware configuration of your physical computer.


Task B: Command Practice
Once you have installed the VM, follow these steps:
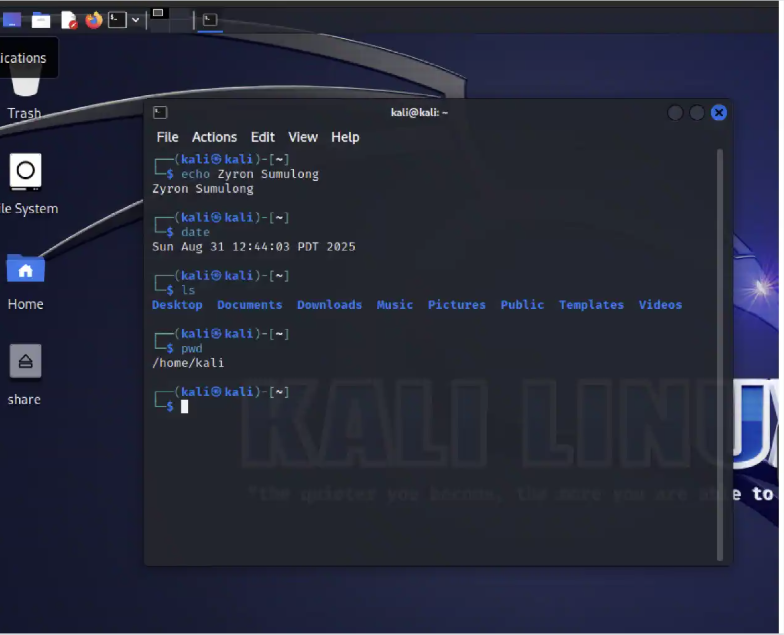
Open the terminal in your VM. Execute the following commands and briefly explain what each command does:
a. echo “your_name” (replace “your_name” with your actual name)
b. date
c. ls
d. pwd

Reflection
In this lab I was able to learn key skills that included setting up a VM and familiarizing myself with essential Linux commands. This lab was a great introduction to using Linux and provided valuable practice with basic commands.