I decided to make a firewall on my current Kali Linux VM. Rather than use an application like pfSense, I chose a host-based firewall. While some of the work I completed in my classes was related to this, much of it was new, so I used several resources, including some AI, to help me progress while still learning from the project. I wanted to start with something simple, so I opted to set up and test a UFW (Uncomplicated Firewall). I have worked with pfSense and setting up firewalls before (including configuring my own on my PC in the past, but I have only set up a UFW once, quite some time ago, so this was a fun project.
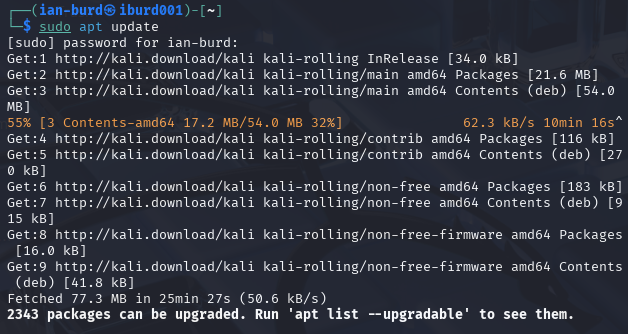
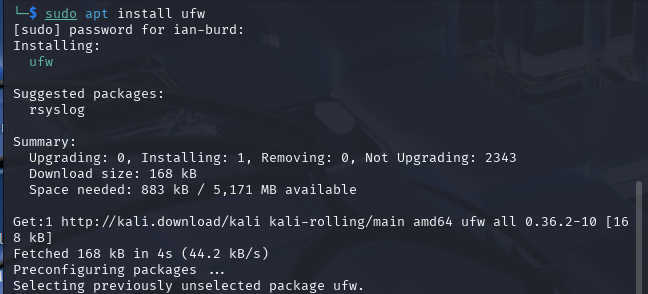
Step 1 – Update Kali, install UFW and Enable UFW;

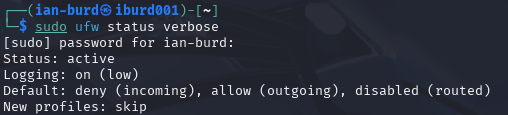
Step 2 – Establish a Baseline:
Establishing a baseline involves checking the current (often default) configuration before making changes. This is what I am doing with my firewall next. I will be checking my current configuration before making any changes.

Netid: Type of Network Connection.
State: Current State (such as LISTEN).
Recv-Q (Data waiting to be received).
Send-Q (Data waiting to be sent).
Local Address:Port: Kali VM’s address and listening port.
Peer Address: The computer it is connected to.
With this baseline established, as mentioned before, I was able to gain an understanding of how this UFW is configured before any changes, security or otherwise, are made. Establishing a baseline is important in more than just firewalls, and is especially important in monitoring situations. Generally, users need to establish a baseline to know what normal looks like. This allows for easier detection of anomalies or behavior that strays suspiciously far from normality.
Step 3 – Configure the Firewall:
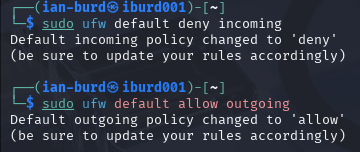
Next, I created a simple ruleset for the uncomplicated firewall. I needed to deny incoming traffic and allow outgoing traffic to my Kali VM. The commands to do this were relatively straightforward and intuitive.
Step 4 – Allow SSH:
While this step is not necessary due to the fact that this firewalls is being built simply as a basic lab, I still opted to allow SSH, in case I decided to expand the project beyond it’s current scope later down the line. This step could, however be skipped in order to get a test service set up sooner.
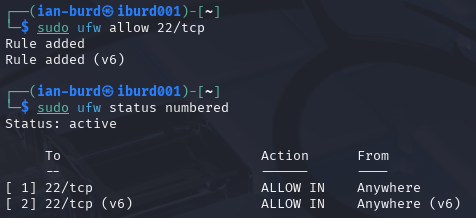
These commands enable the use of SSH through Port 22 and request its status information. Based on the information provided, the rule is active and allows TCP through anywhere, not any one particular IP address. This rule, combined with the previously created default rules, blocks all incoming traffic except for traffic on TCP Port 22, or SSH.
Step 5 – Create a Temporary Test Service
Next, to ensure that the firewall is working properly, we need to test it. To do this, I opted to create a temporary Python web server. Testing the firewall ensures that the configurations are working properly and provides evidence of this.

Step 6 – Find my Kali IP
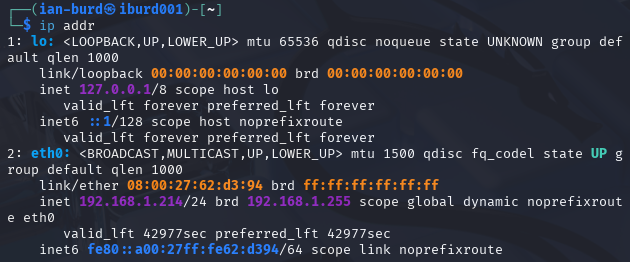
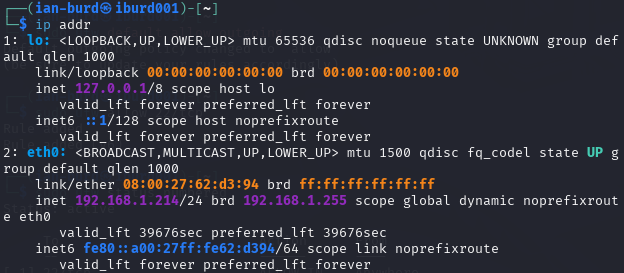
To do this, I needed to open up a second terminal to ensure that the web server I need to have up and running does not shut down, as it is needed for testing. To find my IP again, I can use the same command as before ‘ip addr’.
Step 7 – Test Port 8080:
To do this, I needed another VM, not the same Kali machine I have been building the firewall on. This is to ensure that the incoming traffic rule is working as it should be. Once the other machine was up and running, there were a few commands I needed to run. I opened up an Ubuntu Machine, found the IP address.
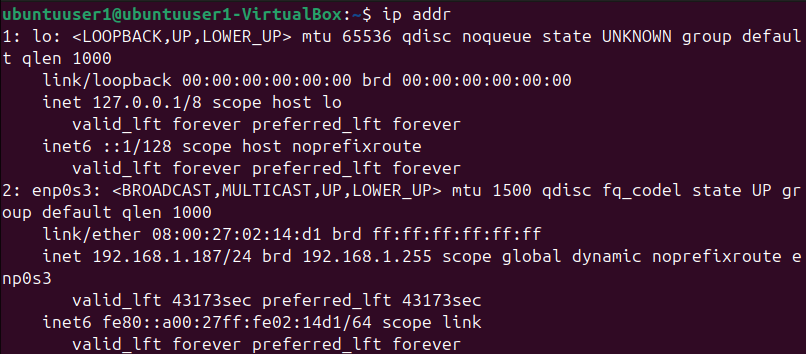
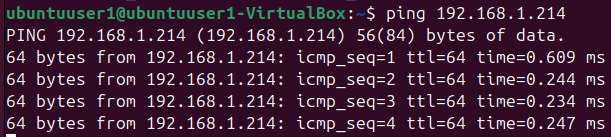
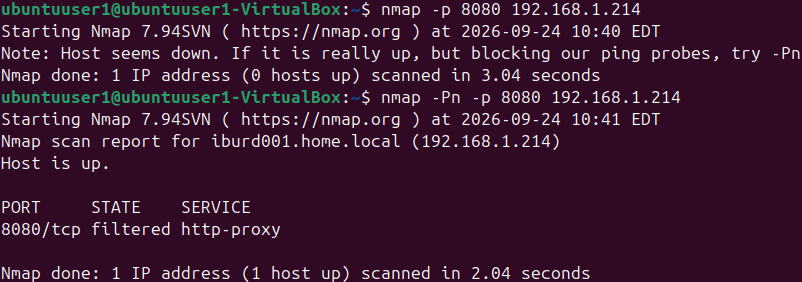
See how TCP port 8080 was listed as a found port, but its state says ‘filtered’? This means that our firewall is working as it should be, as it is blocking incoming traffic as its rules state.
Step 8 – Test Port 8080, with a firewall rule set to ‘allow’:
I needed to set up a new rule in my Kali VM to allow port 8080 traffic into my VM to test if running a port scan on my Ubuntu machine using Nmap would now show the state as ‘open’ rather than ‘filtered’.
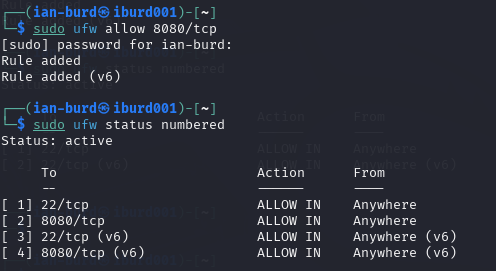
Step 9 – Test the Nmap Scan on Ubuntu with new Kali Firewall Rules:
Next, I went back to my Ubuntu VM and ran the same Nmap command as last time “nmap -Pn -p 8080 <kali IP> and got the following information.
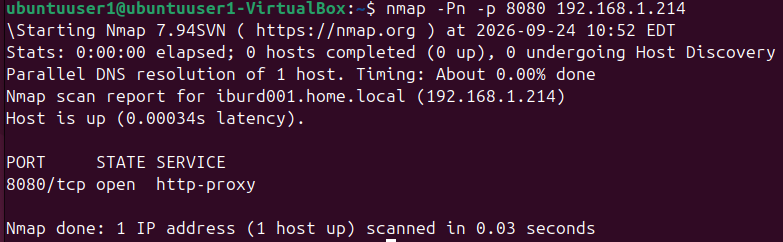
Step 10 – Remove the test rule and re-test the Nmap scan:
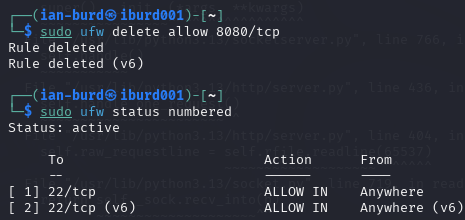
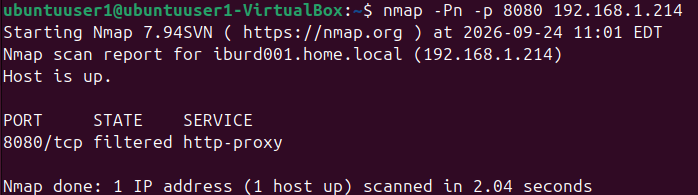
Next, I wanted to test what would happen if I deleted the firewall rule that explicitly allowed port 8080 traffic. If it was working as intended, the status of the next Nmap scan would go back to ‘filtered’ to show that the firewall was once again filtering out the traffic from TCP Port 8080.
I returned once again to my Ubuntu machine and ran the same nmap scan: “nmap -Pn -p 8080 < Kali IP>”
Project Reflection:
This project helped me gain a stronger understanding of how host-based firewalls work to control network traffic. Throughout this project, I configured an Uncomplicated Firewall (UFW) on a Kali Linux Virtual Machine, set incoming traffic to be denied by default, then created a rule to explicitly allow SSH traffic. Then, I used an Ubuntu VM and Nmap to test a temporary web server, running on port 8080. I altered the specific firewall rules regarding traffic over port 8080 and re-ran the Nmap scans several times to verify that the firewall was working as intended. I had some prior knowledge of firewalls from past classes during my time at Old Dominion University, but most of the knowledge was related to pfSense and Windows Defender firewalls, so this was a great learning opportunity to expand my knowledge of host-based firewalls.
I ran into a few issues with VMs not being updated or Nmap not being installed correctly, but these issues were easy to work past and provided useful insight into basic troubleshooting. Overall, this was a great learning experience and a fun project to work on. It was a simple project, but one that provided relavant knowledge and experience when pursing a carrerr in Cybersecurity.