

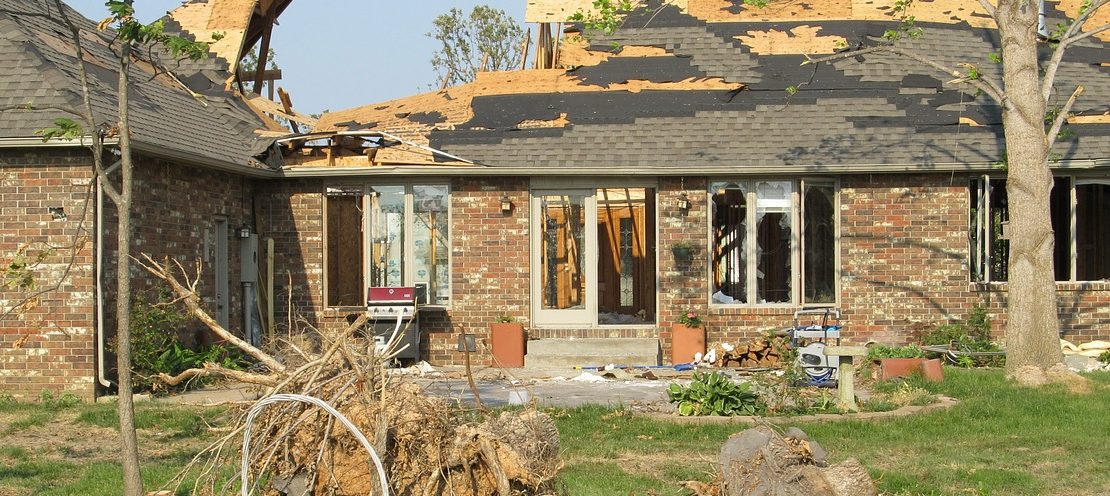
5 Factors to Consider When Protecting Your Property
Protecting your property and protecting your family goes hand in hand, since your house may be able to provide shelter from most weather conditions and perhaps even severe conditions. It’s never too early to prepare, and you can take several basic steps right now to protect your family and your home from disaster. By strengthening your house, you can reduce the risk of damage to your home and possibly reduce insurance premiums. The amount of protection your house can provide from a natural hazard is limited by a number of factors that you should very carefully consider:
The Severity of the Hazard Event
Protecting your home against a northeaster or a tropical storm is much easier than against a major event such as a Category 2 hurricane. For stronger storms, eliminating all damage is very difficult, so the main goal is to significantly lessen the amount of damage that could occur. Each and every small improvement you invest in your home can make a difference. The more small improvements you make to your home, the less likely there will be severe damage during minor events.
Your Location
Buildings in proximity to water are much more likely to flood, even during minor storm events. These flooding events can threaten you and your family, and evacuation should be considered even during minor events. In addition, if your home is close to an open beach, a large bay, or a large marshland area, the force of the wind can be much greater than if the house were surrounded in all directions by buildings, other homes, and/or trees.
How and When Your House Was Built
Building codes adopted by some counties and communities require new houses to have connectors that create a continuous load path from the roof to the wall to the foundation. Virginia adopted the 2003 International Building Code (IBC) and International Residential Code (IRC), which require construction in areas where wind speeds can exceed 100 mph to be designed for high winds in accordance with any one of several technical reference documents, all of which usually require help from an engineering professional. Because of this requirement, many newer homes in coastal areas are generally much stronger than those built before this requirement was in effect. It is important to note, however, that building codes provide minimum requirements, not best practices. There have been several revisions to the county building code since 2003. However, many of the buildings in the state are older than 10 years and thus built without the benefit of the 2003 IBC requirements.
How Your House is Maintained
Maintenance of your house is important. Painting the exterior every five years protects the wood and prevents rot, which can weaken the structure. Termites can also weaken a wood-framed house. If the wood in the house is rotten or has severe termite damage, it will be more difficult and more costly, or even impossible, to strengthen the home. In the coastal areas of Virginia, there are many places where houses are on crawl spaces and where standing water or high water tables are prevalent. It is important to keep moisture from intruding into the wood of the home and causing decay. Proper maintenance will extend the life of a house in more ways than one.
How You Strengthen Your House
Even if your house was not built with hurricane clips or does not follow continuous load path concepts, there are many small steps and some major ones that can be taken to retrofit or address how to strengthen your existing home. The remainder of this section concentrates on many of the options to consider when strengthening your home, whether you’re designing a new home or planning a retrofit of an existing home, including:
- roof-to-wall connections (e.g., hurricane clips), improving the connection of the roof-sheathing to roof-framing members (rafters or trusses), and reinforcing gable ends with bracing
- wall-to-foundation connections
- stronger connectors than those required in the current building code
- flood retrofit measures (strengthening existing foundations and piers for flood forces, elevating mechanical equipment, and elevating structures)
- protection for windows, doors, and garage doors
- alternate sources of back-up electricity.
You may be able to perform the work for many of these measures. However, if the work is beyond your capabilities, consider hiring a licensed structural engineer and/or architect to plan the strengthening and retrofitting program for your home and a licensed contractor to do the installation or construction. Even if you do this work yourself, it is best to contact one or more of these professionals first to obtain guidance and details specific to your house. The complete topic of retrofitting existing homes has been tackled by numerous non-profit organizations and governmental agencies and the result of their hard work fills many reports and several excellent videos.
The following sources can give you more information:
- The Insurance Institute for Business and Home Safety (IBHS) includes numerous articles, reports, and videos that are extremely informative and explain preventative measures that reduce losses from all natural hazards, including hurricanes[1]. IBHS has a retrofit guide that is used in their FORTIFIED for Existing Homes Program.
- The Mitigation Directorate of FEMA is continuously researching hurricane-resistant designs and building methods for the construction of residences and the performance of residences that have been subjected to hurricanes. All of the government publications are available for free and most can be downloaded from the FEMA website and the agency’s Safer, Stronger, Protected Homes and Communities page [2]. FEMA released a publication on retrofitting existing homes called Wind Retrofit Guide for Residential Buildings (FEMA P-804), which is available at fema.gov/library.
It is very important to protect the envelope of your house from wind and rain. The wind from a coastal storm, especially a hurricane, attacks any weaknesses in the roof. Once a weakness is exposed, adjacent areas can be more easily damaged and peeled away. Windows can serve to protect that envelope, unless they shatter, which is almost certain to happen if they are unprotected [3]. Taping your windows will not protect that envelope. A broken window during a hurricane can be devastating in several ways: Besides the incoming hurricane-force wind and torrential rain in your living room, there is shattered glass and debris flying in from outside. It can make walking in your own house hazardous. Even more importantly, there is the problem with internal pressurization of your house. A door or window breach can potentially double the uplift forces on your roof and can significantly increase the chances that your roof will lift off [4]. Several FEMA hurricane mitigation assessment reports indicate that breaching of the building envelope and subsequent internal pressurization leads to progressive structural failure for many houses.

KEEP YOUR ROOF ON
The wind from a hurricane attacks any weakness in the roof. Once a weakness is exposed, adjacent areas can be more easily damaged and peeled away. Thus, strengthening the roof is important and it should be considered for new construction and replacement after its expected life.
Roof Framing/Truss Bracing
There are three ways generally that roofs and roof systems fail in high winds:
- Roof sheathing can be pulled off the roof framing by high-suction wind pressure.
- Roof framing can fail at the roof-to-wall connection.
- Gable end walls can collapse into the attic space or be pulled out from the exterior wall.
Failure of the roof sheathing can be prevented by ensuring the sheathing is adequately attached to the roof rafters or trusses. This can be done from the outside of the roof at the time the roof covering is replaced. Add nails (8d ring-shank nails are recommended) at a minimum spacing of 6 inches on center around the edge of the roof sheathing before re-applying the roof covering. The sheathing may also be secured to the framing from inside the attic by using closed-cell expansive foam to form a bond between the edge of the roof rafter or truss chords and the underside of the roof sheathing.
Roof-to-wall connections can be accomplished on existing homes in several ways:
- Roof sheathing can be removed while replacing the roof covering, and a connector can be attached from the exterior wall to each rafter or truss. The roof sheathing is then re-installed, and the roof covering is replaced.
- The soffit on the outside overhang can be removed, a new 2″x4″ board installed on the exterior siding parallel to the roof, a new connector attached to the rafter or truss, and then installed on the new board and the soffit re-installed.
- A section of drywall or interior wall and roof covering can be removed on the inside of the home, new connectors installed on the inside between the rafters or trusses, and then crown molding or other architectural treatment installed to cover the new connectors.
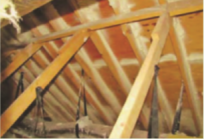
It is possible to significantly strengthen your roof by providing lateral and diagonal bracing to the rafter or trusses. This is particularly important for houses with gable-end roofs. This bracing can be done simply with 2″x4″ boards purchased at a hardware store. Figure below is from the FEMA brochure Against the Wind (FEMA 247), which can be downloaded at fema.gov/library.
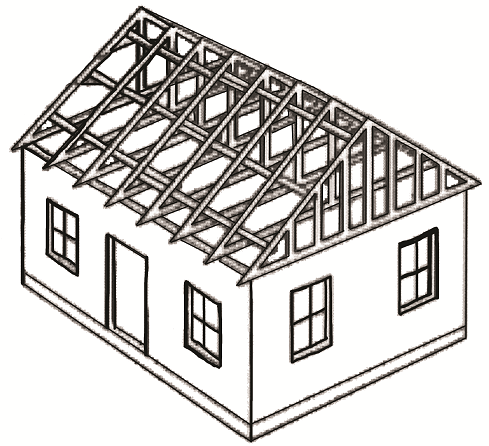
For lateral bracing, 2″x4″ boards are attached to the trusses that run the length of the roof. The 2″x4″ boards overlap over two trusses. Braces should be 18 inches from the ridge, in the center and at the base, about 8 to 10 feet apart. You or a professional can do this work, although this can be difficult with long pieces of lumber in small attics. This bracing should have been installed when the trusses were installed in newer homes.
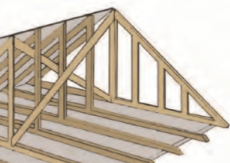
Another important type of bracing for your gable end involves making diagonal braces. Diagonal braces provide additional support against collapse of the gable end caused by high winds pushing (or pulling) on the gable end. Gable ends are more susceptible to high-wind damage because they are usually installed between the exterior wall of the house and the roof rafter or truss. There is a joint in the wood framing at that point, making the connection of the gable ends a weak link in the load path.
Hip-style roofs do not need as much bracing, as they are aerodynamically superior and they have the bracing built into the design of the structure. While gable end roofs have a flat end that is A-shaped, hip-style roofs have all four sides of the roof sloping towards the center of the roof. As a side note, there are small things you can do to strengthen the roof even if is relatively new. For example, if you climb in your attic and see nails that are supposed to attach the plywood sheathing to the truss have missed the truss, then you have found what could be a structural weakness. The joint can be strengthened with a wood epoxy or spray polyurethane foam. FEMA provides guidance on these subjects in its Homebuilders Guide to Coastal Construction (FEMA 499) and Wind Retrofit Guide for Residential Buildings (FEMA P-804). An additional source of information regarding roofs and how to reduce risks from high winds can be found at the IBHS website [5]. The site includes information on re-nailing roof decks, maintaining steep-sloped roofs, guidance for re-roofing, and choosing a roofing material.
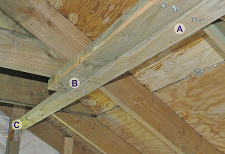
CONTINUOUS LOAD PATH CONNECTIONS
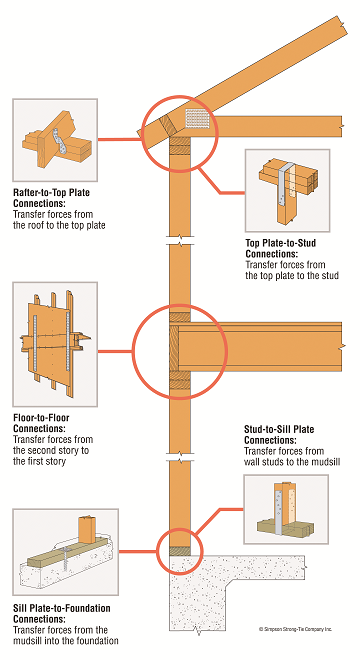
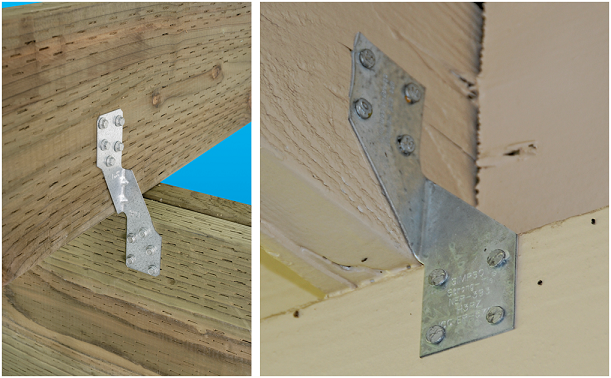
The continuous load path connection is analogous to a chain: Both are only as strong as their weakest link. Historically, the weakest link has often been the roof-to-wall connection. Thus, the hurricane clip was created. The concept of continuous load path connection is illustrated in the figure to the right. This connection ties your roof to your home’s foundation and helps to keep the roof from blowing off during a severe wind event.
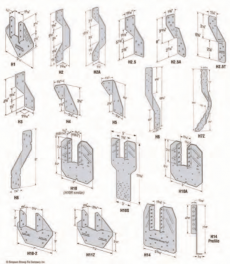
Naturally, all houses have some connection from the roof to the foundation; otherwise, they would fall apart. However, in some coastal areas, much stronger connections are now required in the form of straps, anchors, and hurricane clips to protect against extreme winds from coastal storms. A properly selected hurricane clip is required for each rafter. In addition, the rafters at gable end eaves should be strapped down. Exterior beams supported by corner columns also require strap down. For houses with post and beam roof construction, fasteners should be installed for roof rafter to roof beams, top of post to horizontal-ridge beam, and post-to-beam connections located at the exterior wall.
BUILDING BEYOND CODE REQUIREMENTS
Building beyond code requirements can minimize damage and result in a home that is more wind and flood resistant. For many homeowners, even minor damage of 15 percent or less can be an extreme hardship. After Hurricane Ike (2008) in Texas, FEMA conducted an assessment of both wind and flood building performance and determined the following:
As is frequently observed during Mitigation Assessment Team (MAT) investigations, damages to buildings and other structures are routinely produced by less than design wind speeds due to the following: lack of understanding of basic wind-resistant design and construction practices; insufficient codes and standards at the time of construction; insufficient or lack of design guides and/or test methods at the time of construction; and improper or non-compliant building modifications or lack of maintenance by the property owners. Overall, the damages observed by the MAT were consistent with typical wave damage patterns, where damage to properly designed and constructed elevated homes is generally minor until such time as the waves reach above the elevated floor system, at which point the damage increases dramatically with increasing water level and wave height. Performance of residential building foundations with regard to coastal and near-coastal hazards depended primarily on the residence having adequate elevation, proper construction, and proper foundation selection. If any of these criteria were not satisfied, performance suffered [6].
In designated coastal wind zones, recently built houses are required to have the complete load path connection. For older houses, it is possible to retrofit to add components of the connection. Each house is different but, in general, it will be easier and less expensive to put in hurricane clips than to do the foundation connection. Check with a licensed architect, structural engineer, or contractor to determine what is feasible for your house.
Strengthening the foundation to resist uplift will generally require the removal of interior finishes. The installation of uplift connections should be planned by a licensed structural engineer and only after they have inspected the home to understand materials and methods used to construct the home and have calculated the wind uplift requirements.
It is preferable to do both the roof to-wall connection and the wall-to foundation connection. However, if the wall-to-foundation connection is too difficult or expensive because of the way your house was built, installing only the roof-to-wall connection is better than doing nothing. Remember, the weakest link for many homes is the roof-to-wall connection, and thus the hurricane clip will make that weakest link significantly stronger and improve the performance of the home during weaker wind events. Should Virginia experience a design wind event of nearly 120 mph however, houses without a strong floor-to-foundation connection are still expected to fail.
SYNTHETIC ROOF UNDERLAYMENT
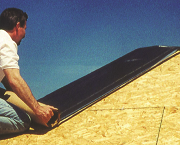
Until the 21st century, most residential sloped roofs received a layer of asphalt-saturated felt building paper underneath the roofing material. Mimicking the attributes of house wraps, synthetic roof underlayments are now available that serve the same function as a secondary weather barrier with better resistance to tearing, moisture, and ultraviolet rays than traditional roofing felt.
Recent natural disasters and subsequent rebuilding efforts have highlighted the versatility of synthetics as roof underlayments by providing a real-life test environment. After several hurricanes ravaged southern coastal areas of the United States, many people were forced out of their damaged homes. At the same time, large numbers of homes required quick roof repair and “drying in” to minimize further damage due to water intrusion. With limited resources, contractors triaged homes, repairing the critical components and installing synthetic underlayments as temporary roofing. The underlayments performed better than FEMA’s blue tarps and did not require removal and discarding when the new shingles were installed [7].
KEEP WATER OUT
Flood Prevention
Protecting your property from flooding can involve a variety of actions, from elevation to inspecting and maintaining the building to installing protective devices. Most of these actions, especially those that affect the structure of your building or their utility systems, should be carried out by qualified maintenance staff or professional contractors licensed to work in your state, county, or city. The most important information to know about your home when considering flood prevention techniques is the relationship between the base flood elevation (BFE) shown on the Flood Insurance Rate Map (FIRM) for your community and the elevation of your lowest floor (the one that would get wet if flooded).
FEMA’s National Flood Insurance Program (NFIP) website provides detailed information on flooding and flood risks, including a flood risk profile tool that will rate the flood risk for a specific address. The best way to reduce damage from floods for residential structures in a flood-prone area is elevation. An excellent source of information about floods and protecting your property from flooding is found on FEMA’s Ready–Prepare, Plan, Stay Informed website . Additional information is available in FEMA’s Coastal Construction Manual (FEMA P-55), Protecting Your Property from Flooding, Home Builder’s Guide to Coastal Construction (FEMA P-499), and Homeowner’s Guide to Retrofitting (FEMA P-312).
Wet Floodproofing
For those homes not located in a special flood hazard area and if local regulations allow, you could consider the option of wet floodproofing your home. Wet floodproofing means modifying the uninhabited portions of the house, such as a crawlspace, so that floodwaters can get in but won’t cause significant damage. It may be a practical solution for parts of the house that are not living space. Remember that wet floodproofing does nothing to alleviate the threat from fast-moving floodwaters, which are often a major cause of damage.
Wet floodproofing encompasses a variety of measures [8]:
- Use Flood-resistant Materials—Materials have differing abilities to resist flood damage. Flood resistance classifications have been developed for flooring, wall and ceiling materials, and the adhesives used to install them. These classifications are published by FEMA and are listed in FEMA Technical Bulletin 2: Flood Damage-Resistant Materials Requirements. Examples that can be very attractive and flood resistant include clay tile, stone, or brick with waterproof mortar; solid vinyl flooring with chemical-set adhesives; stained concrete; terrazzo; decay-resistant or pressure-treated woods; and rigid, closed-cell foam insulation.
- Create Flushable, Drainable Walls—In wet floodproofing, floodwater should be able to flow into and drain out of walls and other cavities to prevent damage from water pressure and keep the wall cavity from trapping contaminants. After flooding, there should be a way to drain, clean and dry these spaces easily to remove silt and contaminants and prevent the growth of harmful fungi and bacteria. Consider removable wide baseboards or wainscoting.
- Elevate Appliances and Utilities—Items to elevate include your outside air conditioner compressor, inside furnace or air-conditioning unit, washer and dryer (choose front-loaders if on platform), water heater, freezer, and electrical outlets and switches. Also substitute cooktop and wall ovens for freestanding range or drop in units. An appliance can be elevated by placing it on a sturdy, flood-resistant platform or a strong shelf, which is securely attached to a structural support that can withstand flooding. If wood is used, it should be solid, pressure-treated lumber.
- Install Barriers around Appliances—Build a mini flood wall around appliances where shallow-depth flooding occurs often or set the washer and dryer on sturdy plastic sheeting or bags that can be raised during a flood threat.
• Add a Storage Building above Flood Levels—Relocate some appliances to a new building built high enough to be safe from flood damage. Keep enough space available in it to store valuable furnishings during a flood threat. Construction of the building may be subject to regulation.
Keep these points in mind when you wet floodproof [9]:
- Activities that involve work on the electrical system, gas, or airconditioning compressor usually require the services of a licensed contractor. Check with your local permit official to find out about requirements in your area.
- Raising the electrical system above flood levels will protect it from water damage, but it won’t make it safe to have service turned on while water is in the building.
- Even when a home is allowed to flood, sewage backflow prevention is important to prevent the serious health hazards and more expensive cleanup procedures associated with that type of contamination. A backflow valve should be installed.
- Since wet floodproofing does not keep the structure dry, cleanup still is very important. Even if you successfully stop sewage backup through your plumbing, there is a good chance water coming in from outside has some chemical and biological contaminants. Disinfection, cleansing, and thorough drying are essential to remove contamination and to prevent growth of hazardous molds and decay.
- Wet floodproofing activities will not reduce your flood premiums, so the motivation for this activity should center on reducing the damage caused by flooding. During a flood event, you may still be required to evacuate by local emergency management officials.
Dry Floodproofing
When elevation is not an option, another way to protect a structure and its contents from flood damage is to seal the building so that flood waters cannot enter. Dry floodproofing is primarily for slab on grade buildings with concrete or solid masonry walls. It cannot be used to put residential structures in compliance with the National Flood Insurance Program. It may have application in sturdy, structurally sound buildings in areas of shallow, low-velocity flooding. Check with your state floodplain coordinator and local NFIP regulator for applicability. In addition, this flood protection method is not for buildings located in coastal high hazard areas like V zones or coastal A zones (as designated on FEMA Flood Insurance Rate Maps). These special flood hazard areas are not only subject to inundation by the 1-percent-annual-chance flood event, but are also subject to additional hazards due to storm-induced velocity wave action.
You should consult a design professional before undertaking a dry floodproofing project. Dry floodproofing is not effective when water velocities are high, when waves are present, or for rapidly rising water. Dry floodproofing is appropriate primarily for slab-on-grade buildings with concrete or solid masonry walls. Concrete and masonry are easier to seal, more resistant to flood damage, and stronger than other conventional construction materials.
Dry floodproofing encompasses a variety of measures:
- applying a waterproof coating or membrane to the exterior walls of the building
- installing watertight shields over doors, windows, and other openings
- anchoring the building as necessary so that it can resist flotation
- installing backflow valves in sanitary and storm sewer lines
- raising HVAC and electrical system components above the flood level
- anchoring fuel tanks and other storage tanks to prevent flotation
- installing a sump pump and foundation drain system
- strengthening walls so that they can withstand the pressures of flood waters and the impacts of flood-borne debris
- building with materials that are flood-resistant, i.e. can withstand flood waters for at least 72 hours (examples: concrete, ceramic tile, pressuretreated lumber, steel, metal, brick, epoxy paint, foam, and closed-cell insulation)
- ensuring wells are properly constructed to avoid contamination from floodwaters
Keep these points in mind when you dry floodproof:
- There are several disadvantages to dry floodproofing. Flood insurance premiums are not reduced for dry floodproofed residential structures. Ongoing maintenance is required, adequate warning time is required to close any openings, and the home must not be occupied during a flood.
- The height of your dry floodproofing should not exceed 3 feet. The pressures exerted by deeper water can cause walls to buckle or collapse. Before you use dry floodproofing to protect against greater flood depths, have a structural engineer evaluate the strength of your walls.
- If your dry floodproofing measures require human intervention before flood waters arrive, such as placing shields over doors and windows, you should have an operations and maintenance plan that describes all the actions that must be taken and lists the people who are responsible. It should also include a schedule of periodic maintenance that states how often the dry floodproofing measures will be inspected and who will perform the inspections.
- The cost of individual dry floodproofing measures will vary with the size, condition, and use of your building; the dry floodproofing height; and the extent to which you use contractors and engineers.
- In many cases flooding on a property can be caused by poor drainage. If this is the case, it may be of great benefit to address the drainage issue with the professional advice of a licensed civil engineer.
Protection of your home’s envelope from breaches during a windstorm is critically important, particularly to its vulnerable windows and doors. If your home is located in a high-wind zone, it is important that window coverings not only withstand hurricane-force winds, but also withstand windborne-debris impacts. The usual standard for impact resistance is known as the “Large Missile Impact Test.” Essentially, it determines whether a given covering can withstand the impact of a 9-pound 2″x4″ board fired at 30+ mph. Coverings should be tested and approved to meet industry standards for hurricane impact and should carry a label indicating such approval. Check with the manufacturer. Use only licensed contractors and reputable dealers selling products tested by reputable testing vendors.
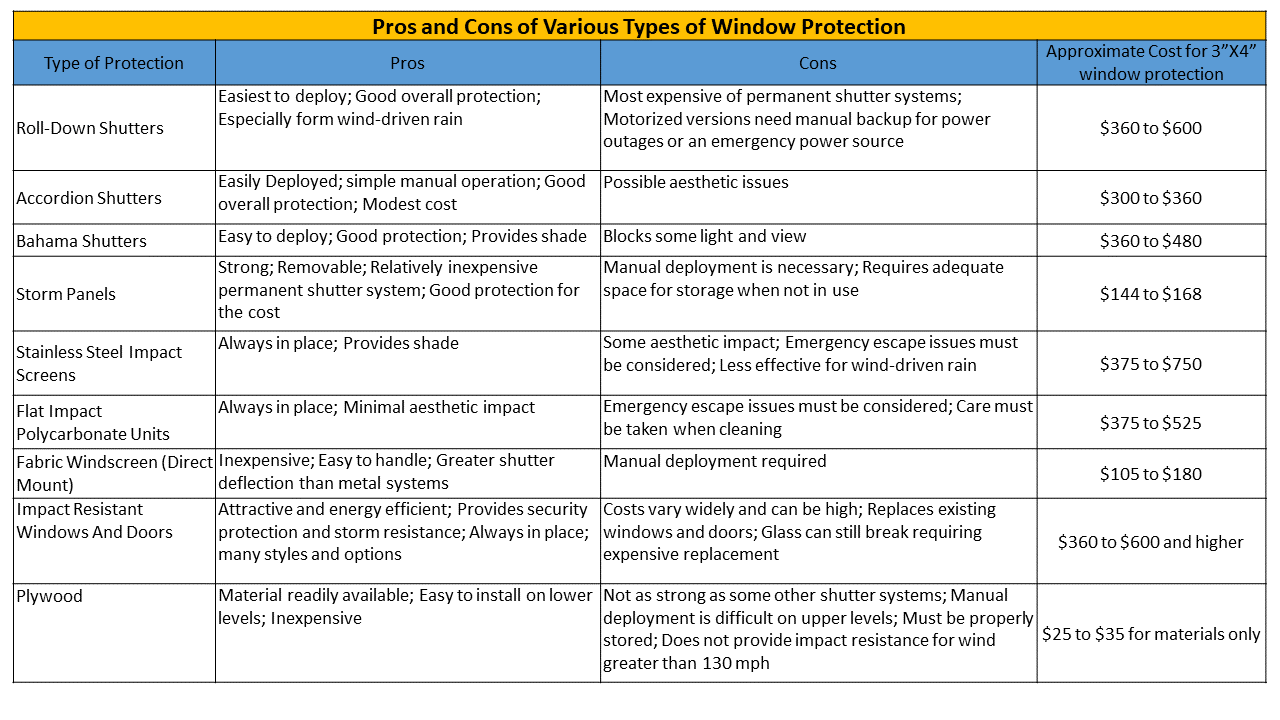
The International Hurricane Protection Association (a trade association group comprising manufacturers, contractors, and other industry professionals) has several tips regarding selection of products, selection of installing contractors, and other useful information on its website [10]. Several types of window and door opening protection systems are generically described below. Within each category, numerous reputable manufacturers provide different products, each with individual features, benefits, and costs. The prices shown are estimates for installed costs and represent local and nationwide averages as of May 2010. Pricing will vary between providers and change over time. You should consult with a competent contractor specializing in supplying and installing these systems.
Roll-down Shutters
Roll-down shutters represent the window covering type that is easiest to deploy and offers the best overall protection features. These are permanently attached to the building. The shutter consists of a movable “curtain” of slats that is held in place by vertical tracks. When not deployed, the shutter stores in a hood that is housed above the window or door being protected. Most of the components of roll-down shutters are made from extruded aluminum. Because the roll-down shutter makes solid contact with the window sill, patio deck, or other structure at the bottom of the shutter and its farthest extent of travel, this shutter type demonstrates the highest level of protection against wind-driven rain in addition to wind and debris. Rolldown shutters can be deployed using a variety of operators—both manual and electric motor types. These can be installed directly over windows and doors, or in some cases, at a balcony’s edge to form an enclosure.

Since roll-down shutters are easily deployed, they often are used on a regular (non-storm) basis for light control, insulation against heat and noise, or privacy and security. The variety of features and methods of operation leads to a wide range of costs for this shutter type. These shutters can be made for custom sizes and uses.
Accordion Shutters
One of the most commonly used shutter types in hurricane-prone regions is the accordion shutter. This is a permanently installed system with interconnected “blades” that operate between horizontal tracks. When not in use, the blades fold and are stored on either side of the door or window being protected. Accordion shutters are manually deployed and can be deployed from the inside of the home, if the opening is a single- or double-hung window or an in-swinging window or door. Installed prices range approximately $16 to $30 per square foot.
Decorative/Protective Shutters
For homeowners who wish to add a decorative flair to the home’s exterior while protecting windows against storm forces, Bahama (or Bermuda) shutters are available. These are most commonly made using extruded aluminum frames and louvers, although some composite materials have also been used in these types of shutters. Typically, these are finished using a durable exterior grade powder coating or automotive-grade polyurethane paint system.

While these shutter types imitate the design of traditional wood shutters, it should be noted that no wood shutter of either type has been tested and approved as opening protection since wood will not pass the “Large Missile Test.”
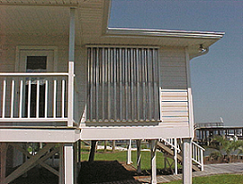
Storm Panels
Removable storm panel systems are one of the most widely used and costeffective systems available for opening protection. These consist of a series of panels, made from steel, aluminum, or impact-resistant polycarbonate. When not in use, panels are stackable for convenient storage. A wide variety of track options are possible. While these systems are relatively inexpensive (approximately $7 to $15 per square foot, depending on panel type and track options), they require much more effort for the homeowner to deploy than the other types mentioned above.
In-Place Systems
Requiring no advance deployment, impact-resistant systems that are permanently installed on a structure can be an attractive option for opening protection. Two types currently on the market are impactresistant stainless steel screen units and installed flat impact polycarbonate. Both have little, if any, negative aesthetic impact on the home. Impact-resistant stainless steel screen systems consist of a heavy gauge stainless steel screen mesh that is secured in an extruded aluminum frame. The unit is installed over the window to be protected.
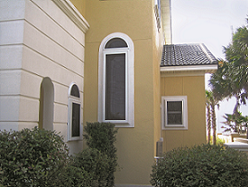
These are available as operable units, which facilitates cleaning and emergency escape. Screen units also provide excellent solar shading characteristics. These systems cost approximately $25 to $50 per square foot. Flat impact polycarbonate units are available to protect most single and double window sizes and types found in residential homes. They are made from UV-stable optical quality grades of polycarbonate and provide excellent protection against all storm forces. Because these systems are not operable from the inside of the home, emergency escape from the home must be considered before installing this system. Typical systems cost approximately $25 to $35 per square foot.

Fabric Windscreen
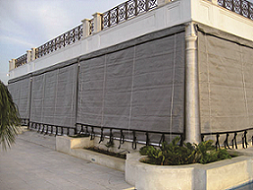
Impact-resistant fabric panels made from high tensile strength geosynthetic fibers such as polyethylene or reinforced PVC have become increasingly popular for use as window and door protection. These systems are attached on opposite sides of the window or door, usually to permanently installed panel mates or tracks with mounting studs. The panels include integrated grommets, which facilitate the deployment of the windscreens. These systems are relatively inexpensive, costing approximately $7 to $12 per square foot. The polyethylene fabric types, which are basket weave systems, allow some light and visibility through the deployed screens. Some models incorporate emergency escape zippers. The PVC types are somewhat translucent, allowing light in the dwelling, but do not allow visibility through the screen.

Geosynthetic screens have also been extensively employed to enclose large, even irregularly shaped openings. Such systems range in price from $20 to $40 per square foot. Polyethylene basketweave fabric windscreen deploys directly over ground floor windows of a coastal home. Polyethylene basketweave fabric windscreen is deployed at edge of patio, enclosing the entire area. Image courtesy of Roll-a-way 66 of such systems, site-specific engineering is often required. Consultation with a contractor is recommended.
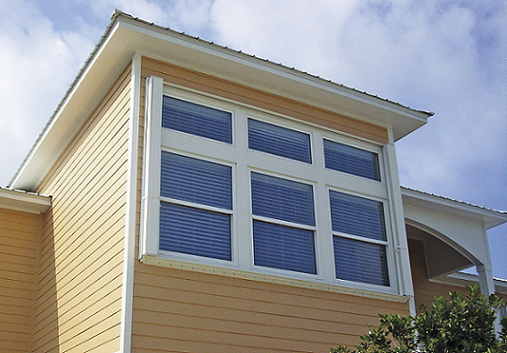
Impact-resistant Windows and Glazed Doors
In order to withstand both wind pressures and impact from windborne debris, window and door manufacturers have developed products with both sturdier frames and laminated (impact-resistant) glazing. Such systems are available in a variety of styles, options, and costs. While impact-resistant openings offer deployment-free protection, the glass can still be broken (but remains in the frame). Also, while these products are often available to the consumer through home improvement stores, professional installation is highly recommended in order to ensure that proper attachment of the windows to the structure is achieved.

Plywood
Historically, plywood has been the most commonly used option for protecting window openings. This is undoubtedly due to its relatively low cost and ready availability. Plywood coverings offer protection for moderate level storms if properly installed. However, plywood can rot or warp if stored in a wet or warm area. Also, plywood is relatively heavy. You will need two people to help prepare and install plywood window coverings. Because of its weight, it would be difficult or even dangerous to install plywood if a ladder is needed. Thus, plywood shutters may be appropriate for easily accessible windows on the first floor, or windows that can easily be reached by a terrace or patio on upper floors.
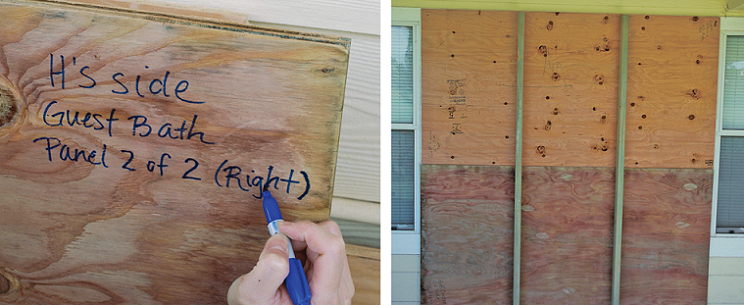
Although you can install plywood shutters yourself to save on cost, you should still seek the advice of a licensed architect or structural engineer before you start. Professionals can guide you on specific details for your windows. A general recommendation is that you use at least 5/8-inch exterior-grade plywood for shutters. Thinner plywood is not as strong and did not perform as well during destructive Hurricane Andrew in Florida in 1992. While the International Residential Code (and other similar codes) allows some use of plywood as protection under very specific conditions, those allowances are restricted to areas where the design wind speed is 130 mph or less. For more information on hurricane shutter design using plywood, see “Plywood Designs” in the Learn More section.
Window Film
An after-market product used to enhance glass breakage prevention is commonly known as security window film. Such products are often touted as “hurricane film” or similar claims that cannot be substantiated by testing. Application of any of these window films to existing windows does NOT constitute adequate opening protection and should not be considered foruse as opening protection. For more information, visit the website of the International Window Film Association [11]. Table below lists the advantages and limitations of each type of covering discussed above. For most homes, a combination of different covering types is employed, based on the needs and budget of the homeowner.
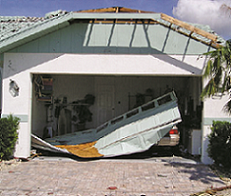
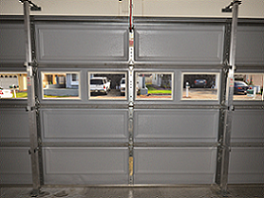
Impact-resistant Garage and Entry Doors
One of the most important yet overlooked openings in a home that requires protection are its garage and entry doors. Most major suppliers of both types of doors offer products (with or without glazing options) that meet both wind- and impact-resistance requirements. Often, the replacement of a nonrated door with one of these newer types is cost-effective when compared to the cost of providing a covering for the older door. As with impact-resistant glazed windows and doors, a qualified professional installer should be used to install an impact-resistant garage or entry door. Doors that swing out are more storm resistant than in-swing doors because the door is closing against the door jamb, which provides resistance to the door being pushed in by high winds. The garage door is a significant weakness in the building envelope due to its large area and the stress it is subject to from wind pressure.
Garage door options include:
- replacement with a stronger door
- horizontal bracing
- vertical bracing
- other type of a garage door bracing kit.
For many garage doors, vertical bracing is a popular and reasonably priced option [12]. Double entry doors should have slide bolts at the top header and bottom threshold of the inactive door, a deadbolt with at least 1-inch throw length between each door, and three hinges for each door. This requirement is similar to other guidelines for single entry doors, which call for at least three hinges and a bolt long enough that goes into the 2″x4″ framing of the door. Whenever entry doors are fortified, at least two of them must be operable for access and exiting at any time.
Cutting or trimming trees that overhang your house are additional measures that you can take to protect your property during a hurricane. Although trees provide a buffer to the full strength of the wind, there is a serious danger if there are large trees or limbs that are close enough to fall on the house. Few roofs are strong enough to withstand a falling 20-inch diameter, 40-foot tall pine tree.
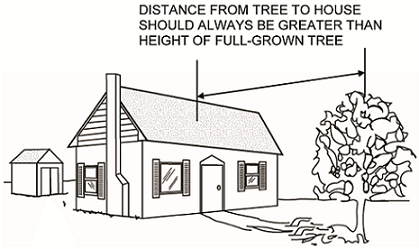
Tree limbs or branches falling onto your house will cause considerable damage. Figure to the right illustrates the distance from the tree to the house to ensure that falling limbs do not affect the roof. If it is not possible to remove a tree, you can at least cut off all branches that hang over the roof of the house. Generally, you should hire a licensed tree trimmer to perform this work. Trees with shallow roots may also be susceptible to falling over when the soil is saturated. Shallow roots cannot prevent a tree with leaves from falling over when the tree canopy is filled with blowing wind. This is a probable occurrence when the area is affected by severe rainfall along with heavy winds, which is usually the case with northeasters and hurricanes.
A good way to determine the risk of flooding for your house is to observe and study your property. Even inland properties may be susceptible to flooding if there is poor localized drainage. If your property floods during small rain events, then the problem may be greater during a storm or hurricane. You can reduce your risk yourself by improving the drainage on your property, by increasing your house’s resistance to floods and by purchasing flood insurance. Examples of how to improve drainage include sloping property toward drainage areas or installing drains to redirect surface water away from structures. Additionally, you should inspect ditches and drains in the area surrounding your home to make sure they are not blocked by excessive vegetation or debris.
A safe room is designed to withstand winds from the strongest hurricanes (Categories 3 to 5) and strong tornadoes. This option should only be considered if the house is outside of all known flood and storm surge zones and is strengthened to the highest level. Safe rooms should not be built in a flood zone, where there is threat of moving water. During a hurricane or other high-flood event, these areas need to be evacuated no matter how fortified the room is against the wind. It is much less expensive to build a safe room during original construction of the house. FEMA notes that while construction costs vary nationwide, the cost to build a safe room inside a new house (which can also double as a master closet, bathroom, or utility room) ranges from $2,500 to $6,000. The additional cost can be wrapped into the original home mortgage. This is a good investment that yields a sizable return by adding value to your house as well as protection and peace of mind for your family.
For more information regarding the design and construction of safe rooms in homes, visit the Learn More section of this website.
In case of an emergency, the power to your house should be turned off through the main breaker switch, circuit breaker panel, or fuse box. In addition, all homes should be equipped with ground fault circuit interrupters (GFCIs). GFCIs are inexpensive electrical devices that, if installed in household branch circuits, are designed to protect people from severe or fatal electric shocks. GFCIs could prevent over two-thirds of all electrocutions [13]. Because a GFCI detects ground faults, it can also prevent some electrical fires and reduce the severity of others by interrupting the flow of electric current. GCFIs are commonly found in kitchens, bathrooms, laundry rooms, or other places where water and electricity are close together. If you don’t have them, consider having them installed by a licensed electrician.
By following key safety precautions when dealing with electricity during and after storms and other disasters, you can help prevent death, injuries, and property damage. Take care when stepping into a flooded area and be aware that submerged outlets or electrical cords may energize the water, posing a potentially lethal trap.
Flooded Areas: Do not use electrical appliances that have been wet. Water can damage the motors in electrical appliances such as furnaces, freezers, refrigerators, washing machines, and dryers.
Wet Electrical Equipment: A qualified service repair dealer should recondition electrical equipment that has been wet. For more information, the National Electrical Manufacturers Association (NEMA) has produced a brochure, Guidelines for Handling Water Damaged Electrical Equipment, for use by suppliers, installers, inspectors, and users of electrical products to provide advice on the safe handling of electrical equipment that has been exposed to water. It outlines whether items will require complete replacement or can be reconditioned by a trained professional. Items covered include: electrical distribution equipment, motor circuits, power equipment, transformers, wire, cable and flexible cords, wiring devices, GFCIs and surge protectors, lighting fixtures and ballasts, motors, and electronic products. The NEMA brochure can be downloaded free of charge at nema.org [14].
Downed Power Lines: These can carry an electric current strong enough to cause serious injury or death. The following tips can keep you safe around downed lines:
- If you see a downed power line or wire of any kind, move away from the line and anything touching it. You may not be able to differentiate between a cable, telecommunications, or electric wire, so stay clear of all downed wires of any kind. Avoid contact with objects that could come in contact with downed wires such as metal fences, sheds, vehicles, and tree limbs and branches. The human body is a ready conductor of electricity.
- The proper way to move away from the line is to shuffle away with small steps, keeping your feet together and on the ground at all times. This will minimize the potential for a strong electric shock. Electricity wants to move from a high voltage zone to a low voltage zone—and it could do that through your body.
- If you see someone who is in direct or indirect contact with the downed line, do not touch the person. You could become the next victim. Call 911 instead.
- Do not attempt to use another object such as a broom or stick to move a downed power line or anything in contact with the line. Even nonconductive materials like wood or cloth, if lightly wet, can conduct electricity and then electrocute you. Downed or damaged power lines in a residential area can pose a serious danger to public safety.
- Be careful not to put your feet near water where a downed power line is located.
- If you are in your car and it is in contact with a downed line, stay in your car. Tell others to stay away from your vehicle.
- If you must leave your car because it’s on fire, jump out of the vehicle with both feet together and avoid contact with the car and the ground at the same time. This way you avoid being the path of electricity from the car to the earth. Shuffle away from the car.
- Do not drive over downed lines.
Be aware of your coverage: NFIP’s flood insurance is designed to cover structural damage and things required to run the household (i.e. heating/AC systems), it does not cover any upgrades done to basements. Finished walls, floors and ceilings or personal belongings that get destroyed while in a basement typically won’t be covered.
Before the Flood: Belongings stored in the basement that can be damaged by water should be elevated or removed. Belongings that can be damaged by mold should be removed. Elevate or relocate the furnace and ductwork onto a platform or raise the base on legs above the flood plain. Mildew-resistant paint applied to interior basement walls can help reduce mold and some brands even provide 5 year guarantees that it will prevent the growth of mold and mildew on the painted surface. If your home is flooding from the basement up (e.g. sewer backup, rise in local groundwater, runoff issues), then a water alarm can provide lead time before your belongings are damaged by floodwaters. Water alarms are similar to smoke alarms; they beep when exposed to water (cost $10 – $20 at hardware stores).
After the Flood: Give your house plenty of time to dry. Many problems result from rebuilding after a flood before everything dries. If it takes a week for the visible signs of moisture to disappear, allow at least another week for the parts you cannot see to dry. Don’t try to force a swollen door to close. Don’t force wooden parts to fit. When completely dry, the wood may regain its original shape. If the electrical code allows, move the main breaker (or fuse box) and the electrical outlets and switches above the flood protection level for your home. If you need to replace a flooded furnace, water heater, or AC, install the new one on a higher floor. If your new air conditioner or heat pump will be outside, install it on a platform above the flood protection level. A water heater can be put anywhere near a hot water pipe. An updraft furnace located in a basement can be replaced with a downdraft furnace on a floor above the flood protection level. Install new wallboard panels sideways so they are only four feet high. If the next flood is less than four feet deep, you only have to replace half the wall.
Mold & Mildew: Mold can cause serious health problems. You should limit exposure to mold, typically with non-ventilating goggles, rubber gloves, and a ≥N-95 respirator appropriate for mold removal. If you are allergic or have a respiratory condition you should strongly consider completely avoiding exposure.
- Remove and discard anything that has been wet for more than 24-48 hours. Mold may be hidden in places such as the back side of dry wall, wallpaper, or paneling, the top side of ceiling tiles, the underside of carpets and pads, etc.
- Do not paint or caulk moldy surfaces, as it will likely peel.
- Hard surfaces should be scrubbed with detergent and water, and dry completely.
- Absorbent or porous materials, such as ceiling tiles and carpet, may have to be thrown away if they become moldy.
- If you are unsure about how to clean an item, or if the item is expensive or of sentimental value, you may wish to consult a specialist. Click on “EPA Mold Cleanup Guidelines” in the Learn More section for more information.

Before discussing alternate power sources during an emergency, one general suggestion is to make your house as energy efficient as possible as you replace equipment and appliances in your house after they have outlived their normal life.
For example, if your lights, television, or refrigerator need replacing, consider products with the EPA’s Energy Star label. These products may cost slightly more, but over their lifetime, the energy savings will far outweigh the small initial cost increase.
Energy efficient equipment will be especially useful during an emergency, when you may be on alternative forms of power with limited supply. For example, a regular 100-watt lamp running off an emergency power station (essentially built around a car battery) may run for two hours. That same emergency station can run a fuel-efficient 23-watt compact fluorescent light almost 8 to 9 hours with the same light output. As another example, a refrigerator with the Energy Star label can run on a fuel-efficient generator for 16 hours on one gallon of gas. Since most refrigerators do not need to run continuously, it may be possible to run the efficient refrigerator on one gallon of gas for one or two days.
GENERATORS
Some households may require uninterrupted power because of the critical needs of some family members. For example, the elderly, disabled, or sick may require a respirator, dialysis machine, or other medical equipment. Some medicine such as insulin, which is stored for over a month, may need to be refrigerated. For many families, the most important major power requirement is to run a refrigerator or freezer. If your family cannot get by without the refrigerator or there are other critical power needs for medical or other purposes, then you may want to consider a portable generator. Take special care with portable electric generators, which can provide a good source of power but can become deadly if improperly installed or operated. Power from generators can backfeed along power lines and electrocute anyone coming in contact with them, including electric utility line workers who are making repairs. A qualified, licensed electrician should install your generator to ensure that it meets local electrical codes.
Other generator-related tips:
- Make sure your generator is properly grounded.
- Keep the generator dry.
- Plug appliances directly into the generator.
- Make sure extension cords used with generators are rated for the load, free of cuts and worn insulation, and have three-pronged plugs.
- Do not overload the generator.
- Use a ground fault circuit interrupter (GFCI) to help prevent electrocutions and electrical shock injuries. Portable GFCIs require no tools to install and are available at prices ranging from $12 to $30.
Most importantly, never run a generator indoors or in your garage because of the possibility of carbon monoxide gas accumulation, which cannot be detected by smell. Good ventilation is required. Operate your generator outside and away from open windows. Do not hook up a generator to your house power supply without a licensed electrician.
In general, when running your refrigerator with a generator, keep the refrigerator and freezer at the coldest setting. Refrigerators may only need to run a few hours a day to preserve food. Using a refrigerator thermometer, you should aim to maintain 40°F in the refrigerator compartment and 0°F in the freezer. Open the refrigerator door as little as possible. This handbook does not recommend any particular generator or brand. However, if you are considering a generator, look first at your power needs and then at cost, reliability, quietness, and fuel efficiency, among other factors. You may want to read consumer reviews of generators and consider some of the following factors:
Power needs. Size the generator so that it runs the equipment you need or want to run in an emergency. It will make a difference if you just run the refrigerator, versus the refrigerator, lights, and other equipment. Some equipment such as a refrigerator may require 500 watts to run but 1,500 watts to start up. Each piece of equipment is different. You can get general guidelines from the manufacturers in the form of charts and tables for equipment power needs. A more accurate estimate, however, is to call your manufacturer or buy an amp meter that measures running and startup wattage or amperage. You can also get good advice on sizing a generator from the dealer where you buy the unit.
Fuel efficiency. During an emergency there will be limited fuel supplies. The amount of power you need and the fuel efficiency of the generator will determine if you need one or two gallons per day instead of five or six.
Quietness. Generators are usually noisy, but some are quieter than others. If you need to run a generator, your family and neighbors will appreciate a quiet generator.
POWER STATIONS
Power stations are found in many hardware stores and may have a radio, flash light, air compressor, battery jump starter, AC outlet, and/or DC outlet built around a modified car battery. These units can come in handy during a power outage, since they can form part of your stock of emergency supplies and also provide limited emergency power. If your cordless phone does not work because the base of the unit has no power, a power station could supply electricity so that calls could be made (an alternative is to use a corded phone). It should be noted that after an emergency, there may be many reasons the phone does not work that are beyond your control, such as heavy traffic or loss of function with the phone system.
INVERTERS
Inverters take the 12-volt DC power from your car battery and convert it to 115-volt AC power that can run household appliances. This can be very important if you need to run power tools in an emergency and the power is out. The inverter will drain your car battery, so look for inverters that have a low battery shutdown feature to prevent total battery drain. You should not run an inverter with the car running unless the manufacturer provides specific instructions with safety guidelines. In addition, if the manufacturer approves of such procedures, the car should not be run in a garage, but rather in a well-ventilated area.
BATTERY CHARGERS
Your car battery can be an important source of DC and AC power with an inverter. To keep the car battery charged, you should consider a battery charger as part of your emergency supplies. The charger only works when there is household power or backup power through a generator, but it can recharge your car battery if needed. New units are small and portable and provide a quick charge to a dead battery in only a few minutes and a total charge in a few hours.
Selecting a contractor to do your work is very important. This handbook does not recommend or endorse any particular company. When selecting a contractor, it is necessary to perform proper due diligence and check qualifications. It is up to you to select the companies and verify their records. It is suggested that you get an estimate from at least three reputable contractors. Make sure the contractor is licensed, insured, and has not received complaints. You should always ask for a list of referrals. Get the agreement in writing with the final payment due on completion. The Home Builders Association of Virginia can provide guidance on selecting a remodeler. You can also check the Better Business Bureau’s Accredited Business Directory online by clicking here.
Hiring a licensed contractor is very important. In many areas across the country that have been impacted by disasters, there are numerous examples of families who have lost savings and insurance funds as a wave of unlicensed contractors flooded the impacted area in search of work. Before you have extensive work performed, you should also consider a consultation with a licensed architect or structural engineer, depending on the particular work that needs to be done. Even if you perform the work yourself, a licensed professional should be consulted for initial guidance, since every house is slightly different.
FEMA’s Hazard Mitigation Assistance (HMA) program is intended to encourage investment in long-term mitigation measures to reduce vulnerability to natural hazards. The Virginia Department of Emergency Management administers the HMA program in this state. Grants are awarded through two yearly grant programs and one disaster funded grant program. The HMA program is subject to the availability of federal appropriation funding or presidential disaster declaration. Available funding for the Pre-disaster Mitigation (PDM) grant is $90 Million with a state set aside of $575,000. Available funding for Flood Mitigation Assistance (FMA) is $199 Million. The FY 2015 Hazard Mitigation Assistance Guidance remains valid for FY 2016[15].The state of Virginia hopes to reduce the risk to individuals and property from natural hazards while simultaneously reducing reliance on federal disaster funds. As such, VDEM encourages state and local governments to take advantage of funding provided by HMA programs in both the pre- and post-disaster timeframes.
Among other things, the program can provide funds to states to assist homeowners in implementing mitigation measures to existing structures. Some of the project types that have been approved by FEMA for use in assisting homeowners are:
- Property Acquisition and Structure Demolition—the acquisition of an existing at-risk structure and/or property and conversion to open space through the demolition of the structure. The property must be deed-restricted in perpetuity to open space uses to restore and/or conserve natural floodplain functions.
- Property Acquisition and Structure Relocation—the physical relocation of an existing structure to an area outside of a hazardprone area or a regulatory erosion zone and, typically, the acquisition of the underlying land. Relocation must conform to all applicable state and local regulations. The property must be deed-restricted in perpetuity to open space uses to restore and/or conserve the natural floodplain functions.
- Structure Elevation—physically raising an existing structure to an elevation at or above the Base Flood Elevation or higher if required by FEMA or local ordinance. Structure elevation may be achieved through a variety of methods, including elevating on continuous foundation walls; elevating on open foundations such as piles, piers, posts, or columns; and elevating on fill. Foundations must be designed to properly manage all loads and be appropriately connected to the floor structure above. Utilities must be properly elevated as well. FEMA encourages applicants and sub-applicants to design all structure elevation projects in accordance with the American Society of Civil Engineers (ASCE) 24-05 Flood Resistant Design and Construction.
- Structural Retrofitting of Existing Buildings—modifications to the structural elements of a building to reduce or eliminate the risk of future damage and to protect inhabitants. The essential structural elements of a building to protect in order to prevent damage include foundations, load-bearing walls, beams, columns, structural floors and roofs, and the connections between these elements.
Funding under HMA programs is subject to the availability of appropriations and, for Hazard Mitigation Grant Program funds, to the amount of FEMA disaster recovery assistance specified under a presidential major disaster declaration. To assist in establishing funding priorities, local and state mitigation plans are utilized to identify the highest risks.
Home | Introduction | Overview of Natural Hazards | Protecting Yourself and Your Family | Protecting Your Property | Insurance | Coastal Construction and Beach Management | Climate Change
- Risks – Hurricanes. Insurance Institute for Business and Home Safety website. Accessed August 2012 at FEMA.gov.
- Mitigation Directorate. Federal Emergency Management Agency website. Accessed August 2012 at FEMA.gov.
- Residential Coast Construction Manual (FEMA P-55). Federal Emergency Management Agency, 2011. Accessed August 2012 at fema.gov/residential-coastal-construction.
- Is Your Home Protected from Hurricane Disaster? A Homeowner’s Guide to Retrofit. Insurance Institute for Business and Home Safety, 1998.
- Disaster Safety Videos. Insurance Institute for Business and Home Safety website. Accessed August 2012 at disastersafety.org.
- Mitigation Assessment Team Report: Hurricane Ike in Texas and Louisiana- Building Performance Observations, Recommendations, and Technical Guidance (FEMA P-757). Federal Emergency Management Agency, April 2009. Accessed August 2012 at fema.gov.
- Synthetic Roof Underlayment. National Association of Homebuilders (NAHB) Research Center, ToolBase Services website. Copyright 2001. Accessed August 2012 at toolbase.org/technology-inventory/roofs/synthetic-roof-underlayment.
- Homeowner’s Guide to Retrofitting: Six Ways to Protect Your House from Flooding (FEMA L-235- brochure and FEMA P-312- detailed manual). Federal Emergency Management Agency, December 2009. Accessed August 2012 at fema.gov.
- Protecting your Property from Flooding. FEMA website, June 2009. Accessed August 2012 at fema.gov.
- Hurricane Proofing Installation. International Hurricane Protection Association website. Copyright 2009. Accessed August 2012 at inthpa.com.
- Window Film Information Center. International Window Film Association website. Accessed August 2012 at iwfa.com.
- Bracing Garage Doors. National Weather Service website. Accessed August 2012 at www.prh.noaa.gov/cphc/HAW/garage_doors.php.
- Electrical Safety Precautions During Disasters. Consumer Product Safety Commission Electrical Safety Foundation International website. Copyright 2010. Accessed August 2012 at publications.usa.gov/epublications/safety/precautions.htm.
- Guidelines for Handling Water Damaged Electrical Equipment. National Electrical Manufacturers Association (NEMA) website. Copyright 2010. Accessed August 2012 at nema.org/stds/water-damaged.cfm.
- Unified Hazard Mitigation Assistance (HMA). Virginia Department of Emergency Management (VDEM) website. Copyright 2012. Accessed July 2016 at vaemergency.gov/em-community/grants/HMAgrant2010.