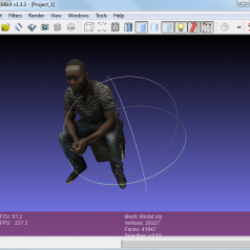
Mesh Lab processing
- Open MeshLab from Start > Programs > MeshLab

- Edit > Select Faces in Rectangular Region > Select with the rectangular selection what to delete
- Filters > Selection > Delete Selected Faces
- File > Export Selected Faces as STL (use some simple name e.g. model01) to the following directory: D:\MeshFix-V2.1\MeshFix-V2.1\bin64
b) MeshFix
- Open Command Prompt (search “command”, click command icon).
- A few commands:
- c: (d:) – go to root directory in c drive (d drive)
- cd – change directory; cd .. – change to parent directory
- use “tab” key to complete filename.
- dir – display files in directory
- Basic DOS commands – click here

2. Go to the D:\MeshFix-V2.1\MeshFix-V2.1\bin64
3. Type: “MeshFix.exe model_name.stl new_model_name.stl

model_name = your model name
new_model_name = assign new model
c) Autodesk Netfabb
1. Open the file in Netfabb

2. Go to Extras > Repair Part

3. Part > Export Part > As STL
d) Import STL to Slic3R and Generate G code